Art with Heart Wow Tutorials

Wednesday, 30 November 2022

AWHT Colour Creations #31 Mossy Meadows

Mossy Meadows with Leaves of Holly Fancy Fold

Hello. Welcome to Valley Inspirations with Andrea and the Art with Heart Colour Creations Blog Hop. We are working though the Stampin' Up! colours in alphabetical order, featuring one colour each week. 


This week’s Blog Hop is focussing on a deep muted green called Mossy Meadows. Mossy Meadows is part of the Neutrals Colour Family and is a strong and dark olive green colour that can coordinate with many other colours. This colour is lovely when used for leaves, trees and so many other images. 


Mossy Meadow is produced in Stampin' Up!'s card-stock, both A4 & 12"x12"Classic Stampin' inks (ink pads re-inkers); Stampin' Write Markers; Stampin' Blends Combo; Soft Pastels Assortment; Neutrals Designer Series Paper as well as Boughs of Holly, Rustic Harvest, Awash in Beauty, Happy Forest Friends and Hues of Happiness  DSPs; A Million Thanks Kit; and Solid Faceted Gems. That is quite a list demonstrating the colour's versatility.

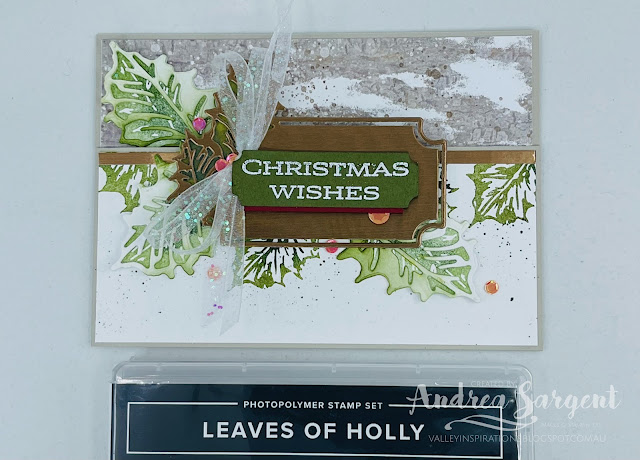
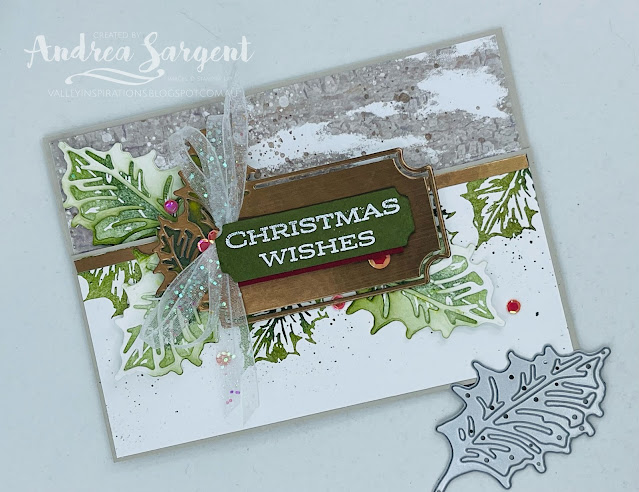
My card uses Mossy Meadow card-stock, ink, Stampin' Write Marker and Boughs of Holly DSP plus a range of non-Mossy Meadow bits and pieces. While Mossy Meadow is a dark-ish colour, using it with techniques like partial blending and other colours means the project doesn’t need to be dark & somber. Here is my card:

Send personally created leaves of holly to wish friends and family a special Christmas.

For me, holly leaves are a part of Christmas and as I was pondering what I would create using Stampin’ Up!s Mossy Meadow, the Leaves of Holly bundle seemed a great choice as it would also add to my Christmas card stash. I thought I had created sufficient Christmas cards, but I recently more accurately calculated my needs and realised more cards were required. There may be extra Christmas cards over the next couple of weeks of blog hops. Let’s see.

Send personally created leaves of holly to wish friends and family a special Christmas.

I decided to use one of the packets of Designer Series Papers that include Mossy Meadow in their colour combos - the Boughs of Holly DSP seemed the obvious choice. I used 2 designs from this DSP - a coordinating neutral abstract design that was added to the top section of the card design and a mottled deep green design that was added behind the large label’s holly leaves. As I considered the design, I thought of using a simple fancy fold - one that reminds me of a barn door. I’m not sure what it is called.

Send personally created leaves of holly to wish friends and family a special Christmas.

After trimming the top section from the front of the card, a Basic White card-stock panel was added inside the card to the base. A strip of the neutral design of the DSP was adhered over the top section of the Basic White panel and a thin strip of Brushed Bronze foil from the Brushed Metallic foil card-stock was added over the seam. An extra piece of Basic White card-stock was stamped along the top edge with holly leaves from the Leaves of Holly stamp set using Mossy Meadow and a dabbing of Evening Evergreen Classic inks. A splattering of Mossy Meadow was also added with a Stampin’ Write Marker

Send personally created leaves of holly to wish friends and family a special Christmas.

Holly leaves were also stamped on an extra piece of Basic White card-stock and then die cut using the coordinating dies from the Holly Berry dies. Another fine strip of Bronze Foil was layered over the top edge. Detailed holly leaves were also die cut from Basic White card-stock. These detailed die cut leaves were partially coloured with a Blending Brush using Mossy Meadow ink. I really love the effect created. The larger holly leaf label die was used with the copper Brushed Metallic foil card-stock to cut the central label. The coordinating dies include a die to cut a backing for the label’s holly leaves. This was cut from the dark green DSP design that includes a significant amount of Mossy Meadow. The stamped and blended holly leaves were layered together.

Send personally created leaves of holly to wish friends and family a special Christmas.

The Bronze label was centred on the front layer using Dimensionals and the stamped and blended holly leaves were arranged, with one leaf sitting on the back section. A sentiment from the same stamp set was white heat embossed using Versamark ink, White Emboss Powder and a Heat Tool. It was die cut with the smaller label die. A small strip of Cherry Cobbler card-stock was layered underneath before the sentiment was added with Dimensionals. A bow of White Glittered Organdy ribbon was tucked under the edge of the sentiment label using Glue Dots. A number of Cherry Red Adhesive-Backed Seasonal Sequins were sprinkled around to give a touch of complementary colour and sparkle.

Send personally created leaves of holly to wish friends and family a special Christmas.

To further decorate the inner panel that will be used for the personal message, a second stamped and blended holly leaf was added as well as some extra red sequins. A Basic White C6 envelope was also decorated with the final holly leaf.

Send personally created leaves of holly to wish friends and family a special Christmas.

Thank you for spending time with me on my blog. I really enjoyed creating this card to share with you.

Send personally created leaves of holly to wish friends and family a special Christmas.

There is more Mossy Meadows creativity. To continue with the blog hop, click the  "onto the next" graphic below and be taken to the blog of the lovely Fiona Bell RyanI am looking forward to checking out Fiona's creation. I do love seeing everyones' projects as there is always so much inspiration.

I hope to see you next week when we will be featuring Night of Navy as we continue the weekly 2022-2023 Colour Creations Blog Hops.  

Stay well, stay safe and be kind to yourself and others. 

Andrea 💕🐾


If you find a broken link or have come to this blog hop from a different entry point, you can view the full list of participants on Catherine Proctor’s blog @ What Cathy Made. Cathy is our  Art With Heart Team Colour Creations Coordinator.  She is an amazing lady. Check out her delightful creation while you are there.

If you live in Australia, don't already have a Stampin' Up! demonstrator and would like your own copy of Stampin' Up's 2022-2023 Annual Catalogue, the July - December 2022 Mini Catalogue or the coming January-April 2023 Mini Catalogue then let me know and I will be delighted to send them to you.  Please don't hesitate to make contact with any other queries about this project or Stampin' Up!. 

#colourcreationsbloghop  #stampinup #stampinupaustralia #stampinupsouthpacific #stampinupdemo  #handmadecards #makeacardsendacard #stampinupdemonstrator #papercrafting #artwithheartteam  #papercrafter  #stamper  #valleyinspirations   #boughsofholly #leavesofholly 

Monday, 28 November 2022

AWH Heart of Christmas #22

Heart of Christmas Blog Hop: Spruced Up

Hello. Welcome to Valley Inspirations with Andrea and the last Art with Heart Team Heart of Christmas Blog Hop for 2022. Can you believe there is less than a month to Christmas? Eek

So glad you are joining us for our last 2022 Heart of Christmas Blog Hop. I have enjoyed creating cards to share using the Spruced Up Christmas bundle. Here are my cards:
 
Send blessings to family and friends by creating your own cards with Stampin’ Up!s Spruced Up bundle.

The Spruced Up bundle is so gorgeous. I have so many ideas of designs, but time only enabled me to create two cards for this Blog Hop.

CARD 1:

Send blessings to family and friends by creating your own cards with Stampin’ Up!s Spruced Up bundle.

I recently saw Emma Goddard, a UK Stampin' Up! Demonstrator and past Artisan, create a card that had a background with Granny Apple Green ink blending onto a Parakeet Party piece of card-stock. As I was musing on a design for a card for this Blog Hop I remembered Emma's background and thought it would go well with the Spruced Up bundle. That is where I started. 

Send blessings to family and friends by creating your own cards with Stampin’ Up!s Spruced Up bundle.

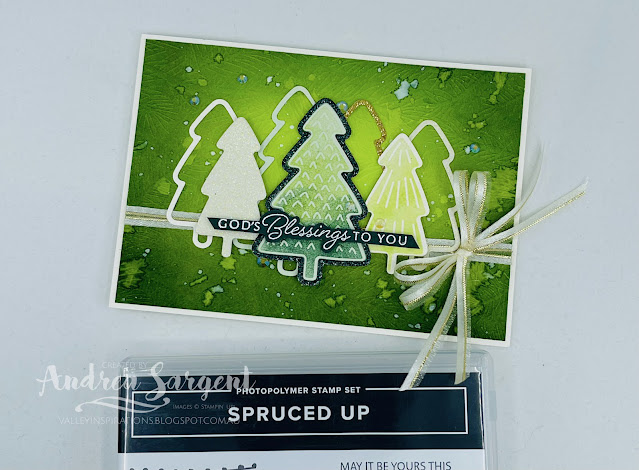
A piece of Parakeet Party card-stock had Granny Apple Green ink blending added around the edges with the base being a slightly heavier application. Deciding I wanted it a little darker, I added some Evening Evergreen Classic Stampin' ink as well. The panel was dry embossed with the pine embossing folder from the Wintry 3D set of folders. A splattering of water was added over the panel - I love this effect. Then some White Craft ink was also splattered over the panel. The panel was put aside to allow the splattering to dry properly.

Send blessings to family and friends by creating your own cards with Stampin’ Up!s Spruced Up bundle.

The larger tree from the Spruced Up stamp set was inked with Soft Sea Foam ink and then some Granny Apple Green and Evening Evergreen inks were added to the stamp with Blending Brushes. It was stamped onto Very Vanilla card-stock. The smaller tree was stamped using Soft Sea Foam and Granny Apple Green inks. The stamped trees were cut with coordinating dies from the Spruced Up Outines dies. These tree dies also cut trees in Evening Evergreen, Very Vanilla and Gold Glimmer Speciality paper. I love the way the die cuts both the tree and an outline in one go. The two pieces can be used together or separately, depending on your desired design. It is hard to pick up all the glimmer of the Speciality Paper with the camera. 

Send blessings to family and friends by creating your own cards with Stampin’ Up!s Spruced Up bundle.

The background darker edges were trimmed off before adhering the background panel to a Thick Very Vanilla card-base. I forgot to add some split Gold & Vanilla Satin-Edged ribbon before adhering the background to the base, so I needed to tuck the ribbon around the edges with a couple of Glue Dots. Whew! A bow was tied separately and adhered over the ribbon after the various pieces of the Spruced Up forest were arranged and adhered with either Multipurpose Liquid Glue or Mini Dimensionals. A sentiment from the Hope and Peace stamp set was white heat embossed using Versamark ink, White Emboss Powder and a Heat Tool. It was then fussy cut and added with Mini Dimensionals. A number of Iridescent Rhinestone Basic Jewels added extra shimmer.

Send blessings to family and friends by creating your own cards with Stampin’ Up!s Spruced Up bundle.

A Very Vanilla card-stock panel was stamped with another sentiment, this time from the Brightest Glow stamp set was stamped in Evening Evergreen ink and a remaining stamped tree and outline were adhered to a corner. Another outline piece was adhered onto the front of a Very Vanilla C6 envelope.

Send blessings to family and friends by creating your own cards with Stampin’ Up!s Spruced Up bundle.

CARD 2:

I had a number of trees and tree outlines left over from my earlier creating so also created a simpler more mono-tone card.

Send blessings to family and friends by creating your own cards with Stampin’ Up!s Spruced Up bundle.

A piece of Basic White card-stock had some Pool Party ink blending added to the top of the panel. Both water splattering and White Craft ink splattering was added. Looking at the card as I write this blog, I wonder if it should have had some dry embossing added to the background panel. Perhaps the snowflake embossing folder from the Wintry 3D EF pack would have been good. What do you think?

Send blessings to family and friends by creating your own cards with Stampin’ Up!s Spruced Up bundle.

A Basic White card-stock stitched circle die cut, having been cut using the largest circle from the Stylish Shapes dies, was on my work table. It was popped up on Dimensionals and a Wonderful Snowflake was adhered on top. Trees were stamped in Pool Party/Evening Evergreen inks and light Pool Party ink, before being die cut with coordinating dies. 

Send blessings to family and friends by creating your own cards with Stampin’ Up!s Spruced Up bundle.

A small Evening Evergreen Glimmer tree and a larger tree outline of White Glimmer paper (from the Real Red and White Glimmer Paper bundle) were arranged with the two stamped trees. A left over sentiment from the previous card was fussy cut, removing a couple of the sentiment’s original words. I love the way using part of a sentiment provides more options. Some white sequins from the Adhesive-Backed Seasonal Sequins add some extra sparkle.

Send blessings to family and friends by creating your own cards with Stampin’ Up!s Spruced Up bundle.

A smaller stamped tree and a white glimmer tree outline were added to a Basic White card-stock panel with a sentiment from the Brightest Glow stamp set, stamped in Evening Evergreen ink. A larger tree was stamped on the front of a Basic White C6 Envelope to bring some coordination with the card's design.

Send blessings to family and friends by creating your own cards with Stampin’ Up!s Spruced Up bundle.

I have numerous die cut trees remaining, so may create similar but different cards to ensure the die cuts don't go to waste. It will also help to build my card stash. Thank you for dropping in for our last Heart of Christmas Blog Hop for 2022.

It is always a delight to see everyone's creations and I am sure there will be gorgeous Christmas projects on show so don't miss checking out each blog. To continue with the blog hop, click the "onto the next" graphic below to be taken to the blog of my fellow South Aussie and talented friend, the lovely Tina Gillespie. I always look forward to checking out Tina's creations together with everyone else's. 

Don't forget the weekly Colour Creations Blog Hop by the Art with Heart Team that launches every Wednesday at 8.00pm AEST. This Wednesday we are focussing on Mossy Meadow.

Stay well, stay safe and be kind to yourself and others.

Andrea XXX


If you find a broken link and the next blog doesn’t come up or you started part way through, please head to the blog of our Heart of Christmas Blog Hop Host, the very special Sharon Davern, and she will have the list of all Art With Heart Team members who are participating in this blog hop with links to each blog. Check out her beautiful creation while you are there.

If you are in Australia, don't already have a Stampin' Up! demonstrator and would like your own copy of Stampin' Up's 2022-2023 Annual Catalogue and or the July - December Mini Catalogue or the coming January - April 2003 Mini Catalogue, then let me know and I will be delighted to send them to you. Pease don't hesitate to contact me with any other queries about these projects or Stampin' Up!

#heartofchristmas #heartofchristmas2022  #awhtheartofchristmas #Stampin'Up! #stampinupaustralia #stampinupsouthpacific #stampinupdemo  #handmadecards #makeacardsendacard #stampinupdemonstrator #papercrafting #artwithheartteam  #papercrafter  #stamper  #valleyinspirations #sprucedup #hopeandpeace #

Wednesday, 23 November 2022

AWHT Colour Creations #30 Mint Macaron

Mint Macaron with Carolling Mice

Hello. Welcome to Valley Inspirations with Andrea and the Art with Heart Colour Creations Blog Hop. We are working though the Stampin' Up! colours in alphabetical order, featuring one colour each week.


This week’s Blog Hop is focussing on a soft green called Mint Macaron. Mint Macaron is part of the Subtles Colour Family and is a pretty colour. I do love this colour and its versatility - I guess I am particularly partial to subtle colours. This colour is lovely when used for leaves, trees, macarons (as the name suggests) and so much more. 


Mint Macaron is produced in Stampin' Up!'s card-stock, both A4 & 12"x12"Classic Stampin' inks (ink pads re-inkers); Stampin' Write Markers; Stampin' Blends Combo, Subtles Designer Series Paper as well as Gingham Cottage, Santa Express, Design a Daydream DSPs, Christmas Gifting Kit, Celebrate Today Magnet Board Kit, Today is the Day and Santa Express Memories & More Card Packs, together with Santa Express Memories & More Cards & Envelopes. That is quite a list demonstrating this colour's versatility.

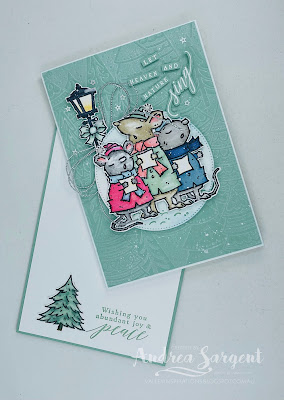
I am sharing one card as my day has been quite topsy turvy there by leaving my second card unfinished and unable to complete the blog in time. The card uses Mint Macaron card-stock, ink and Stampin' Blends Combo plus a range of non-Mint Macaron bits and pieces. Here it is:

Wish Merry Christmas to family and friends with cute Caroling Mice.

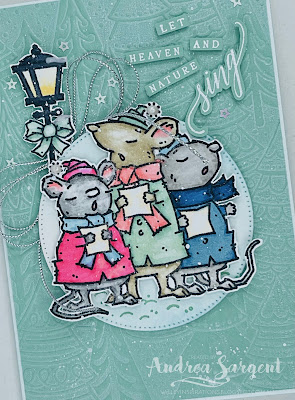
The inspiration for creating this week was an Artisan's article on inking an embossing folder with White Craft ink before embossing a piece of Crumb Cake card-stock using the Whimsical Woodlands 3D embossing folder. I love the effect created and thought it would work brilliantly with Mint Macaron card-stock. I cautiously applied the White Craft ink on my first try - the results are seen on this card. On my second try, I applied the ink more thickly to gain a more dramatic effect. That card is unfinished but will try to get it finished and post it soon.

Wish Merry Christmas to family and friends with cute Caroling Mice.

As mentioned, I started by inking the Whimsical Woodlands 3D embossing folder with White Craft ink before using it to emboss a piece of Mint Macaron card-stock. It was put aside to dry while 3 caroling mice were stamped in Black Momento ink on Basic White card-stock. The light pole and a tree from the same Caroling Mice stamp set were also stamped out. The 3 images were coloured with Stampin' Blends, ie Mint Macaron, Flirty Flamingo, Polished Pink, Balmy Blue, Night of Navy, So Saffron, Pale Papaya, Soft Succulent, Smoky Slate, Crumb Cake, Gray Granite and Basic Black combos with the Colour Lifter. All the images were fussy cut as the Caroling Mice is a stand alone Host stamp set without any sentiments. I am happy to fussy cut - this set is soooo cute. When I initially saw this set I thought it was more appropriate for the northern hemisphere, however, given the weather (low temperatures) we have been experiencing in Adelaide I believe the wooly scarves & caps are very relevant here.

Wish Merry Christmas to family and friends with cute Caroling Mice.

A circular label cut with the largest stitched circle in the Stylish Shapes dies was on my desk and was prefect for grounding my focal elements. A little blending using Balmy Blue Stampin' Classic ink was added to part of the edge and an "indicative ground" stamp was added in Mint Macaron Classic ink. This label was added with Dimensionals. The mice were also added to the label with Dimensionals and the light pole was partially tucked underneath with Multi-purpose Liquid Glue

Wish Merry Christmas to family and friends with cute Caroling Mice.

Some white Pearlized Enamel Effects was dropped on the pom poms on the caps and a little was added to an edge of the street light and bow. A triple bow was tied with some silver Elegant Trim and tucked under the lamp post and label. A sentiment from the Perched in a Tree stamp set was white heat embossed on Mint Macaron card-stock using Versamark ink, White Emboss Powder and a Heat Tool. Some White Craft ink was splattered over the card. The final touch was the addition of some tiny stars from the Sparkle and Shine sequins.

Wish Merry Christmas to family and friends with cute Caroling Mice.

The card inner was created with Basic White card-stock that was stamped with a sentiment from the same stamp set in Mint Macaron ink.  The remaining little tree was adhered near the base. This panel was then mounted onto a slightly larger piece of Mint Macaron card-stock. A C6 Basic White envelope was stamped with the light pole in Momento ink.

Wish Merry Christmas to family and friends with cute Caroling Mice.


Thank you for spending time with me on my blog. I so appreciate you.

There is more Mint Macaron creativity. To continue with the blog hop, click the  "onto the next" graphic below and be taken to the blog of the lovely and talented Rachel WoodardI always look forward to checking out Rachel's creations. I do love seeing everyones' projects - there is always variety and so much inspiration.

I hope to see you next week when we will be featuring Mossy Meadows as we continue the weekly 2022-2023 Colour Creations Blog Hops.  Also, don't forget that we are joining our last Heart of Christmas Blog Hop for 2022 next Monday evening to share some Christmas projects to help with your crafting preparations. 

Stay well, stay safe and be kind to yourself and others. 

Andrea 💕🐾


If you find a broken link or have come to this blog hop from a different entry point, you can view the full list of participants on Catherine Proctor’s blog @ What Cathy Made. Cathy is our  Art With Heart Team Colour Creations Coordinator.  She is an amazing lady. Check out her wonderful creation while you are there.

If you live in Australia, don't already have a Stampin' Up! demonstrator and would like your own copy of Stampin' Up's 2022-2023 Annual Catalogue and or the July - December 2022 Mini Catalogue then let me know and I will be delighted to send them to you.  Please don't hesitate to make contact with any other queries about this project or Stampin' Up!. 

#colourcreationsbloghop  #stampinup #stampinupaustralia #stampinupsouthpacific #stampinupdemo  #handmadecards #makeacardsendacard #stampinupdemonstrator #papercrafting #artwithheartteam  #papercrafter  #stamper  #valleyinspirations   #carolingmice #perchedinatree #whimsicalwoodlands

Monday, 21 November 2022

AWH Heart of Christmas #21

Heart of Christmas Blog Hop: Joyful Flurry with Hope & Peace

Hello. Welcome to Valley Inspirations with Andrea and the Art with Heart Team Heart of Christmas Blog Hop for 2022. 

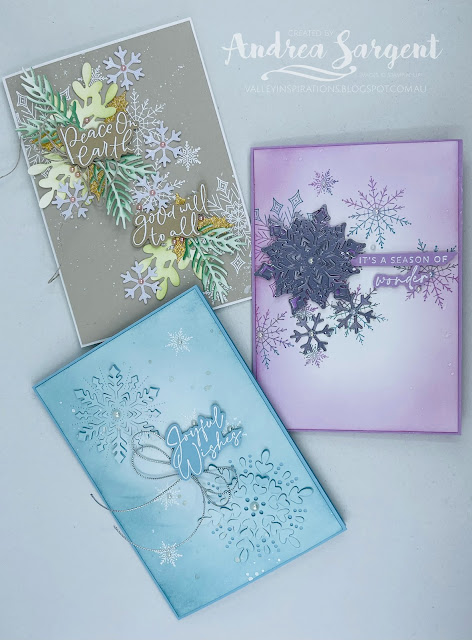
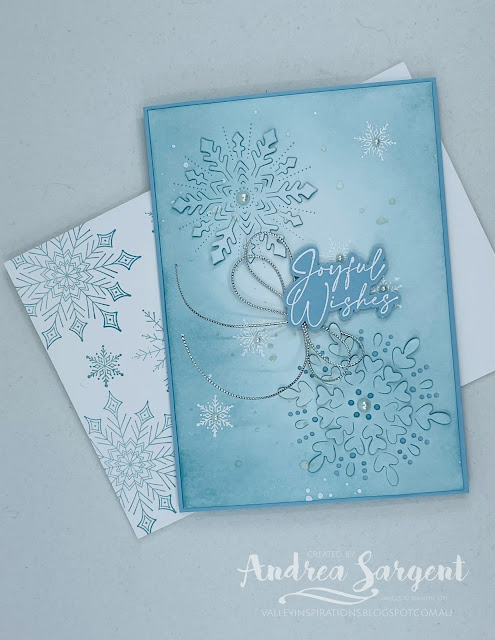
So glad you are joining us for our second to last 2022 Heart of Christmas Blog Hop. I have really enjoyed playing with the Joyful Flurry Christmas bundle with an extra Christmas sentiment set and banner dies. Here are my cards:

Flurry of joyful snowflakes are a brilliant way to send Christmas wishes.

Prior Card:

I created a card for a Christmas Challenge a couple of months ago using the Joyful Flurry Bundle. I wasn’t really pleased with it, so not wanting to be thwarted, I wanted to have a descent play with this bundle. The 3 cards above were the result of my play.

Flurry of joyful snowflakes are a brilliant way to send Christmas wishes.

The card above, that was created a couple of months ago, started with a water-colour wash on Shimmery White card-stock using Pool Party, Balmy Blue and Fresh Freesia Classic Stampin’ inksSnowflakes from the Joyful Flurry stamp set were stamped in Versamark ink and heat embossed with White Emboss Powder and a Heat Tool.  A few of the snowflake dies from the Frosted Flurry dies partially cut snowflakes in the water-colour panel. The “pop up” sections were poked up from behind using the pointy poker attachment of my Take Your Pick Tool

Flurry of joyful snowflakes are a brilliant way to send Christmas wishes.

Smaller snowflake dies cut snowflakes from White Glimmer paper from the White & Red Glimmer Paper. A sentiment from the stamp set was white heat embossed on Pool Party card-stock. The sentiment was layered over a piece of White Glimmer paper and a bow of silver Metallic Mess ribbon before being added with Mini Dimensionals. Iridescent Rhinestone Basic Jewels were added to the centre of snowflakes.

CARD 1:

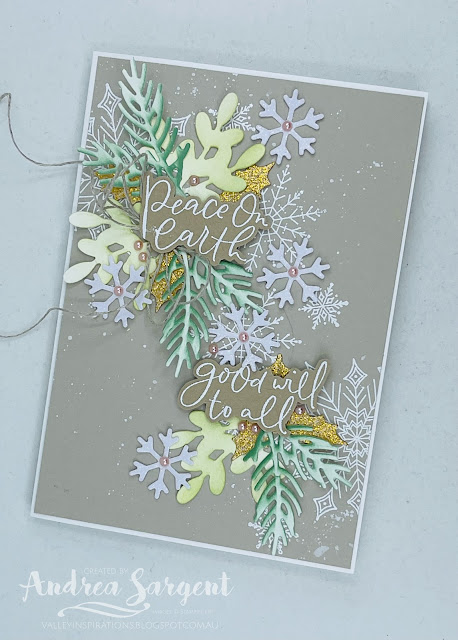
When I started the card above, I had in mind the combined use of some pine/leaves etc with snowflakes from the Joyful Flurry bundle but at that time I couldn’t make it work and took a different tac. I thought I would try again this week using different colours, etc.

Flurry of joyful snowflakes are a brilliant way to send Christmas wishes.

Starting with a piece of Sahara Sand card-stock, snowflakes from the Joyful Flurry stamp set were white heat embossed. Some White Craft ink was splattered over the panel using the mid-sized Water Painter. The small snowflake die from the Frosted Flurry dies again cut small snowflakes from White Glimmer paper from the White & Red Glimmer paper. Pine fronds and a rounder leaf sprig (Mistletoe???) were cut from Basic White card-stock and then coloured with either Mint Macaron or Soft Sea Foam inks using Blending Brushes.

Flurry of joyful snowflakes are a brilliant way to send Christmas wishes.

A sentiment from the Hope and Peace stamps were white heat embossed on a piece of Crumb Cake card-stock. And then it was fussy cut in two. All the pieces were arranged together with some Gold Holly Leaves embellishments and adhered with Mini Dimensionals, Multipurpose Liquid Glue or Glue Dots. A double Linen Twine bow was tucked under the top sentiment with Glue Dots. The final touch was the addition of Pearl Basic Jewels coloured with a light Flirty Flamingo Blend.

Flurry of joyful snowflakes are a brilliant way to send Christmas wishes.

The card inner was created with Basic White card-stock stamped with snowflakes using second generation Sahara Sand ink. A second sentiment from the Hope and Peace stamp set was white heat embossed on Crumb Cake card-stock, then fussy cut before being adhered on the card inner. The Basic White panel was mounted onto a slightly larger piece of Sahara Sand card-stock before being adhered to the Thick Basic White card base. A C6 Basic White envelope was also stamped with snowflakes in Sahara Sand ink.

Flurry of joyful snowflakes are a brilliant way to send Christmas wishes.

CARD 2:

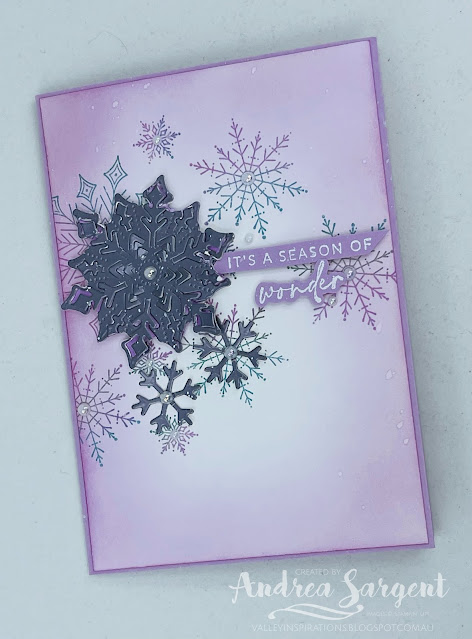
The idea for the second card started with a layout that I had recently seen Emma Goddard, a UK Stampin’ Up! Demonstrator and previous Artisan, demonstrate in one of her Card & Cuppa classes. The layout morphed into the card below using different stamps, colour scheme and embellishments plus the addition of blending.

Flurry of joyful snowflakes are a brilliant way to send Christmas wishes.

Fresh Freesia ink was applied to a piece of Basic White card-stock with a Blending Brush and snowflakes were stamped with a combination of Fresh Freesia and Balmy Blue inks. This card front was adhered to a Fresh Freesia card base. 

Flurry of joyful snowflakes are a brilliant way to send Christmas wishes.

A snowflake was die cut from Silver Foil (the mid mauvish foil) using an open die from the
Frosted Flurry dies before being die cut with one of the intricate dies that only partially cuts certain bits. This was adhered to a plain die cut snowflake so that the snowflake could be added with Dimensionals. A sentiment was white heat embossed on Fresh Freesia card-stock and then fussy cut and added with Mini Dimensionals. Iridescent Basic Pearls were added to snowflake centres as the final touch. 

Flurry of joyful snowflakes are a brilliant way to send Christmas wishes.

A Basic White card-stock inner also was stamped with Fresh Freesia & Balmy Blue ink snowflakes. A different sentiment from the Joyful Flurry stamp set was stamped in Fresh Freesia ink. Part of an extra mauvish Silver foil snowflake was adhered near a top corner. A Basic White C6 envelope was stamped with the same snowflakes and the remainder of the foil snowflake was added.

Flurry of joyful snowflakes are a brilliant way to send Christmas wishes.

CARD 3:

As I was creating Card 2, the idea for this card was formed as a simpler version that could be created more quickly in a number of different colours. I so love the effect of the partially die cut snowflakes. 

Flurry of joyful snowflakes are a brilliant way to send Christmas wishes.

Balmy Blue ink was blended over a Basic White card front and some White Craft ink with a little Wink of Stella was splattered over. Once dry, two partial die cut snowflakes were cut in the card front and the small snowflake stamp was white heat embossed a number of times. The card front was added to a Balmy Blue card-stock base. 

Flurry of joyful snowflakes are a brilliant way to send Christmas wishes.

A sentiment from the Joyful Flurry stamp set was white heat embossed on Balmy Blue card-stock and fussy cut. It was popped up with Dimensionals. A double Silver Elegant Twine bow was tucked under the sentiment and adhered with Glue Dots. Basic Pearl Jewels were added as the finishing touch.

Flurry of joyful snowflakes are a brilliant way to send Christmas wishes.

A Basic White card inner was stamped with second generation Balmy Blue inked snowflakes. A Basic White C6 envelope also was stamped in Balmy Blue ink.

Flurry of joyful snowflakes are a brilliant way to send Christmas wishes.

That's it from me for this week. Thank you for dropping in for this penultimate 2022 Heart of Christmas Blog Hop.

It is always a delight to see everyone's creations and I am sure there will be gorgeous Christmas projects on show so don't miss checking out each blog. To continue with the blog hop, click the "onto the next" graphic below to be taken to the blog of the lovely Kate Morgan. I always look forward to checking out Kate’s creations together with everyone else's. 

Don't forget the weekly Colour Creations Blog Hop by the Art with Heart Team that launches every Wednesday at 8.00pm AEST. We are focussing on a delightful colour this week, Mint Macaron. 

Stay well, stay safe and be kind to yourself and others.

Andrea XXX


If at any time you find a broken link and the next blog doesn’t come up or you started part way through, please head to the blog of our Heart of Christmas Blog Hop Host, the very special Sharon Davern, and she will have the list of all Art With Heart Team members who are participating in this blog hop. Check out her beautiful creation while you are there.

If you are in Australia, don't already have a Stampin' Up! demonstrator and would like your own copy of Stampin' Up's 2022-2023 Annual Catalogue and or the July - December Mini Catalogue then let me know and I will be delighted to send them to you. Pease don't hesitate to contact me with any other queries about these projects or Stampin' Up!. 

#heartofchristmas #heartofchristmas2022  #awhtheartofchristmas #Stampin'Up! #stampinupaustralia #stampinupsouthpacific #stampinupdemo  #handmadecards #makeacardsendacard #stampinupdemonstrator #papercrafting #artwithheartteam  #papercrafter  #stamper  #valleyinspirations #joyfulflurry #hopeandpeace #christmasbanners