Art with Heart Wow Tutorials

Wednesday, 28 June 2023

AWH Colour Creations Blog Hop #9 Pecan Pie

Pecan Pie with Les Shoppes Fancy Fold

Hello. Welcome to Valley Inspirations with Andrea and the Art with Heart Colour Creations Blog Hop. We are working though the Stampin' Up! colours in alphabetical order, focussing on one colour each week, however, we are starting with the new colours and currently showcasing the new Core colours.


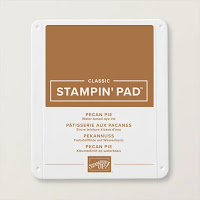
This week’s Blog Hop is focussing on a mid brown called Pecan Pie. Pecan Pie is part of the Neutrals Colour Family and is a warm brown with a yellow base. This colour is a lovely neutral when used for earthen pots, trees, parts of buildings and all things brown.


Pecan Pie is produced in Stampin' Up!'s card-stock, both A4 & 12"x12"Classic Stampin' inks (ink pads re-inkers); Stampin' Write Marker; Stampin' Blends Combo; Neutrals Designer Series Paper as well as Earthen Elegance, Let’s Go Fishing, Les Shoppes & Glorious Gingham DSPs; plus Pecan Pie Bordered Ribbon; and Opaque Ovals.

Create a unique fancy fold card to say “thank you” to a special friend, featuring Les Shoppes and Zoo Crew designer series papers.

Pecan Pie
 card-stock, ink, Blends Combo, Stampin’ Write Marker, Les Shoppes & Let’s Go Fishing DSP and Bordered Ribbon have been used in the creation of this project plus a range of non-Pecan Pie bits and pieces.

Create a unique fancy fold card to say “thank you” to a special friend, featuring Les Shoppes and Zoo Crew designer series papers.

As mentioned, Pecan Pie is a lovely mid brown and as a neutral could be combined with many different colours. I tossed around a number of ideas for my project for this blog hop, but then decided to show case Pecan Pie through some Designer Series Papers that incorporate Pecan Pie. The main DSP used on this project is the gorgeous Les Shoppes DSP. Buildings that include Pecan Pie in various ways were selected. I also used a map design from the Let’s Go Fishing DSP and couldn’t resist adding a couple of images from the Zoo Crew DSP to bring a touch of fun to my fancy fold card. The Designer Series Paper sale will finish at the end of this month - so don’t miss out buy gorgeous Stampin’ Up! DSPs. I have used 3 different DSPs, but there are many others to select from that are currently 15% off.

The fold is a Book Jacket fold, recently demonstrated on uTube by Susan Campfield, a USA demonstrator. To me, this fold was so apt as the card was to feature a book shop on the front. The fold also is giving a sense of dimension, eg buildings on different streets.

Create a unique fancy fold card to say “thank you” to a special friend, featuring Les Shoppes and Zoo Crew designer series papers.

A few water-colour backgrounds were created with Pecan Pie, Pebbled Path, Petal Pink, Balmy Blue and Old Olive Classic Stampin’ inks, on Fluid 100 Watercolor Paper and the wide Water Painter from the set of 3 Water Painters. The Heat Tool was used to move some of the colour around and to speed up drying of the coloured panels. Before the panels were fully dry the Embossed Brick 3D Embossing Folder added some texture to the cobbled road/footpath sections. Once the panels had fully dried a Blending Brush was used to lightly apply some definition to the embossed area using Pecan Pie ink. This addition is not really obvious in the photos but at the time of applying a tad of extra colour the change in definition could be seen.

Create a unique fancy fold card to say “thank you” to a special friend, featuring Les Shoppes and Zoo Crew designer series papers.

A number of shops were fussy cut from the Les Shoppes DSP. Potted plants, the chalk board and the “up-stairs” asian lanterns together with extra railing from the asian cafe and an extra window planter were also fussy cut. A couple of oh so cute critters were fussy cut from the Zoo Crew DSP. (I know you can only see one zany critter, but wait …)

Create a unique fancy fold card to say “thank you” to a special friend, featuring Les Shoppes and Zoo Crew designer series papers.

Extra colour/texture was added to a number of areas. Light splattering was applied to the blue sky and the cobbled road with a Pecan Pie Stampin’ Write Marker. Some shading was added to the critters with Stampin’ Blends Combos, including Pecan Pie, Petal Pink, Smokey Slate, Basic Black and Crumb Cake. Some Pool Party Blending was lightly applied to the Asian cafe window. Some Wink of Stella was added to the window, and some other spots.

Create a unique fancy fold card to say “thank you” to a special friend, featuring Les Shoppes and Zoo Crew designer series papers.

Here is a top view of the fancy fold. It was created with 2 pieces of Thick Very Vanilla card-stock, with one piece scored to create a 2.5cm square spine and the other piece included the Book Jacket Flap. It was really important to burnish the scored folds with a Bone Folder. The adhesive of choice to form the Fancy Fold was Tear ‘n Tape - strong and wouldn’t ooze and stick where it wasn’t wanted.

Create a unique fancy fold card to say “thank you” to a special friend, featuring Les Shoppes and Zoo Crew designer series papers.

Here is the decorated flap. It shows another shop with an artistic echidna (or hedgehog for those in the Northern Hemisphere), and look - she is painting the shop (wink, wink).  All of the pieces were arranged and adhered with Multipurpose Liquid Glue or Dimensionals/Mini Dimensionals.

Create a unique fancy fold card to say “thank you” to a special friend, featuring Les Shoppes and Zoo Crew designer series papers.

The spine of the book was stamped with a vertical sentiment from the Vertical Blooms stamp set. Pecan Pie ink was used for the sentiment. All of the panels were mounted on slightly larger pieces of Pecan Pie card-stock.

Create a unique fancy fold card to say “thank you” to a special friend, featuring Les Shoppes and Zoo Crew designer series papers.

The final touches included some Pecan Pie Bordered Ribbon down the card spine that will enable easy lifting of a little gift - eg a long chocolate, that is to be hidden in the spine. The ribbon is tied together at the top with a Linen twine bow. I couldn’t resist a little bling, so added some Champagne Adhesive-backed Sparkle Gems. Some were scattered around and others were strategically added as door knobs.

Create a unique fancy fold card to say “thank you” to a special friend, featuring Les Shoppes and Zoo Crew designer series papers.

Inside the card, a piece of a map from the Let’s Go Fishing DSP was adhered to the flap. To give some extra definition a line was drawn near the edge with the fine tip of a Pecan Pie Marker. So as not to add further bulk on the inner centre panel, a piece of Basic White card-stock was edged with the Light Pecan Pie Blend to replicate a sense of the mounting. A thin strip of left over water-coloured panel was adhered to the right and fussy cut books and a flower linked the inner to the book shop on the card front.  

A part of a shop was cut from the edge of the Les Shoppes DSP and adhered to a Very Vanilla C6 Envelope to link the envelope to the card it will hold. It’s a great way to use partial images from the edges of DSP.

Create a unique fancy fold card to say “thank you” to a special friend, featuring Les Shoppes and Zoo Crew designer series papers.

Thank you so much for dropping in to check out my Pecan Pie project. I hope this fancy fold brought you a smile.

Create a unique fancy fold card to say “thank you” to a special friend, featuring Les Shoppes and Zoo Crew designer series papers.

Create a unique fancy fold card to say “thank you” to a special friend, featuring Les Shoppes and Zoo Crew designer series papers.

There is more Pecan Pie creativity to see, so continue your way around the blog hop. Just click the "next" graphic below to be taken to the blog of a special friend, the lovely Rachel PalmieriI am looking forward to checking out Rachel’s creation. I do love seeing everyones' projects - there is always so much inspiration.

I hope to see you next week when we will be featuring Balmy Blue, from the Subtles Colour family, as we continue the weekly 2023-2024 Colour Creations Blog Hop series

Stay well, stay safe and be kind to yourself and others.

Andrea 💕🐾

If you find a broken link or would like to view the full list of participants please head to Catherine Proctor’s blog @ What Cathy Made. Cathy is our brilliant Art With Heart Team Colour Creations Coordinator.  She is an amazing & long suffering lady. Check out her delightful creation while you are there.

If you live in Australia, don't already have a Stampin' Up! demonstrator and would like your own copy of the new Stampin' Up 2023-2024 Annual Catalogue, then let me know and I will be delighted to send it to you.  Please don't hesitate to make contact with any other queries about these projects or Stampin' Up!. 

#colourcreationsbloghop  #stampinup #stampinupaustralia #stampinupsouthpacific #stampinupdemo  #handmadecards #makeacardsendacard #stampinupdemonstrator #papercrafting #artwithheartteam  #papercrafter  #valleyinspirations   #zoocrew  #lesshoppes #verticalblooms 

Wednesday, 21 June 2023

AWH Colour Creations Blog Hop #8 Lemon Lolly

Lemon Lolly with Lighting the Way Fancy Fold

Hello. Welcome to Valley Inspirations with Andrea and the Art with Heart Colour Creations Blog Hop. We are working though the Stampin' Up! colours in alphabetical order, focussing on one colour each week. We have started with the new In Colours and are currently focussing on the newly introduced Core Colours.


This week’s Blog Hop is focussing on a pale yellow called Lemon Lolly. Lemon Lolly is part of the Subtles Colour Family and is a delightful light clean yellow. This colour would be lovely for a baby card, flowers and providing a sense of light. As with the other new colours, I am exploring coordinating colours but I think it work’s well with other Subtles like Bubble Bath, Fresh Freesia, Soft Sea Foam and Lost Lagoon as well as a gorgeous deep blue, Misty Moonlight (as used in the card below).


Lemon Lolly is produced in Stampin' Up!'s card-stock, both A4 & 12"x12"Classic Stampin' inks (ink pads re-inkers); Stampin' Write Marker; Stampin' Blends Combo; Subtles Designer Series Paper as well as Fresh As A Daisy, Bright & Beautiful, Masterfully Made DSPs; plus Sheer Ribbon Combo Pack; and Adhesive-backed Solid Gems and Opaque Ovals.


Lemon Lolly card-stock, ink, Bright & Beautiful DSP, Lemon Lolly Sheer Ribbon
 and Adhesive-backed Solid Gems have been used in the creation of this project plus a range of non-Lemon Lolly bits and pieces.


I really enjoyed playing with this colour and getting to know Lemon Lolly. I decided to interpret this beautiful colour with the concept of light so Lighting the Way seemed the perfect bundle. I had wondered about incorporating an easel fold with a tea light but changed my ideas. Yesterday, when I saw Lisa Curio’s recent u-Tube, I decided to use her fancy fold as the basis for my card.


The Swinging Easel-like fold was cut and scored in a Lemon Lolly cardstock card-base. The background features a Lemon Lolly striped design from the Bright & Beautiful Designer Series Paper. This beautiful DSP is on sale, together with other DSPs, for the month of June. Don’t miss out benefitting from Stampin’ Up!s DSP Sale. It’s a great opportunity to purchase some DSP that has been on your Wish List.

Once the card has been taken from the envelope it will stand upright, with a centre fold in the front of the card. Here is a top view of the fancy fold:


Now to key points of how it was created:  A piece of Fluid 100 Watercolor Paper was wet on wet water-coloured using Lemon Lolly and Soft Sea Foam Classic Stampin’ inks, the wide tip Water Painter and a Heat Tool to move ink around and to dry the panel. Using the Lighting the Way dies, the lantern was die cut in Misty Moonlight card-stock. Fireflies were die cut from Basic White card-stock and a little Vellum cardstock for the larger firefly’s wings. The Sentimental Park dies were used to cut different sized flowers and leaves from Fluid 100 Watercolor Paper. Once the water-coloured panel had fully dried, it was stamped with some grasses using Soft Sea Foam Classic ink. Extra Lemon Lolly ink was stamped using the largest round stamp so that it would sit under the lantern. The fireflies had a little Lemon Lolly ink blended over their tails.


The Misty Moonlight die cut lantern was partially gilded with Gilded Leafing and touches of Multipurpose Liquid Glue. To thinly apply glue, I used the ‘other’ end of the glue that has a slanted applicator. I rarely use this end but it is brilliant to thinly apply flat areas of glue. The glue was left to get a bit more tacky before adding flakes of the Gilded Leafing and then brushing off the excess gold. I love this effect. The flowers were water-coloured with Bubble Bath ink; the ‘holy’ flowers were coloured with Fresh Freesia ink and the leaves with Soft Sea Foam and touches of Lost Lagoon inks


All the pieces were arranged, and either Dimensionals, Glue Dots or Liquid Glue were used to adhere them in place. Some Lemon Lolly Sheer ribbon was looped through the lantern’s top ring and it was tied in place with some White Bakers Twine.


While this photo shows the card inner, it includes the stopper to hold the card front in its folded position. As you can see, some of the Lemon Lolly striped DSP was added to the right. (This card used one 6x6” Lemon Lolly striped DSP sheet.) A sentiment from the Lighting the Way stamp set was stamped in Misty Moonlight ink on Basic White card-stock, before being die cut with one of the Nested Essentials dies. The label needed to be cut down so it aligns within the strip of DSP. To achieve this the label die was moved to trim down one side and then the other side. Also, an extra firefly, some flowers and leaves were scattered around with a few Opaque Gems. A Basic White C6 Envelope was decorated with the last piece of DSP and was stamped with grasses in Soft Sea Foam ink across the bottom of the envelope.


Thank you so much for dropping in. I so appreciate you.


There is more Lemon Lolly creativity, so do continue with the blog hop. Just click the "next" graphic below to be taken to the blog of the lovely Christine BlainI am looking forward to checking out Christine’s creation. I do love seeing everyones' projects - there is always so much inspiration.

I hope to see you next week when we will be featuring Pecan Pieanother of the new core Colours, as we continue the weekly 2023-2024 Colour Creations Blog Hop series

Stay well, stay safe and be kind to yourself and others.

Andrea 💕🐾

If you find a broken link or would like to view the full list of participants go to Catherine Proctor’s blog @ What Cathy Made. Cathy is our wonderful Art With Heart Team Colour Creations Coordinator.  She is a special lady. Check out her delightful creation while you are there.

If you live in Australia, don't already have a Stampin' Up! demonstrator and would like your own copy of the new Stampin' Up 2023-2024 Annual Catalogue, then let me know and I will be delighted to send it to you.  Please don't hesitate to make contact with any other queries about this project or Stampin' Up!


#colourcreationsbloghop  #stampinup #stampinupaustralia #stampinupsouthpacific #stampinupdemo  #handmadecards #makeacardsendacard #stampinupdemonstrator #papercrafting #artwithheartteam  #papercrafter  #valleyinspirations   #lightingtheway     #nestedessentials. #sentimentalpark

Wednesday, 14 June 2023

AWH Colour Creations Blog Hop #7 Bubble Bath

Bubble Bath with Queen Bee & Dainty Delight Fancy Fold

Hello. Welcome to Valley Inspirations with Andrea and the Art with Heart Colour Creations Blog Hop. We are working though the Stampin' Up! colours in alphabetical order, focussing on one colour each week, however, we are starting with the newly introduced colours, and currently focussing on the new Core Colours.


This week’s Blog Hop is focussing on a very pretty pink called Bubble Bath. Bubble Bath is part of the Subtle Colour Family and is a clean light pink. This colour would be a lovely for baby cards, flowers and anything pink. I love it. As with the other new colours, I am exploring coordinating colours but it work’s well with Moody Mauve & Crumb Cake (as used in the card below).


Bubble Bath 
is
 produced in Stampin' Up!'s card-stock, both A4 & 12"x12"Classic Stampin' inks (ink pads re-inkers); Stampin' Write Marker; Stampin' Blends Combo; Subtles Designer Series Paper as well as Fresh As A Daisy, Bright & Beautiful, Delightfully Eclectic DSPs; plus Soft Shimmer Speciality Paper; Bright & Beautiful Memories & More Card Pack and Cards & Envelopes; Sheer Ribbon Combo; and Opaque Ovals.


Bubble Bath card-stock, ink, Bright & Beautiful DSP, Blends Combo and Sheer Ribbon have been used in the creation of these projects plus a range of non-Bubble Bath bits and pieces.


Isn’t Bubble Bath such a pretty pale pink? I loved working with it. I also wanted to use some Designer Series Paper for my project as this month Stampin’ Up! have a DSP sale running throughout June. Do you have DSP on your wish list? Then don’t miss saving 15% this month. I have used one of the designs of the Bright & Beautiful DSP on my project. It is such a versatile pack and features all of the new and returning core colours.


Bubble Bath cardstock was used for this fancy fold’s card base and pieces of the ombre Bubble Bath DSP were cut to fit all of the visible card panels apart from the front focal panel which is Basic White card-stock. This front white panel was stamped diagonally with the larger word/splatter stamp from the Queen Bee stamps in stamped off Crumb Cake Classic Stampin’ ink. You may be thinking “but this stamp set isn’t in the new 2023-2024 Stampin’ Up! Annual Catalogue”. You are right - it isn’t in the Annual Catalogue, however, the stamp set has carried over and is available on-line. I do love this set. I have paired it with the Dainty Delight dies to create the added leaves & flowers.


The front white panel was embossed with the new Exposed Brick 3D embossing folder. It is another amazing embossing folder. The Queen Bee stamps includes a little splatter stamp that I used also with Bubble Bath ink lightly on the front panel. The front panels of DSP were stamped with the tall floral stamp in stamped off Crumb Cake ink. As I was working on the card, I still found the Crumb Cake stamping a bit dark & dominant so I added a little blending of White Craft ink and one of Stampin’ Up!s delightful Blending Brushes. It did soften the stamping.


The beautiful queen bee was gold embossed on both Basic White and Vellum cardstocks. As the  coordinating dies didn’t carry over the bees were fussy cut and the Vellum bee wings and head  were all that was used from the Vellum bee. The card-stock bee was coloured with Bubble Bath, Moody Mauve & Crumb Cake Blends combos. Flowers and leaves were die cut from Basic White card-stock using the Dainty Delight dies. Colour was lightly added to the die cut pieces with Blending Brushes, ie Crumb Cake to the leaves and Bubble Bath and Moody Mauve in different amounts to flowers. The pieces were arranged and added with either Multi-purpose Liquid Glue, Dimensionals and Glue Dots. An extra flower, leaves and small gold embossed bee were added to the top facade of the central panel. 


“Happy” & “Birthday” from the Queen Bee stamp set were stamped in Bubble Bath ink; fussy cut out and added with Dimensionals. The Bubble Bath Sheer ribbon was cut lengthwise only removing the shiny stitched edge. This was tied into a single bow and tucked under an edge of the sentiment. Both sizes of Iridescent Pearls were coloured with the Dark Bubble Bath Blend and added to flower centres and around the sentiment. The Iridescent Pearls are so delightful, adding a little extra shimmer to your project.


The back panel of the fancy fold was prepared for writing one’s personal message by adhering a piece of Basic White card-stock that had a 1cm strip of coordinating DSP adhered to the left side with a touch of remaining die cut & coloured flowers & leaves and a few coloured Iridescent Pearls. A C6 Basic White Envelope was stamped with the tall floral stem in stamped off Crumb Cake ink. By “stamped off” I am referring to a technique where after inking the stamp, it is stamped onto a piece of scrap paper before being stamped onto your project. This lightens the ink colour.


Thank you so much for spending time with me on my blog. It is appreciated.


There is much more Bubble Bath creativity so do continue with the blog hop. Just click the "next" graphic below to be taken to the blog of my fellow South Aussie and friend, the special Tina GillespieI am looking forward to checking out Tina’s wonderful creation. I do love seeing everyones' projects as there is always so much inspiration.

I do hope to see you next week when we will be featuring Lemon Lollyanother of the newly introduced Core Colours, as we continue the weekly 2023-2024 Colour Creations Blog Hop series

Stay well, stay safe and be kind to yourself and others.

Andrea 💕🐾

If you find a broken link or would like to view the full list of participants go to Catherine Proctor’s blog @ What Cathy Made. Cathy is our amazing Art With Heart Team Colour Creations Coordinator.  She is a wonderful lady. Check out her delightful creation while you are there.

If you live in Australia, don't already have a Stampin' Up! demonstrator and would like your own copy of the new Stampin' Up 2023-2024 Annual Catalogue, then let me know and I will be delighted to send it to you.  Please don't hesitate to make contact with any other queries about these projects or Stampin' Up!. 

#colourcreationsbloghop  #stampinup #stampinupaustralia #stampinupsouthpacific #stampinupdemo  #handmadecards #makeacardsendacard #stampinupdemonstrator #papercrafting #artwithheartteam  #papercrafter  #valleyinspirations   #queenbee     #daintydelight

Wednesday, 7 June 2023

AWH Colour Creations Blog Hop #6 Azure Afternoon

Azure Afternoon with Beauty of the Deep

Hello. Welcome to Valley Inspirations with Andrea and the Art with Heart Colour Creations Blog Hop. We are working though the Stampin' Up! colours in alphabetical order, focussing on one colour each week, however, we are starting with the new colours and are currently featuring the new core colours.


This week’s Blog Hop is focussing on a mid turquoise called Azure Afternoon. Azure Afternoon is part of the Brights Colour Family and is a gorgeous blue. This colour would be a lovely watery seaside colour or perhaps even be used for sky. As with the other new colours, I am exploring coordinating colours but I think it work’s well with other blues and blue greens (as used in the card below).


Azure Afternoon is produced in Stampin' Up!'s card-stock, both A4 & 12"x12"Classic Stampin' inks (ink pads re-inkers); Stampin' Write Marker; Stampin' Blends Combo; Brights Designer Series Paper as well as Masterfully Made, Fresh As A Daisy and Bright & Beautiful DSPs; plus White Centre Speciality Paper; Bright & Beautiful Memories & More Card Pack + Cards & Envelopes; the Sheer Ribbon Combo; and Opaque Ovals. It is a beautiful selection.

Beauty of the Deep provides wonderful inspiration in creating a card to tell a special person how amazing they are.

Azure Afternoon card-stock and ink 
have been used in the creation of this project plus a range of non-Azure Afternoon bits and pieces.

Beauty of the Deep provides wonderful inspiration in creating a card to tell a special person how amazing they are.

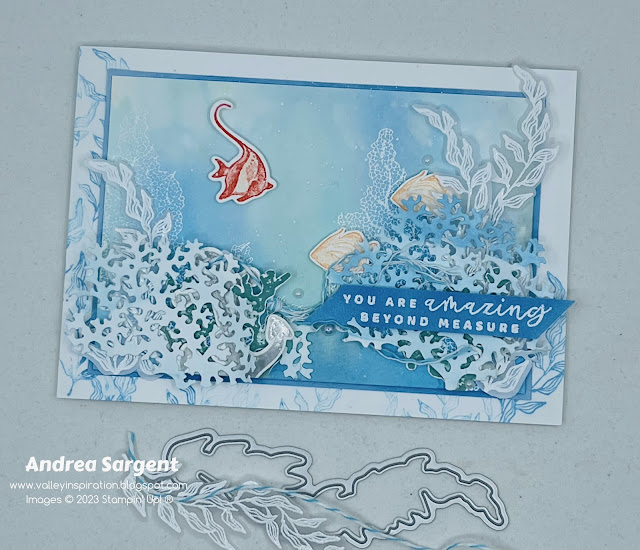
I decided to take note of the name of this colour to set the theme for my project, as such I have used the gorgeous Beauty of the Deep bundle. I also thought that a water-colour background would work brilliantly. I’m sorry to have used another water-colour technique - however, I do love this background and think it works well as an undersea scene.

Beauty of the Deep provides wonderful inspiration in creating a card to tell a special person how amazing they are.

I used the wet on wet water-colour technique with Azure Afternoon Classic Stampin’ Ink together with Blueberry Bushel, Coastal Cabana and Lost Lagoon inks on Fluid 100 Watercolor paper. Once dry, the large filigree coral stamp from the Beauty of the Deep stamp set was white heat embossed over each side edge with Versamark ink, white Emboss Powder and a Heat tool before being mounted on Azure Afternoon card-stock

Beauty of the Deep provides wonderful inspiration in creating a card to tell a special person how amazing they are.

The fish from the Beauty of the Deep set were stamped in either Petal Pink or Calypso Coral inks on Basic White card-stock. They were all coloured with Wink of Stella and a touch of Petal Pink ink. One of the coral plants was stamped in Lost Lagoon ink. The anchor was silver heat embossed. The long leafy plant was white heat embossed on Vellum card-stock. All were die cut with coordinating Beauty of the Deep dies. The wide coral-type plant was die cut from Basic White card-stock. A Thick Basic White card base was stamped along 3 edges with the long leafy stamp in 2nd generation Azure Afternoon ink.

Beauty of the Deep provides wonderful inspiration in creating a card to tell a special person how amazing they are.

All the various pieces were arranged and adhered with either Multi-purpose Liquid Glue, Dimensionals or Glue Dots. Shhhhh - but the 2 smaller Petal Pink fish are swimming up-side-down. I didn’t realise this till I was adding watermarks to the photos. Oops. Some Tahitian Tide 2022-2024 In Color Baker’s Twine was attached to the anchor with the ends frayed to give a sense of the anchor’s rope disintegrating and entwining itself in the sea plants. Some white Craft ink was splattered over as well. A sentiment from Season of Chic stamp set was white heat embossed on Azure Afternoon card-stock. A number of Iridescent Pearls added a little extra shimmer.  

Beauty of the Deep provides wonderful inspiration in creating a card to tell a special person how amazing they are.

A panel of Basic White card-stock mounted on a slightly larger piece of Azure Afternoon card-stock had been 2nd generation Azure Afternoon stamped with the tall leafy stamp and a couple of Petal Pink stamped fish. A C6 Basic White envelope was stamped in the same manner to coordinate.

Beauty of the Deep provides wonderful inspiration in creating a card to tell a special person how amazing they are.

Thank you so much for dropping in to check out my Azure Afternoon Sea Theme card. I so appreciate you and your interest.

Beauty of the Deep provides wonderful inspiration in creating a card to tell a special person how amazing they are.

There is more Azure Afternoon creativity, so do continue with the blog hop. Just click the "next" graphic below to be taken to the blog of my lovely friend, Rachel PalmieriI am looking forward to checking out Rachel’s creation(s). I do love seeing everyones' projects - there is always so much inspiration.

I hope to see you next week when we will be featuring Bubble Bathanother of the new core coloursas we continue the weekly 2023-2024 Colour Creations Blog Hop series over the coming 11 months.

Stay well, stay safe and be kind to yourself and others.

Andrea 💕🐾
https://stampinpals.blogspot.com/2023/06/colour-creations-week-6-azure-afternoon.html

If you find a broken link or would like to view the full list of participants go to Catherine Proctor’s blog @ What Cathy Made. Cathy is our wonderful Art With Heart Team Colour Creations Coordinator.  She is an amazing lady. Check out her delightful creation while you are there.

If you live in Australia, don't already have a Stampin' Up! demonstrator and would like your own copy of the new Stampin' Up 2023-2024 Annual Catalogue, then let me know and I will be delighted to send it to you.  Please don't hesitate to make contact with any other queries about this project or Stampin' Up!


#colourcreationsbloghop  #stampinup #stampinupaustralia #stampinupsouthpacific #stampinupdemo  #handmadecards #makeacardsendacard #stampinupdemonstrator #papercrafting #artwithheartteam  #papercrafter  #valleyinspirations   #beautyofthedeep     #seasonofchic