Art with Heart Wow Tutorials

Thursday, 31 December 2020

Social Stamping - #20 Oh 2020

Oh 2020 and Darling Donkeys with Oh So Ombre DSP

Hello. Welcome to Valley Inspirations with Andrea and the 20th Social Stamping Blog Host.

This is the final Social Stamping Blog Host for 2020. What a year it has been, however, one of the highlights has been regularly joining with this amazing group of creatives. Paper crafting has helped me maintain a level of sanity during this difficult year and the Social Stamping blog hop has given me specific focus to create. Also, I have learnt more about blogging and become more regular with my posts.

Symbolically, I am really looking forward to the end of 2020 and a fresh start to herald a much better year. Logically I know that a new year will not magically bring the changes we would like. However, I am so thankful that we are in one of the best countries in the world.

Darling Donkeys and Oh So Ombre Stampin Up card, Andrea Sargent, Independent Stampin' Up! Demonstrator, Valley Inspirations, Adelaide foothills, Australia

My project this month is symbolic of my desire to kick away 2020 and celebrate a new year filled with hope for better things. The focal stamp set is new and one of the Sale-a-bration offerings available from 5 January that can be choosen for free with a purchase of $90 worth of Stampin' Up! products. This cute set is called Darling Donkeys. I have seen a couple of projects that show the donkey kicking away 2020. To add my own twist I thought I would add some celebration of the incoming 2021. After creating my card I have seen a number with the same idea - great minds think alike! Time had run out for creating another card so I am sharing my interpretation. 😁

Darling Donkeys and Oh So Ombre Stampin Up card, Andrea Sargent, Independent Stampin' Up! Demonstrator, Valley Inspirations, Adelaide foothills, Australia

This card is a Triangle Fun Fold card created from an A4 sheet of Thick Whisper White card-stock that was scored down the centre, both lengthwise and across the width. Then the sheet is cut in half diagonally from corner to corner. (Two cards can be made from one sheet of A4.) The card-stock was folded and burnished along the score lines so that the diagonal edges meet in the middle. This is the card base.

Darling Donkeys and Oh So Ombre Stampin Up card, Andrea Sargent, Independent Stampin' Up! Demonstrator, Valley Inspirations, Adelaide foothills, Australia

Two of the donkeys were stamped on Whisper White card-stock in Gray Granite Classic Stampin' ink. The donkeys were coloured using Stampin' Blends Combo Packs in Gray Granite, Smoky Slate, Basic Black as well as Ivory and the Colour Lifter. Then both donkeys were fussy cut and shaped a little.

Darling Donkeys and Oh So Ombre Stampin Up card, Andrea Sargent, Independent Stampin' Up! Demonstrator, Valley Inspirations, Adelaide foothills, Australia

A piece of Foam Adhesive Sheet was attached to some Gray Granite card-stock and some Rainbow Glimmer Paper and the numbers 2 and 0 were die cut from Gray Granite and 2, 0, 2, 1 from differing colours of the Rainbow Glimmer. The numbers came from the Playful Alphabet die set. The glimmer numbers had pieces of White twine from the Snail Mail Twine Combo pack attached to the bottom. Later these lengths of twine were adhered to the upright donkey's teeth.

Darling Donkeys and Oh So Ombre Stampin Up card, Andrea Sargent, Independent Stampin' Up! Demonstrator, Valley Inspirations, Adelaide foothills, Australia

The card front was cut from another Sale-a-bration product, one of the Bermuda Bay ombre sheets from the Oh So Ombre Designer Series Paper. The two triangles of DSP were mounted on Gray Granite card-stock, which in turn was mounted on the card base leaving a small boarder of the white card base. The donkeys and numbers were manoeuvred to find the appropriate positioning. To ground the donkeys, some grasses from the Beautiful Moments stamp set were stamped directly onto the DSP card front using Granny Apple Green Classic Stampin' ink (the ink coordinates with one of the colours in the Rainbow Glimmer Paper).

Darling Donkeys and Oh So Ombre Stampin Up card, Andrea Sargent, Independent Stampin' Up! Demonstrator, Valley Inspirations, Adelaide foothills, Australia

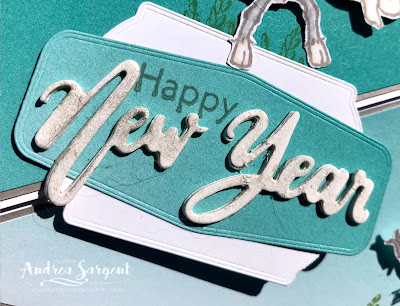
The sentiment was created using the New Year's die from the Word Wishes die set. It was cut four times from Whisper White card-stock, with the "s" trimmed off. The pieces were adhered together to create some dimension. Two labels from the Tasteful Labels die set, one from Whisper White card-stock and the other from the remaining Bermuda Bay Oh So Ombre DSP. The trick with the labels is to only adhere part of the bottom label to the upper flap of the card front so that it will still open. In my post-Christmas vagueness I'm so glad I remembered! While the camera has picked up the added Wink of Stella, It makes the words "New Year" look grubby rather than glittery - oh dear. In reality it actually looks quite shimmery.

Darling Donkeys and Oh So Ombre Stampin Up card, Andrea Sargent, Independent Stampin' Up! Demonstrator, Valley Inspirations, Adelaide foothills, Australia

A Whisper White card inner was stamped with the third donkey from the stamp set and coloured with the same colours of Stampin' Blends. To coordinate with the card front the inner was mounted on Gray Granite card-stock leaving a fine mount.  Another 2 and 0 were cut from Gray Granite card-stock (without any foam sheet attached). The gray numbers were adhered  as if they had fallen from the card front and knocked the donkey on the head. To further coordinate with the card front a Whisper White C6 Envelope was stamped with one of the donkeys using Gray Granite Classic Stampin' ink. "Happy" was stamped in Basic Gray Classic Stampin' ink. This stamp was already on my table as it comes from another new stamp set - the Art Gallery set from the new January - June Mini Catalogue. There is so much gorgeousness in this new catalogue and something for everyone.

Darling Donkeys and Oh So Ombre Stampin Up card, Andrea Sargent, Independent Stampin' Up! Demonstrator, Valley Inspirations, Adelaide foothills, Australia

To finish the card ... oops, as I was finishing writing my blog I realised that I forgotten to add some of the gorgeous clear Elegant Faceted Gems. All of the photos above won't show these gorgeous gems, but hopefully the photo below will. I must go and add the gems now and take another photo. 😔

Darling Donkeys and Oh So Ombre Stampin Up card, Andrea Sargent, Independent Stampin' Up! Demonstrator, Valley Inspirations, Adelaide foothills, Australia

I hope you are enjoying this month's Social Stamping Blog Hop which has focused on the "Oh 2020" theme. If you started at the beginning with our amazing Social Stamping Host, Kelly Kent, then the next talented crafter is Narelle Simm at Eleventh Hour Stamping. Click on Narelle's name to be taken to her blog or click on the "next" graphic. 

To to see the full list of participants click on this next link to be taken to Kelly Kent's Host Blog Post at My Papercraft Journey where you will find all the individual links that can take you to each person's blog.


I hope to see you again next year. I'm not sure whether the Social Stamping Blog Host will continue - keep an eye on Kelly Kent's blog.

Do look after yourself and your loved ones. I hope the New Year is a better year for us all with many good things in store. Stay well, stay safe and be kind to yourself and others in these strange times. 

Andrea 😘

Wednesday, 16 December 2020

Art with Heart Colour Creations Showcase - #29 Mossy Meadow

Mossy Meadow with Dove of Hope

Hello. Welcome to Valley Inspirations with Andrea and the 29th 2020 Colour Creations Showcase by members of the Art with Heart Team - our last Showcase for the year.


This week we are focussing on a deep green called Mossy Meadow. It is classified as a Neutral as given it's depth and richness it is a colour that goes with so many other colours. Mossy Meadows can be found in Stampin' Up!s card-stock, both A4 & 12"x12"Classic Stampin' inks (ink pads, re-inkers); Stampin' Write Markers; Stampin' Blends; numerous Designer Series Papers, including World of Good DSP; Memories & More Cards pack and ribbons/trim and the gorgeous Joy of Sharing all inclusive card kit. Mossy Meadow is a great colour!


I have a number of cards to share with you tonight. Two using the Dove of Hope bundle and two extras direct from the Joy of Sharing card kit. This is an all inclusive kit.

Mossy Meadow Dove of Hope and Wrapped in Christmas Stampin Up card with Brightly Gleaming DSP, Andrea Sargent, Independent Stampin' Up! Demonstrator, Valley Inspirations, Adelaide foothills, South Australia

CARD 1: The format for my first card was inspired by Emma Goddard, a Independent Stampin' Up! Demonstrator from the United Kingdom and she has been part of the Artisan for the last 3 years. As always, thanks for the inspiration Emma.

Mossy Meadow Dove of Hope and Wrapped in Christmas Stampin Up card, Andrea Sargent, Independent Stampin' Up! Demonstrator, Valley Inspirations, Adelaide foothills, South Australia

I started by painting Mossy Meadow stripes on a piece of Shimmery White card-stock using the mid-sized Water Painter. While I covered the card front with stripes, those at the top were fairly light. A little Champagne Mist Shimmer Paint was splattered over the card front. Once dry, I tied a piece of Vanilla ribbon from the Forever Greenery Trim Combo pack around the card front ending with a relaxed large bow.

Mossy Meadow Dove of Hope and Wrapped in Christmas Stampin Up card, Andrea Sargent, Independent Stampin' Up! Demonstrator, Valley Inspirations, Adelaide foothills, South Australia

Two circles were die cut using the Stitched Shapes dies, one from Whisper White card-stock and the other from Mossy Meadow card-stock. After the 2 circles were adhered together, they were popped up on Dimensionals

Mossy Meadow Dove of Hope and Wrapped in Christmas Stampin Up card, Andrea Sargent, Independent Stampin' Up! Demonstrator, Valley Inspirations, Adelaide foothills, South Australia

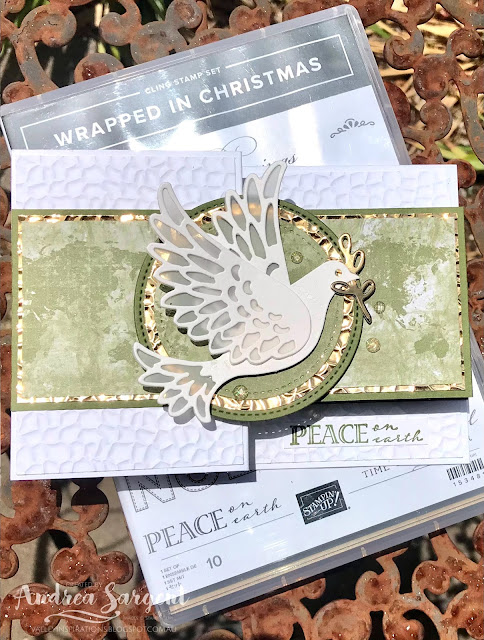
At this point I faffed around quite a bit, including die cutting and colouring trees cut using the In the Pines dies. I tried a range of colour combinations for water-colouring the trees. Nothing really worked. I then thought of using one of the doves from the Dove of Hope bundle, trying the die cut dove first. That dove was too big for placement on the circles. I stamped the mid-sized dove on Whisper White card-stock using Crumb Cake Classic Stampin' ink and then die cut it out using the coordinating Detailed Dove dies. The size was right. A little Champagne Mist Shimmer Paint was added to the wings and the dove was adhered at the body directly to the circles. Looking back I think it would have been good to add some subtle colouring on the dove - perhaps next time.

Mossy Meadow Dove of Hope and Wrapped in Christmas Stampin Up card, Andrea Sargent, Independent Stampin' Up! Demonstrator, Valley Inspirations, Adelaide foothills, South Australia

"Peace on earth" from the Wrapped in Christmas stamp set was stamped on Whisper White card-stock with Mossy Meadow Classic Stampin' ink. The sentiment was trimmed down and popped in place with Dimensionals. A Mossy Meadow leaf sprig was die cut using the small sprig die from the Detailed Dove dies and it was adhered underneath the dove's beak. 

The card front was adhered directly to a Mossy Meadow card-stock base. A number of Red Rhinestone Basic Jewels were added to finish the card.

Mossy Meadow Dove of Hope and Wrapped in Christmas Stampin Up card, Andrea Sargent, Independent Stampin' Up! Demonstrator, Valley Inspirations, Adelaide foothills, South Australia

The card inner was also painted with a number of Mossy Meadow stripes and another sentiment from the Wrapped In Christmas stamp set was added using Mossy Meadow Classic Stampin' ink. The smaller dove was stamped on a small piece of Whisper White card-stock and fussy cut out. A C6 Whisper White envelope was stamped with the larger dove in Crumb Cake Classic Stampin' ink.

Mossy Meadow Dove of Hope and Wrapped in Christmas Stampin Up card, Andrea Sargent, Independent Stampin' Up! Demonstrator, Valley Inspirations, Adelaide foothills, South Australia

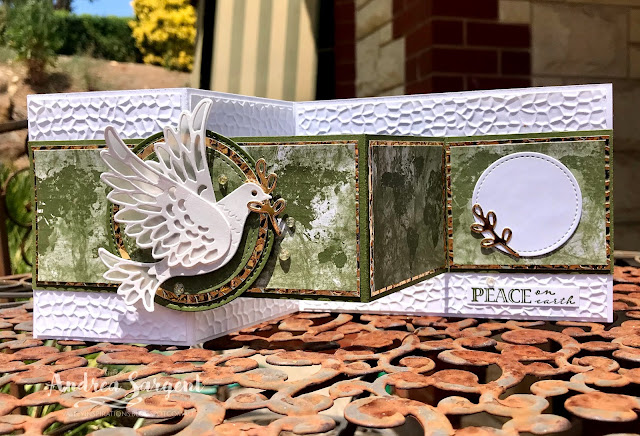
CARD 2: As I had die cut all the pieces for a Whisper White dove, I decided to use them for my second card. In thinking about the design for this 2nd card I decided to use a non-Christmas Designer Series Paper even though I was planning to create a Christmas card. (As I started to plan and write Christmas cards I realised that I didn't have enough so this week I made the most of prepping for tonight's blog hop to create another two Chrissy cards.) This second card is a Double Z-fold card.

Mossy Meadow Dove of Hope and Wrapped in Christmas with Christmas Gleaming DSP Stampin Up card, Andrea Sargent, Independent Stampin' Up! Demonstrator, Valley Inspirations, Adelaide foothills, South Australia

The World of Good Speciality Designer Series Paper included two designs using Mossy Meadow, one of which had a watercolour effect of repeated world maps. I love the soft relaxed effect of this design. I cut a stripe of DSP centring the world continents across the 12 x 12" sheet. From there I cut a Brass Foil strip a little wider than the DSP so the brass mount would show. I also cut some Mossy Meadow card-stock a little wider again to enable the Brass Foil and the DSP to be mounted onto the Mossy Meadow card-stock.

Mossy Meadow Dove of Hope and Wrapped in Christmas with Christmas Gleaming DSP Stampin Up card, Andrea Sargent, Independent Stampin' Up! Demonstrator, Valley Inspirations, Adelaide foothills, South Australia

The card base is half an A4 sheet of Thick Whisper White card-stock, cut lengthwise. The card base was scored in half at the mid-point and the front section was scored so that it could be folded back in half again. The Mossy Meadow piece was scored similarly. Both were pieces of card-stock were folded and burnished at the scoreline with a Bone Folder. The Mossy Meadow piece was turned around so the Z-fold is in reverse to the card base.

Mossy Meadow Dove of Hope and Wrapped in Christmas with Christmas Gleaming DSP Stampin Up card, Andrea Sargent, Independent Stampin' Up! Demonstrator, Valley Inspirations, Adelaide foothills, South Australia

The largest circle from the Stitched Shapes dies was used to cut a Mossy Meadow card-stock circle. The next size stitched circle was used to die cut a circle out of the DSP. A circle from the Layered Circles dies was used to cut a Brass Foil circle. 
The Foil circle was dry embossed using the Hammered Metal 3D Embossing folder.The 3 circles were adhered directly together.

Mossy Meadow Dove of Hope and Wrapped in Christmas with Christmas Gleaming DSP Stampin Up card, Andrea Sargent, Independent Stampin' Up! Demonstrator, Valley Inspirations, Adelaide foothills, South Australia

The Whisper White card-stock and Vellum pieces were adhered together to form the dove. The body of the dove was popped up on Dimensionals. The small leaf spray die was used to cut a Brass Metallic spray of leaves, which was then adhered under the dove's beak.

Mossy Meadow Dove of Hope and Wrapped in Christmas with Christmas Gleaming DSP Stampin Up card, Andrea Sargent, Independent Stampin' Up! Demonstrator, Valley Inspirations, Adelaide foothills, South Australia

Pieces of Whisper White card-stock were cut to fit on each of the three sections of the card base. Each was embossed with the Hammered Metal 3D Embossing folder and then were adhered directly to the card-base. Similarly, 3 pieces of Brass Foil were cut from the Brass Foil strip to fit on the 3 sections of the Mossy Meadow scored and burnished strip. The 3 pieces of Brass Foil also were embossed with the Hammered Metal 3D Embossing folder. The strip of DSP was also cut into 3 to fit each section of the Mossy Meadows strip. The embossed pieces of Brass Foil were adhered directly to the Mossy Meadows strip and then the pieces of DSP were adhered to the Brass Foil.

Mossy Meadow Dove of Hope and Wrapped in Christmas with Christmas Gleaming DSP Stampin Up card, Andrea Sargent, Independent Stampin' Up! Demonstrator, Valley Inspirations, Adelaide foothills, South Australia

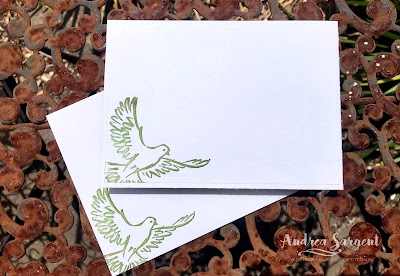
A Whisper White C6 envelope and a piece of Whisper white card-stock were stamped with the mid-sized dove using Mossy Meadows Classic Stampin' ink. The piece of card-stock was adhered to the back of the card in readiness to write a longer greeting.

Mossy Meadow Dove of Hope and Wrapped in Christmas with Christmas Gleaming DSP Stampin Up card, Andrea Sargent, Independent Stampin' Up! Demonstrator, Valley Inspirations, Adelaide foothills, South Australia

The two Z-fold pieces were adhered together, being careful to only add Multipurpose Liquid Glue to half of the longer section of the top Z-fold. The card was folded and glue was added to the lower half section of the Mossy Meadow strip and it was adhered to the end half of the lower part of the card. The dove & layered circles piece was centred onto the top section of the Mossy Meadows strip. A number of Wonderful Gems were added as the final touch. They are gorgeous gems. 

Mossy Meadow Dove of Hope and Wrapped in Christmas with Christmas Gleaming DSP Stampin Up card, Andrea Sargent, Independent Stampin' Up! Demonstrator, Valley Inspirations, Adelaide foothills, South Australia

CARDS 3 & 4: The Joy of Christmas All Inclusive Card Kit is a lovely kit from the August-December Mini Catalogue and the good news is that it is currently discounted. It's only available till the end of December or until sold out. This kit is wonderful if you send a family photo at Christmas. I used the kit as part of a class. I didn't have a suitable photo so made up a couple of cards as shown in the kit. The class ladies loved them, commenting that the cards were really elegant. 

Stampin' Up All Inclusive Kit, Andrea Sargent, Independent Stampin' Up! Demonstrator, Valley Inspirations, Adelaide foothills, South Australia

The cards have a Mossy Meadow base. The pine cones and the poinsettias come in various sizes so there are more than enough to create whatever style card you choose - whether portrait, landscape or with or without a photo. Sorry, I ran out of time to create my own designs with the kit. 


That's it for me for this blog and for the year.

Andrea Sargent, Valley Inspirations, Independent Stampin' Up! Demonstrator, Valley Inspirations, Adelaide foothills, South Australia

Catherine Proctor is our amazing host of the Art with Heart Colour Creations Showcase. If you haven't finished visiting all of the team's colour creations, you can visit/revisit Catherine's page at What Cathy Made, where she hosts all the links to the other Showcase participants. I'm looking forward to checking out everyone's Mossy Meadow creations. It is always inspiring to see the amazing projects created by my colleagues and their application of the colour. Cathy thank you so much for coordinating this Showcase this year. I have really enjoyed the challenge of focussing on each colour and working up a design that will show it off.

Looking forward to seeing you again in the new year when members of the team will share projects that hero Night of Navy (I love this colour), as we continue creating through the Stampin' Up! colour range. Our first Showcase for 2021 will be in the evening of Wednesday 6th January.

I hope you have an amazing Christmas and a wonderful New Year. Here's hoping that 2021 is a year were we get on top of COVID-19 and life gets back on track. Do look after yourself and your loved ones. Stay well, stay safe and be kind to yourself and others in these strange times. 

Andrea 💕🐾


Thursday, 10 December 2020

Art With Heart Creative Showcase - December 2020

December's Creative Showcase with Dragonfly Garden & Seaside View

Hi. Welcome to Valley Inspirations with Andrea and the December Art with Heart Creative Showcase - our last monthly blog hop for 2020.

The theme this month is "Summer", which is a theme with so much potential. For me, summer makes me think of happy & bright colours, of flowers and flying insects like butterflies and dragonflies. My first card was inspired by these elements. Summer also makes me think of relaxing and enjoying a meal or a cuppa outside with friends in view of beautiful scenery. My second card shows a seaside view, where I would love to be sitting, sipping a drink and looking out at the little sailing boat in the distance.

Misty Moonlight Dragonfly Garden and Seaside View Stampin Up card, Andrea Sargent, Independent Stampin' Up! Demonstrator, Valley Inspirations, Adelaide foothills, Australia

I created the first card with yesterday's Art with Heart Colour Creations Showcase in mind, where we were focussing on a gorgeous In Colour, Misty Moonlight. However, I then realised that with unexpected demands on my time, I didn't think I would be able to create another card for this Monthly Creative Showcase, so I saved the dragonfly card for this Blog Hop. Then ... I woke up this morning with a card design buzzing around in my head. I had to give it a go ... and the second card was created. As you can see the colour schemes are similar and the layouts similar, but different.

Misty Moonlight Dragonfly Garden Stampin Up card, Andrea Sargent, Independent Stampin' Up! Demonstrator, Valley Inspirations, Adelaide foothills, Australia

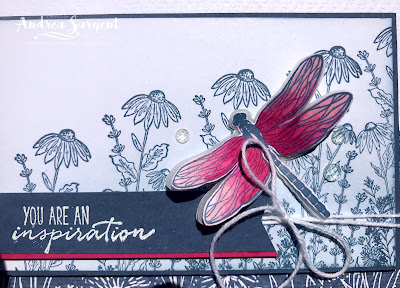
CARD 1: A piece of one of the Misty Moonlight designs from the Dandy Garden 6"x6" Designer Series Paper was adhered to the lower half of the Whisper White card-stock card front, prior to the card front being dry embossed with the Tasteful Textile 3D embossing folder. I love the effect of this subtle texture on both the card-stock and DSP. A piece of Misty Moonlight 2020 - 2022 In Colour ribbon was attached at the centre, covering the edge of the DSP. This card front was then adhered directly to the Misty Moonlight card-stock card base.

Misty Moonlight Dragonfly Garden Stampin Up card, Andrea Sargent, Independent Stampin' Up! Demonstrator, Valley Inspirations, Adelaide foothills, Australia

The floral stamp from the Dragonfly Garden stamp set was repeatedly stamped across a piece of Whisper White card-stock gradually increasing the height of the top flower. Using one of the new Blending Brushes, Seaside Spray Classic Stampin' ink was lightly applied at the base  over the flowers, softening out to no colour near the top. The Blending Brush was a delight to use. 
This stamped piece was mounted onto a piece of Misty Moonlight card-stock leaving a thin boarder. A piece of White twine from the Snail Mail Combo pack was wrapped twice around the panel and tied in a bow. This panel was centred on the card front and attached with  Dimensionals

Misty Moonlight Dragonfly Garden Stampin Up card, Andrea Sargent, Independent Stampin' Up! Demonstrator, Valley Inspirations, Adelaide foothills, Australia

A dragonfly from the stamp set was stamped in Misty Moonlight ink on a scrap piece of Whisper White card-stock. The dragonfly wings were coloured with Light & Dark Melon Mambo Blends and the Colour Lifter used to soften the colour out on the wing tips. The dragonfly was cut out using the Dragonflies punch and another 2 dragonflies were punched out of Vellum. The coloured and vellum dragonflies were layered on top of each other, and adhered just at the upper body to enable fluttering dimension to the wings.

Misty Moonlight Dragonfly Garden Stampin Up card, Andrea Sargent, Independent Stampin' Up! Demonstrator, Valley Inspirations, Adelaide foothills, Australia

A sentiment from the Dragonfly Garden stamp set was stamped in Versamark onto Misty Moonlight card-stock and heat embossed using White Stampin' Emboss powder. The sentiment strip was given a flag end using the Banners Pick a Punch. I love this punch as I find it hard to get an even flag end without it. A strip of Melon Mambo card-stock was added under the lower edge of the sentiment strip. This strip was popped up on Dimensionals over the twine. The dragonfly was adhered in place and a few clear Elegant Faceted Gems were added as a finishing touch.

Misty Moonlight Dragonfly Garden Stampin Up card, Andrea Sargent, Independent Stampin' Up! Demonstrator, Valley Inspirations, Adelaide foothills, Australia

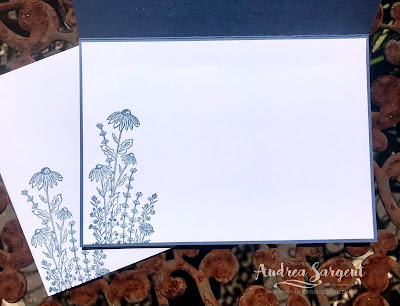
The floral spray from the Dragonfly Garden stamp set also was stamped in Misty Moonlight Classic Stampin' ink on the Whisper White card inner to bring an aspect of the card front to the centre. The same flowers were stamped on the C6 Whisper White envelope.

Misty Moonlight Dragonfly Garden Stampin Up card, Andrea Sargent, Independent Stampin' Up! Demonstrator, Valley Inspirations, Adelaide foothills, Australia

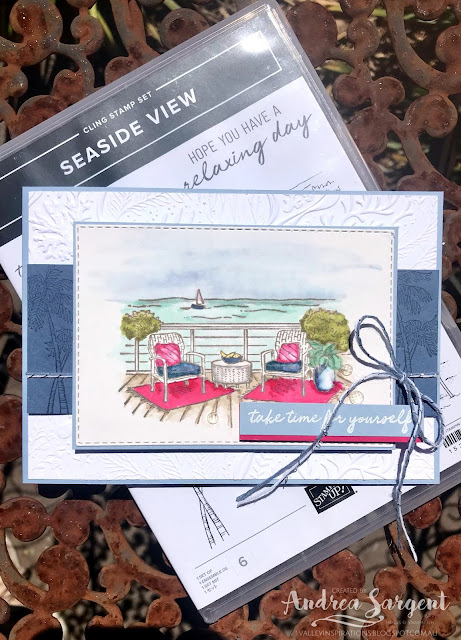
CARD 2: As mentioned, I woke this morning with a card design buzzing around in my head. I had to give it a go, although the card did evolve along the creative process. I love Misty Moonlight with a pop of Melon Mambo as a colour scheme and so kept a similar colour combination, though added some neutrals as required by the stamped scene. I had thought of inking the stamp with Stampin' Write Markers but found my eyes were missing details so decided to colour the image with Stampin' Blends instead.

Misty Moonlight Seaside View Stampin Up card, Andrea Sargent, Independent Stampin' Up! Demonstrator, Valley Inspirations, Adelaide foothills, Australia

The larger scene from the Seaside View stamp set was stamped in Gray Granite Classic Stampin' ink on Shimmery White card-stock. The scene was coloured using Light & Dark Stampin' Blends, specifically Misty Moonlight, Melon Mambo, Crumb Cake, Pool Party, Seaside Spray, Daffodil Delight, Just Jade, Old Olive, Gray Granite 
and of course the Colour Lifter. The scene was trimmed down using one of the Stitched Rectangle dies. The panel was mounted on Seaside Spray card-stock, leaving a tiny boarder.

Misty Moonlight Seaside View Stampin Up card, Andrea Sargent, Independent Stampin' Up! Demonstrator, Valley Inspirations, Adelaide foothills, Australia

A piece of Whisper White card-stock was dry embossed with the delightful Seabed 3D embossing folder and adhered directly to the Seaside Spray card-stock card base. A strip of Misty Moonlight card-stock was stamped with palm trees in Misty Moonlight Classic Stampin' ink. Misty Moonlight twine from the Flowers for Every Season Combo pack was tied around this strip of stamped card-stock finishing with a bow. It was adhered with Dimensionals to the card front.

Misty Moonlight Seaside View Stampin Up card, Andrea Sargent, Independent Stampin' Up! Demonstrator, Valley Inspirations, Adelaide foothills, Australia

The coloured panel was centralised and popped up on Dimensionals. A sentiment from the same stamp set was stamped in Versamark on Seaside Spray card-stock and heat embossed with White Emboss powder. A strip of Melon Mambo card-stock was added underneath the sentiment strip with a thin strip of Melon Mambo showing underneath the sentiment. The sentiment strip was popped up with Dimensionals. As with card 1, 
a few clear Elegant Faceted Gems were added as a finishing touch. These gems are soooo gorgeous.

Misty Moonlight Seaside View Stampin Up card, Andrea Sargent, Independent Stampin' Up! Demonstrator, Valley Inspirations, Adelaide foothills, Australia

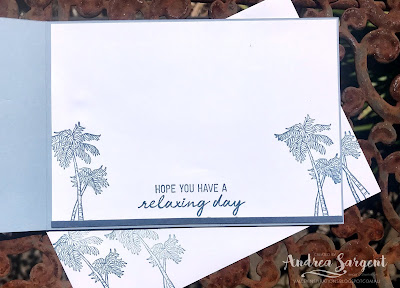
Palm trees and a sentiment from the Seaside View stamp set were stamped in Misty Moonlight Classic Stampin' ink on the Whisper White card inner. A thin strip of Misty Moonlight card-stock was adhered near the bottom of the card inner. Palm trees were also stamped on the C6 Whisper White envelope.

Misty Moonlight Seaside View Stampin Up card, Andrea Sargent, Independent Stampin' Up! Demonstrator, Valley Inspirations, Adelaide foothills, Australia

Thank you for visiting the Valley Inspirations blog. 
I really appreciate you spending time with me on my blog as part of the Art with Heart "Summer" themed projects blog hop. I hope you have been inspired in some way. I have really enjoyed creating these cards to share with you.

Misty Moonlight Dragonfly Garden and Seaside View Stampin Up card, Andrea Sargent, Independent Stampin' Up! Demonstrator, Valley Inspirations, Adelaide foothills, Australia

I am so blessed to be apart of such a talented team. Knowing each of my colleagues in this Creative Showcase, I am sure that they have amazing "Summer" projects to share with you. Don't miss checking out each of their blogs. Rachel is our brilliant host of the Art with Heart Monthly Creative Showcase, so if you haven't finished visiting all of the team's amazing creations, you can visit/revisit Rachel's page at Handstamped by Rachel, where she hosts all the links to the other Showcase participants. I'm certainly looking forward to checking out everyone's creations and always find inspiration.


I hope you join us again next year when our first Showcase will be featuring new products from the new January - June Mini Catalogue. There are so many gorgeous products in this catalogue. 


Please don't hesitate to contact me if you are in Australia and would like a copy of the  Stampin' Up! 2020-2021 Annual Catalogue or the January - June Mini Catalogue; or if you have any queries that I could help with. Also, if you are interested in buying Stampin' Up! products, I would delighted to serve you.

Take care of yourself and your loved ones. I hope you stay safe, stay heathy and stay sane.

Have a wonderful Christmas and New Year.

Andrea 😘

Wednesday, 9 December 2020

Art with Heart Colour Creations Showcase - #28 Misty Moonlight

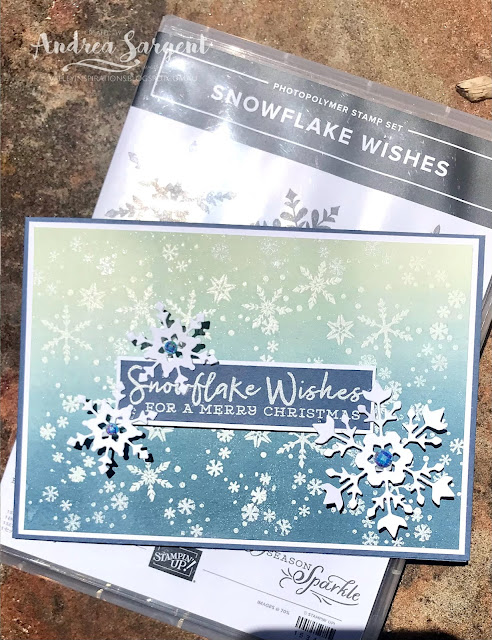
Misty Moonlight with Snowflake Wishes

Hello. Welcome to Valley Inspirations with Andrea and the 28th 2020 Colour Creations Showcase by members of the Art with Heart Team - our second to last one for the year.


This week we are focussing on a gorgeous blue called Misty Moonlight. It is one of the 2020-2021 In Colours and is a softer muted blue. Misty Moonlight can be found in Stampin' Up!s card-stock, both A4 & 12"x12"Classic Stampin' inks (ink pads, re-inkers); Stampin' Write Markers; Stampin' Blends; numerous Designer Series Papers, including Flowers for Every Season DSP, Memories & More Cards pack, Cards & Envelopes packs, the Boho Indigo Product Medley, In Colour ribbon & Enamel Dots + much more. It is a delightful colour!


I had a couple of design ideas but as I was driving home after an appointment a couple of days ago I saw a banner out of the corner of my eye that inspired the card for tonight's Colour Creations Showcase. Having said that, if you were to look at the card near the banner, you may not recognise the inspiration I saw as the design evolved further during the development of the card. I also created a second card for this Showcase but have decided to use it for tomorrow's blog hop as time is running out and I suspect that I won't have an opportunity to work up the 2 designs that are floating in my brain. Do check back tomorrow to see a different Misty Moonlight inspired card.

Misty Moonlight Snowflake Wishes Stampin' Up! card, Andrea Sargent, Independent Stampin' Up! Demonstrator, Valley Inspirations, Adelaide foothills, Australia

I still need some more Christmas cards - how about you? This card is simple and I plan to create a few more using differing colour combinations.


First, a piece of Shimmery White card-stock was heat embossed, stamping the two small snowflake flurries from the Snowflake Wishes stamp set with Versamark and embossed with White Stampin' Emboss powder. 


Using Sponge Brayers, Misty Moonlight, Seaside Spray and Soft Sea Foam Classic Stampin' ink was applied with each colour overlapping the adjacent colour. After adding the colour, there were some spaces without snowflakes so I stamped and heat embossed some of the small flurries over the brayered card front. These snowflakes aren't as crisp and white as those applied before adding the colour. It was a good experiment to see the difference.


The card front was mounted on Whisper White card-stock leaving a thin boarder and then mounted onto the Misty Moonlight card base. A sentiment from the same stamp set was white heat embossed on Misty Moonlight card-stock and then mounted with a thin boarder of Whisper White card-stock. The sentiment was popped up on Dimensionals in the centre of the card front. Snowflakes from the So Many Snowflake dies were cut from Whisper White card-stock and 3 snowflakes were added to the card with some gorgeous Blue Adhesive-backed Gems in the centre of the white die cut snowflakes. I was delighted to see that the Snowflake Wishes stamp set, So Many Snowflakes dies and the Blue Adhesive Backed Gems are all carrying over. They all are a joy to create with and provide so much inspiration.


I was a bit carried away with the snowflake flurries stamped in Seaside Spray and Misty Moonlight Classic Stampin' ink on the Whisper White card inner - but that won't stop me writing my personalised greetings. The snow flurries were also stamped on the flap of a C6 Whisper White envelope.


Do come back tomorrow to see my other Misty Moonlight summery creation.

Catherine Proctor is our wonderful host of the Art with Heart Colour Creations Showcase. If you haven't finished visiting all of the team's colour creations, you can visit/revisit Catherine's page at What Cathy Made, where she hosts all the links to the other Showcase participants. Thank you so much Cathy for coordinating this Colour Creations Showcase this year - you are a Champion. I'm looking forward to checking out everyone's Misty Moonlight creations. It is always inspiring to see the amazing projects created by my colleagues.

I hope to see you again next week when members of the team will share projects that hero Mossy Meadow. This is another fantastic colour.

I hope all your Christmas preparations are going well. Do look after yourself and your loved ones. Stay well, stay safe and be kind to yourself and others in these strange times. 

Andrea 💕🐾


AWH Colour Creations Blog Hop #30 Highland Heather

Highland Heather with One of a Kind & Frozen Edges Hello. Welcome to  Valley Inspirations with Andrea  and the  Art with Heart Colour Cr...