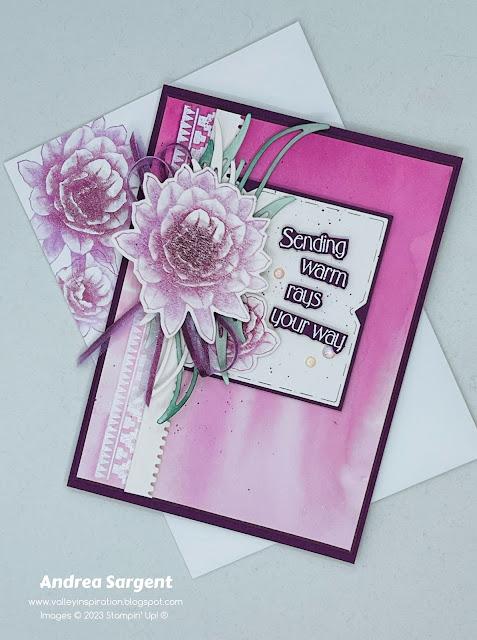
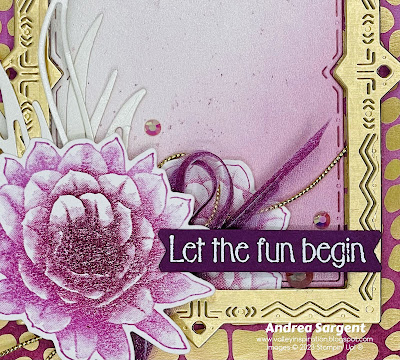
Rich Razzleberry card-stock, ink and a Stampin' Write Marker have been used in both projects plus a range of non-Rich Razzleberry bits and pieces. Here are my cards:
While
Rich Razzleberry is a beautiful colour, it is not one of my regular go to colours, so I needed to ponder a little to decide on design elements. The gorgeous
Desert Details bundle recently made its way to me and I was excited to use this bundle. Also, having Googled desert flowers, I was delighted to see some desert roses with deep purple centres. Where to from there …
CARD 1:
As I was thinking of design elements for my Rich Razzelberry project I saw the current challenge for Just Add Ink - a delightful sketch, so I decided to create a card for the JAI #642 Challenge. Here is the sketch:
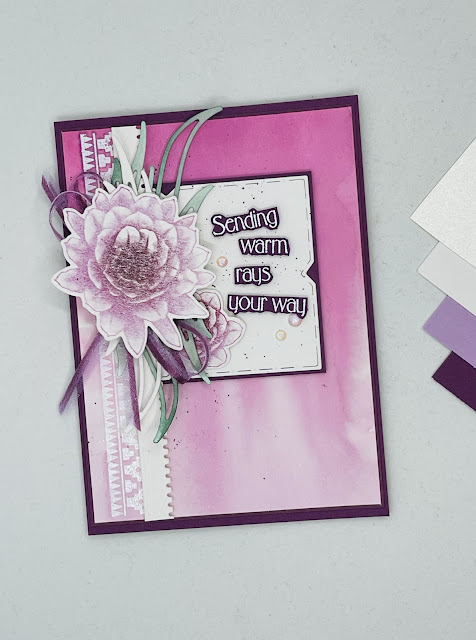
This is the project I created for the JAI #642 Challenge, incorporating Rich Razzelberry and some water-colour resist. To check out the other projects just click on the graphic above. Later edit: So delighted - I just noticed that I received an Honourable Mention for this project.
One of the geometric stamps from the
Desert Details stamp set was stamped down one side of a panel of
Shimmery White card-stock in
Versamark ink and then it was heat embossed with
White Emboss Powder and a
Heat Tool. A wet on wet water-colour wash was applied using
Rich Razzelberry and
Fresh Freesia Classic Stampin’ inks, with the darker
Rich Razzelberry ink running into
Fresh Freesia at the base. To maintain the off-white base tone of
Shimmery White the lovely label die cut a label from
Shimmery White card-stock. This was mounted on a slightly larger piece of
Rich Razzelberry card-stock and splattered with a
Rich Razzelberry Stampin’ Write Marker. The mounted label was then cut to size so the left edge would align with the heat embossed stripe. It was positioned with
Dimensionals.
A die cut strip of Pearlescent Paper was positioned over the label and aligned along the embossed stripe. The two flowers from the Desert Details stamp set were placed in a Stamparatus and inked with Fresh Freesia ink. Before being stamped, Rich Razzelberry ink was applied with the Mini Blending Brush. It was the perfect size. More Rich Razzelberry ink was added and stamped a couple of extra times to ensure the flower centres had depth of colour. The flowers were die cut with coordinating dies from the Desert Details dies. Some spikey “leaves” were also cut from Shimmery White card-stock, with two sets of leaves water-coloured with Evening Evergreen ink.
Flowers and leaves were all arranged, using a variety of
Dimensionals,
Multipurpose Liquid Glue and
Glue Dots. A piece of
Fresh Freesia Open Weave ribbon was cut in half lengthwise and the edge stripe of the ribbon was coloured with a
Rich Razzleberry Marker. This ribbon was tied in a bow and tucked under the large desert flower with a
Glue Dot. A sentiment was white heat embossed onto
Rich Razzelberry card-stock and fussy cut. A few
Iridescent Basic Rhinestone Jewels were the final touch.
A
Basic White card-stock panel had an off-cut strip of the water-coloured front panel, together with a thin strip of
Rich Razzelberry card-stock adhered near the bottom. A remaining small desert flower and some leaves were also added. A
Basic White C6 Envelope was stamped with the flowers. They were coloured the same way as described above.
As I was designing for this Blog, a number of ideas came to mind. Not wanting the inspiration to go to waste, this second card was created.
Rich Razzelberry goes beautifully with Gold, so a piece of the
Like an Animal Speciality Designer Series Paper was coloured using Stampin’ Up!s beautiful
Blending Brushes in
Rich Razzleberry and
Fresh Freesia inks. (I thought the snake print fitted well with the desert theme.) Once coloured it was adhered directly to a
Fresh Freesia card base (to differ from the
Rich Razzelberry card base of the first card). Dies from the
Desert Details dies were used to create a
Brushed Gold frame and the smaller die cut the inner section from
Pearlescent Paper. “Leaves” were also die cut from
Pearlescent Paper.
The desert flowers were stamped as described above and die cut with coordinating dies. The
Brushed Gold die cut frame was positioned using
Adhesive Strips - they were perfect for this task. The
Pearlescent inner had some
Rich Razzelberry and Fresh Freesia inks lightly applied with Blending Brushes in two corners and splatter was added using a
Rich Razzelberry Marker. The flowers and leaves were positioned with either
Dimensionals or Multipurpose Liquid Glue.
Bows tied from Rich Razzleberry coloured Fresh Freesia Open Weave Ribbon and Gold Elegant Trim were tucked under the large desert flower with Glue Dots. A sentiment from the Desert Details Stamp set was white heat embossed on Rich Razzelberry card-stock. The sentiment ends were die cut using the frame die so the ends coordinated with the die cut frame. Iridescent Pastel Gems added the final touch. The pinky tone adapted to the colour surrounding it. These gems are so beautiful.
A
Basic White card-stock panel had some off-cut strips of the blended
Like an Animal SDSP front panel adhered near top and bottom. A couple of remaining small desert flowers and leaves were also added with a
Rich Razzleberry stamped and fussy cut sentiment. A
Basic White C6 Envelope was stamped with the flowers on the envelope front and back flap.
Thank you so much for dropping by. I hope you are enjoying the Blog Hop and finding inspiration as you ”hop” along.


