Art with Heart Wow Tutorials

Wednesday, 6 November 2024

AWH Colour Creations Blog Hop #28 Granny Apple Green

Granny Apple Green with Sophisticated Sled

Hello. Welcome to Valley Inspirations with Andrea and the Art with Heart Colour Creations Blog Hop. We are working though the Stampin' Up! colours in alphabetical order, focussing on one colour each week.


This week’s Blog Hop is focussing on a delightful yellow-green colour called Granny Apple Green. It is the colour of its name sake apple.  Granny Apple Green is part of the Brights Colour Family and I love it - now. Must admit, I used to think it was a really bright green until were had Lemon Lime Twist and Parakeet Party. Now I recognise it as a wonderful green that is seen in nature - not only granny apples, but so many different leaves and much more. I love Granny Apple Green with yellows & blues, with real red and Pool Party and many more.    


Granny Apple Green is produced in Stampin' Up!'s card-stock, both A4 & 12"x12"Classic Stampin' inks (ink pads, re-inkers & ink spots); Stampin' Write Marker; Stampin’ Blends Combo; Watercolor Pencils, Soft Pastels, Brights Designer Series Paper as well as many other products. 


These projects have incorporated Granny Apple Green as Classic Stampin' ink, card-stock, Stampin' Write Marker and Stampin’ Blends Combo.


I had planned a different card to showcase Granny Apple Green but not long before I started to create I saw a card by Jay Sorario, a UK Stampin’ Up! Demonstrator where he used the base die from the Sophisticated Sled dies used as a window - so I had to give it a go. 


The sled die was cut from Gold Foil as well as a number cut from Thick Basic White cardstock. The white die cuts were adhered together with a piece of … Vellum adhered on top. It was trimmed to the outside of the adhered die cuts and the gold foil piece was layered on top. A piece of … Designer Series Paper was laid behind and it too was trimmed with Snips. This was adhered to a panel of Basic White card-stock that had been embossed with the Exposed Brick 3D embossing Folder.


The wreath, other floral arrangement and the bird were gold heat embossed onto Basic White card-stock. The images were coloured with Stampin’ Blends, ie Granny Apple Green, Real Red, Pool Party Combos and the Colour Lifter. The coordinating dies from the Sophisticated Sled dies cut the images. The bow from the other arrangement was fussy cut and then popped up on the wreath with a Mini Dimensional. The wreath was added to the “window” with Mini Dimensionals.


I had decided to create a “Flying Flinch” card, a design that I had first seen Sue Campfield create, a USA Demonstrator. I found my measurements for use with A4 card stock  and cut and scored the base from Thick Basic White. The focal panel was mounted onto a slightly larger piece of Granny Apple Green card stock and then popped up on Dimensionals onto a larger piece of Thick Basic White card stock that had been embossed also with the Exposed Brick 3D Embossing Folder. Two Basic White card stock pieces were trimmed a little smaller than the 2 end panels. Two Granny Apple Green panels were cut to fit in the next inner sections. Two panels of Gold Mercury Vellum Speciality DSP were cut to the same size as the green card-stock pieces. They were adhered together and then embossed with the same Embossing Folder.


Here is a photo taken from above to show the fold.


The focal panel was finished with a sentiment from the Sophisticated Sled stamps that was white heat embossed onto Granny Apple Green card-stock and then trimmed down. It was added with Mini Dimensionals and an unravelled thread of the Gold Twisted Twine was placed underneath. A red cardinal was added to the left side. A few gold Blooming Pearls were scattered near the sentiment.


There is only a small panel for writing a personal message and a message could extend to the panel on the other side (below).


A Basic White C6 Envelope was gold embossed with the longer arrangement and the envelope flap was embossed with the same brick embossing folder.


A coordinating tag was created too. Three individual tags were die cut with the tag die from the Merriest Trees dies. The Granny Apple Green tag was embossed with the Brick EF. The Gold Mercury Vellum was just die cut and a 3rd tag was die cut from Basic White card-stock. A rectangle of Gold Foil was a section that fell out from the die cut Gold Foil “window”. Another arrangement and cardinal were added with Mini Dimensionals. Another sentiment from the same stamp set was gold heat embossed as well. The 3 tags were tied together with a little Iridescent Striped ribbon and some Gold Twisted Thread.


Thank you so much for dropping in on your way around the Granny Apple Green Colour Creations Blog Hop. I so appreciate you spending time with me.


To continue with the blog hop just click the "next" graphic below to be taken to the blog of the lovely Kate MorganI am looking forward to checking out Di’s creation(s). I do love seeing everyone’s' projects - there is always so much inspiration.

I do hope to see you next week when we will be featuring Gray Granite as we continue the weekly 2024-2025 Colour Creations Blog Hop series

Stay well, stay safe and be kind to yourself.

Andrea 💕🐾


If you find a broken link or would like to view the full list of participants go to Catherine Proctor’s blog @ What Cathy Made. Cathy is our brilliant Art With Heart Team Colour Creations Coordinator.  She is a wonderful lady. Check out her delightful creation while you are there.

Living in Australia, don't already have a Stampin' Up! demonstrator and would like your own copy of the Stampin' Up 2024-2025 Annual Catalogue, then let me know and I will be delighted to send it to you.  

Please don't hesitate to make contact with any other queries about these projects or Stampin' Up! 

#colourcreationsbloghop  #stampinup #stampinupaustralia #stampinupsouthpacific #stampinupdemo  #handmadecards  #stampinupdemonstrator  #papercrafting   #sophisticatedsled


Monday, 4 November 2024

AWH Heart of Christmas Blog Hop #14

Christmas with Iconic Imagery

Hello. Welcome to Valley Inspirations with Andrea and the fourteenth Art with Heart Team Heart of Christmas Blog Hop for 2024. We will be hopping every week until the end of November. It is hard to believe there are only a few blog hops remaining for this year. 


We all love sharing Christmas creativity with you and hope that you will be inspired in your preparations for Christmas. This week I am using an On-line Exclusive bundle that was launched months ago. When I first saw the Iconic Imagery bundle I envisaged using these smaller images to create wreaths with either stamping in the round or placing the die cut images in a circle. This week I have focussed on using the little tree images. There are two tree images, one being a line image and other a filled in stamp. They are used together as a 2 step process to create a little tree.


As you can see, the cards are similar and different. The techniques to create the wreaths are different. I will go into that below. 


This first card was also created in response to a challenge Emma Goddard gave to those in her Card and a Cuppa Group. We usually gather via Zoom every Friday night, however, Emma was away on a well earned holiday last Friday so she gave us a layout challenge with 4 potential variations. I CASEd this layout, though moved the wreath into the upper left quadrant.
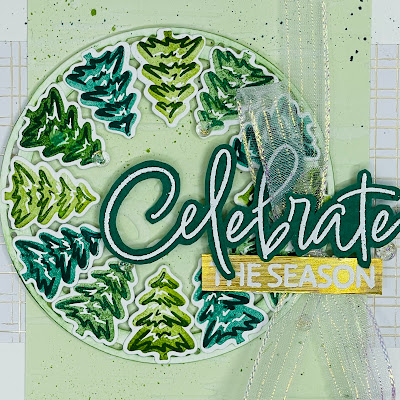
The trees were individually stamped, firstly with the outline stamp and then with the in-fill stamp from the Iconic Imagery stamp set. I found it easier to line up the images by stamping in this order. The outline colours were Pretty Peacock, Shaded Spruce & Garden Green Classic Stampin’ inks, whereas the infill colours were lighter, ie Shaded Spruce, Garden Green and Granny Apple Green inks.


The little trees were individually die cut with the coordinating tree die from the Iconic Imagery dies. A circle was die cut from Soft Sea Foam card-stock using 2 of the Spotlight On Nature dies. They are a wonderful set of circular dies. A panel of Soft Sea Foam card-stock was embossed with the Birchwood 3D Embossing Folder. It was then layered over a Basic White card-base with a wide strip of white & gold Regal Distressed Patterns Speciality Paper.


Some splattering was added to the background using both Shaded Spruce and Granny Apple Green Stampin Write Markers. The tree wreath was built by alternating the 3 different colour trees and adhering them to the die cut ring. Dimensionals were added behind the wreath and it was positioned to the left-hand side over the SDSP strip.


The word “Celebrate” from the Iconic Imagery stamps was white heat embossed onto Shaded Spruce card-stock. The smaller words “The Season” was white heat embossed onto Gold Foil. The sentiment words were fussy cut and then added with Mini Dimensionals.  A bow was tied in the 
Iridescent Striped Trim and it was tucked under the sentiment pieces. Some Iridescent Foil Gems were scattered around the sentiment and wreath. 


A Basic White card inner was stamped with some other words from the same stamp set. An embossed strip of Soft Sea Foam card-stock and a thin strip of the white and gold SDSP were adhered down the RHS and 3 remaining die cut trees were adhered in a row and the bottom of the card. Some Shaded Spruce splattering was added with a Stampin Write Marker.


The last 3 remaining little die cut trees were added to a C6 Basic White envelope and a little Shaded Spruce splattering was added. 

CARD 2


I wanted to use the same stamps to create a tree wreath by stamping in the round. Many years ago I had created a template using a square die and die cutting it 4 times to create 16 distinct points. I used this and my retired Stamparatus to stamp the tree outline in Shaded Spruce ink. The infill stamp was inked with Granny Apple Green ink with touches of Garden Green ink applied with a Blending Brush. You could draw a circle and then manually stamp the trees in place, but knowing me, it would likely be a little uneven. A little Shaded Spruce splattering was added.


The stamped background was mounted to a slightly larger piece of Gold Foil. In turn, the background panel was adhered with Dimensionals, to a panel of white & gold Regal Distressed 
Patterns Speciality Paper that had been mounted on a Shaded Spruce card base.


I usually heat emboss at least 2 of the sentiments in case one goes array. Both sentiment sections were good and so I had a set ready for this 2nd card - just needed to fussy cut them.  This time the Gold Foil sentiment was adhered with Multipurpose Liquid Glue and “Celebration” was added with Mini Dimensionals with the bow tied using 2 half pieces of the gorgeous Iridescent Striped Trim tucked under the sentiment and adhered in place with a couple of Glue Dots. Some of the subtle Pearl embellishments from the Cherry Cobbler and Pearl Self Adhesive Berries were scattered around the sentiment and tree wreath.


A Basic White card inner was stamped with words from the same stamp set.  Trees were 2 stepped stamped in a row at the bottom of the card inner and a Granny Apple Green inked heart near the sentiment (to disguise the fact that “Love” is at a tad of an angle).


I had a 6x6 inch envelope at hand so stamped that with little 2-step stamped trees in the same colours as on the card. Another option would be to create an envelope using DSP. 


Thank you so much for dropping in on your way around the Heart of Christmas Blog Hop.


There is more Christmas creativity, so do continue with the blog hop. Just click on the "next" graphic below to be taken to the blog of a lovely lady, Christine BlainI always look forward to checking out Christine’s creation(s). I do love seeing everyones' projects - there is so much inspiration. I know we are small in number this week, but I am sure there will be wonderful projects to see.

Also, many of us participate in the Colour Creations Blog Hop that goes live every Wednesday night where we showcase one of Stampin’ Up!s colours each week. We would love you to also check in on us for more creative inspiration.

Stay well, stay safe and be kind to yourself.

Andrea 💕🐾


If you find a broken link or would like to view the full list of participants go to Sharon Davern’s blog @ Rhapsody in Craft. Sharon is our amazing Art With Heart Team Heart of Christmas Coordinator.  She is a special lady. Check out her delightful creation while you are there.

If you live in Australia, don't already have a Stampin' Up! demonstrator and would like your own copy of the Stampin' Up 2023-2024 Annual Catalogue and or the September-December 2024 Mini Catalogue, then let me know and I will be delighted to send them to you.  Please don't hesitate to make contact re any queries about these projects or Stampin' Up!. 

#heartofchristmas  #heartofchristmas2024 #stampinup #stampinupaustralia #stampinupsouthpacific #stampinupdemo  #handmadecards #stampinupdemonstrator #papercrafting #artwithheartteam  #papercrafter  #valleyinspirations   #iconicimagery


Sunday, 3 November 2024

CASEing the Catty #494 - CASE A Sketch

CASE A Sketch meets Christmas Friends

Hello, Welcome to Valley Inspirations with Andrea and #494 Challenge with CASEing the Catty.


I am so glad you have dropped by. You may have come from Rochelle Blok, as you take this week’s Blog Hop or perhaps arrived directly here; either way I am delighted you are here. At the end of my blog, I have linked to Peta Stephen so you can continue with the Blog Hop.

At CASEing the Catty we love to use the samples from the Stampin' Up! Catalogues as inspiration and each week we have a different theme to guide our CASEing. To CASE is to "Copy And Selectively Edit" or some say "Copy And Share Everything". This week we are CASE-ing the a sketch from one of the cards on page 36 of the 2024 Stampin' Up! September-December Mini Catalogue.


The projects provided on page 36, display the Splendid Autumn Suite. This week we have chosen to CASE the layout of the Wild Wheat card on the bottom right and specifically a sketch that was based on the layout. Here is the sketch:


I converted the portrait layout to landscape and also changed the rectangle focal section to a flattened circular label, adding images and die cuts to the Basic White flattened label. I am still in Christmas creating mode - so here’s my project:


 I was also inspired by this week’s Global Design Project colour challenge, ie Pool Party, Granny Apple Green and Real Red. It is Challenge #GDP469.

I would not have thought to put these colours together, but I adore the combination. It works brilliantly for Christmas. What do you think???


The polar bear and little trees from the Christmas Friends Stamp set were stamped in Smoky Slate Classic ink onto Basic White card-stock. Isn’t the bear so cute and whimsical. The bear was coloured with Real Red, Granny Apple Green and touches of Smoky Slate Stampin’ Blends combos. The little trees had a little Granny Apple Green Blends added over some of the lines. The images were die cut with coordinating Christmas Friends dies. A circle die from the same set of dies was used to cut the background label.


A panel of Basic White card-stock was lightly coloured with Pool Party Classic ink and a Blending Brush, before being embossed with the Fern 3D Embossing Folder. Some water was splattered over the panel and allowed to dry before a little Granny Apple Green splattering using a Stampin’ Write Marker. This panel was mounted onto a slightly larger piece of Pool Party card-stock before being mounted to a Pool Party card base.


The images were arranged over the circular label that had its bottom section trimmed off. Something else was needed and I had some die cut white pine sprays on my workstation that had been cut with two of the dies from the Golden Greenery dies, so some of them were added to the arrangement. A sentiment from the Reindeer Fun Stamp set was white heat embossed onto Real Red card-stock and die cut with one of the Greetings of the Season dies. This sentiment provides one of the thin strips on the sketch. Some Pool Party PomPom Ribbon was laid underneath the sentiment with some of the ribbon showing beneath the sentiment. This ribbon provides the second thin strip in the sketch.


The final touches - some new Gold Twisted Thread - an Online Exclusive that will be available to all from the 5th November and a scattering of the gorgeous Iridescent Faceted Gems. They are a favourite of mine this year.


The card inner is a panel of Basic White card-stock with a different critter from the Christmas Friends stamp set was stamped in Smoky Slate ink and coloured with Stampin’ Blends. A related sentiment from the same set was also stamped in Smoky Slate ink. I couldn’t resist adding a few Real Red die cut music notes - a real gem in the dies. A C6 Basic White envelope was stamped in the polar bear image.


Thank you so much for dropping in on your way around the CASEing the Catty Blog Hop for Challenge #494.


Don’t miss any of the inspiration from this wonderful Crew. The next blog in the hop is the lovely Peta Stephen. Just click on the "next" graphic below to be taken to her blog. I am sure her project will be a special.


Join In The Challenge
: We would love you to share a project you have created that has been inspired by the new 2024-2025 Stampin' Up! Annual Catalogue. To share, all you need to do for to the CASEing The Catty Challenge Group. If you aren't a member, its easy to request to join and then all you need to do is upload a photo of your project to the main section. You can click on the graphic below to be taken to the group on Facebook. We would love to see your creation.


#ctc494 #stampinup #stampinupaustralia #stampinupsouthpacific #stampinupdemo  #handmadecards #makeacardsendacard #stampinupdemonstrator #papercrafting #papercrafter  #valleyinspirations   #reideerfun  #greetingsoftheseason #caseingthecatty #christmasfriends  #goldengreenery


Wednesday, 30 October 2024

AWH Colour Creations Blog Hop #27 Gorgeous Grape

Gorgeous Grape with Hang An Ornament

Hello. Welcome to Valley Inspirations with Andrea and the Art with Heart Colour Creations Blog Hop. We are working though the Stampin' Up! colours in alphabetical order, focussing on one colour each week.


This week’s Blog Hop is focussing on a strong deep purple called Gorgeous Grape.  Gorgeous Grape is part of the Regals Colour Family and is a rich purple that can harmoniously coordinate with blues and pinks, neutrals etc.  It would be wonderful for berries, grapes, flowers …  and anything needing a strong- purple.


Blueberry Bushel is produced in Stampin' Up!'s card-stock, both A4 & 12"x12"Classic Stampin' inks (ink pads re-inkers); Stampin' Write Marker; Stampin’ Watercolor Pencils Assortment 2;  Soft Pastels; Regals Designer Series Paper as well as a number of other products. 


This project has incorporated Gorgeous Grape as Classic Stampin' ink, card-stock and a Stampin' Write Marker.


I was inspired by a Stampin’ Up! post this month. Stampin’ Up! is focussing this month on colour combinations selected by using the SU Colour Wheel. Demonstrators who attended On Stage earlier this year received a Colour Wheel that incorporates all the current SU colours. It is a wonderful tool when thinking about a colour combo for a project. Starting next month, this colour wheel will be available for general purchase. The post seen recently featured Gorgeous Grape with Azure Afternoon and Highland Heather. I started with these 3 colours, but then decided I wanted a lighter blue background - Balmy Blue and an extra colour for a bauble, ie Pretty in Pink.


The two different baubles in the Hang An Ornament stamp set were stamped in Versamark ink and gold heat embossed onto Fluid 100 Watercolor Paper. The baubles were coloured individually with Gorgeous Grape, Azure Afternoon, Pretty in Pink, Highland Heather and the fifth  bauble was water-coloured with a mix of Azure Afternoon and some Gorgeous Grape Classic inks. The fifth bauble is the bottom one - I love the depth achieved by adding Gorgeous Grape. I water-coloured some other baubles, playing further with Gorgeous Grape by adding more water to get lighter tones. I was fascinated that one of the baubles looked the same colour as the one coloured with Highland Heather.  A little ink blending was added using the same colour as the water colouring around the deeper edges.


The background was blended with Balmy Blue, with some Azure Afternoon making a deeper colour near the top, plus a little Gorgeous Grape near the top edge. Water splattering was added and when the background was dry, further splattering was added with White Craft ink. A little Gorgeous Grape splatter was added with a Stampin’ Write Marker - but it was light and not picked up by the camera. Gold Foil was die cut to create tag toppers and some holly leaves.


Two sentiments from the stamp set were white heat embossed on coordinating card-stock and then die cut with either a scalloped die or the finer rectangular die. Gold Twisted Thread will be generally available early November - it is amazing. As you can see it was tied to each bauble and the Gold Foil topper was adhered at the top. The die cut sentiments were added with Mini Dimensionals. The baubles were arranged and adhered in place at slight angles to give a sense of movement to the dangling baubles. Some Gold Foil holly was added to a couple of baubles with some Pearl Adhesive-backed Berries and a tiny Gold Twisted Thread bow.

The last couple of days have been a bit haywire so I ran out of time to finish the card inner and make a Slimline envelope from Designer Series Paper. A task for another day.


Thank you so much for dropping in on your way around the Gorgeous Grape Colour Creations Blog Hop. I so appreciate it.

To continue with the blog hop just click the "next" graphic below to be taken to the blog of the lovely Di FurnissI am looking forward to checking out Di’s creation(s). I do love seeing everyone’s' projects - there is always so much inspiration.

I do hope to see you next week when we will be featuring Granny Apple Green as we continue the weekly 2024-2025 Colour Creations Blog Hop series

Stay well, stay safe and be kind to yourself.

Andrea 💕🐾


If you find a broken link or would like to view the full list of participants go to Catherine Proctor’s blog @ What Cathy Made. Cathy is our brilliant Art With Heart Team Colour Creations Coordinator.  She is a wonderful lady. Check out her delightful creation while you are there.

Living in Australia, don't already have a Stampin' Up! demonstrator and would like your own copy of the Stampin' Up 2024-2025 Annual Catalogue, then let me know and I will be delighted to send it to you.  

Please don't hesitate to make contact with any other queries about these projects or Stampin' Up! 


#colourcreationsbloghop  #stampinup #stampinupaustralia #stampinupsouthpacific #stampinupdemo  #handmadecards  #stampinupdemonstrator  #papercrafting #handanornament


AWH Colour Creations Blog Hop #30 Highland Heather

Highland Heather with One of a Kind & Frozen Edges Hello. Welcome to  Valley Inspirations with Andrea  and the  Art with Heart Colour Cr...