Art with Heart Wow Tutorials

Showing posts with label Social Stamping. Show all posts

Saturday, 24 April 2021

Social Stamping - #23 Neutrals

Neutrals with Playful Pets & In Good Taste

Hello. Welcome to Valley Inspirations with Andrea and the April 2021 Social Stamping Blog Host. Currently, we are focussing on each of Stampin' Up!'s Colour families.


This month the nominated colours form the Stampin' Up! Neutrals family. The Neutrals range from light to dark and include greys and browns as well as 3 fantastic colours - Night of Navy, Mossy Meadow and Merry Merlot. The latter colours have an amazing ability to coordinate with many other colours, just like neutrals. Apart from the 3 colours just mentioned, Stampin' Up!s' Neutrals include: Sahara Sand, Crumb Cake, Soft Suede and Early Expresso (browny tones); and Smokey Slate, Grey Granite and Basic Grey (grey tones)


In thinking of the Neutrals colour family my mind went to some of Stampin' Up!s Designer Series Papers, particularly the In Good Taste DSP. I so love this DSP and its earthy neutral tones and their use in woodgrains, tiles and textural fabrics. Also, I needed to test out something I had seen and wanted to create for a class - so I decided to combine the two. I have seen some examples of a decorated set of 3 photo frames hanging on a lovely ribbon and needed to work out how to create it so I could demonstrate the process to a craft group of lovely ladies. I don't have good photos to share so I have decorated the frames using the Playful Pets DSP and ... stamp sets.


The frames were built on Thick Basic White card-stock cut in 4 inch squares together with 5 inch woodgrain DSP. The frame backing is Thick Basic White cut at 3 15/16 inches. The 4" Basic White square is centralised on the 5" DSP and the largest square die from the Stitched Shapes dies is used to cut a square hole in the centre. The Basic White and DSP die cut frames are adhered together and after trimming the corners, the excess DSP is folded back onto the back of the frame and adhered in place.


Foam Adhesive Strips are added to 3 sides of the slightly smaller Thick Basic White card-stock squares. The 4th side is for the insertion of photos so no Dimensionals are added on this side. The frame backs are adhered to the frame fronts.


Dogs and a couple of cats were fussy cut from the Playful Pets DSP. (Balloons were stamped in Stazon on Shimmery White card-stock using the Hot Dog stamp set. A dog bowl from the Pampered Pets bundle was stamped in Stazon ink on Shimmery White card-stock and coloured - I had started my blog before finishing the project. As numerous things inhibited me from crafting I haven't been able to get to this stage, but hope to later in the day. When I do I will re-load photos with the finished product. I hope you understand.)


I tried numerous things for the background, finally lightly applying Night of Navy and Mossy Meadow with Blending Brushes onto Shimmery White card-stock. To add some texture some water was flicked over the backgrounds. I was going to emboss the backgrounds or partially emboss them but my morning completely changed so I ended up just slipping them in the frames. The dogs & cats were positioned. They are only adhered to the frames as I feel I need to do something else with the project - but time has disappeared. A couple of bones and a heart trinket from the Playful Pets Trinkets have been added.

A length of the Vanilla Open Weave Ribbon from the Forever Greenery Trim Combo Pack was adhered to the back of the frames using Tear n Tape, ensuring the ribbon was centred and the frames evenly spaced and at the right angle. It's now ready to hang. Of course, instead of decorating the frames it would be lovely to slip precious photos in and have some tastefully added decor - depending on the nature of the photos.

I've loved creating this project using some of the SU's Neutral colours. Neutrals usually support other colours, so it was great to hero this colour family. 

That's it from me this month. I hope you are enjoying the NeutralsSocial Stamping Blog Hop for April. If you started at the beginning with our amazing Social Stamping Host, Kelly Kent, then you have progressed through all the talented crafters and can now return to Kelly Kent at My Papercraft Journey. Either click on Kelly's name or click on the "next" graphic to be taken to her blog.

To see the full list of participants, click on this link and be taken to Kelly Kent's Host Blog Post at My Papercraft Journey - its a different post where you will find all the individual links that can take you to each person's blog.

I hope to see you again next month, when we will be focussing on the Neutral colour family

Do look after yourself and your loved ones. Stay well, stay safe and be kind to yourself and others in these strange times.

Andrea 😘

Saturday, 27 March 2021

Social Stamping - #22 In Colours

In Colours with Hot Dog and Butterfly Brilliance

Hello. Welcome to Valley Inspirations with Andrea and the second Social Stamping Blog Host for 2021. Currently, we are focussing on each of Stampin' Up!'s Colour families.

This month the nominated sets of colours are the In Colours. To ensure Stampin' Up colours are 'on trend' they introduce a new group of 5 colours every year that stays around for 2 years. There are always 2 sets of In Colours complementing the range of colours. At the moment the In Colours include: for 2020-2022 - Magenta Madness, Misty Moonlight, Just Jade, Bumblebee and Cinnamon Cider; and for 2019-2021 - Seaside Spray, Purple Posy, Rococo Rose, Terracotta Tile and Pretty Peacock.  The latter are about to retire.


PROJECT 1:  A Card featuring 2020-2022 In Colours

I am a bit of a dog tragic and so when I saw the cute little sausage dogs in the Jan-Jun Mini Catalogue I knew the Hot Dog stamp set would make its way home. It is a great set. A friend of mine (who loves her little dogs) has retired recently so I thought I would make this card to celebrate her stepping into the next phase of life. Balloons are often a part of a celebration, so 5 balloons were water-coloured in each of the In Colours.


The balloons and one dog were stamped in Versamark on Shimmery White card-stock and heat embossed with White Stampin' Emboss Powder. Some bones and hearts were also stamped on a card front size piece of Shimmery White card-stock. As mentioned, each balloon was water-coloured using the fine Water Painter with either Just Jade, Bumblebee, Magenta Madness, Cinnamon Cider or Misty Moonlight Classic Stampin' ink. The dog was water-coloured with Crumb Cake ink. The little envelope was stamped in Crumb Cake and the heart coloured in Magenta Madness.


The card front was water-coloured with Seaside Spray ink using the mid-sized Water Painter. The heat embossed bones and hearts resisted the colour to a subtle effect. When almost dry, the card front was embossed with the Tasteful Textures 3D embossing folder. A sentiment from the same stamp set was stamped on a scrap of Shimmery White card-stock and punched out with the Classic Label Punch.


The stamped and coloured balloons were fussy cut, removing the stamped string and pieces of White Twine from the Snail Mail Twine Combo were adhered to the back of each balloon. The balloons, dog (which also had been fussy cut) and sentiment were arranged and then adhered with Dimensionals. The little envelope was added to an edge of the sentiment label. Tail wagging lines were drawn in using a Soft Suede Stampin' Write marker. Little White Resin Hearts were scattered around.


PROJECT 2: A Set of 5 Cards with each card featuring one of the 2019-2021 In Colours. These colours are retiring as of 4th May. They are gorgeous colours and I will miss them, however, I am looking forward to the new In Colours - they are gorgeous too.


The cards are all created with the same process and techniques, just different colours and a few minor changes to give some uniqueness. 

Featuring Pretty Peacock

This card features Pretty Peacock. The background was water-coloured with Pretty Peacock Classic Stampin' ink on Fluid 100 Water-colour paper using the mid-sized Water Painter.  I water-coloured each background at the same time and left them all to dry. The Butterfly Brilliance stamp has all the butterflies joined in one stamp so the Stamparatus is great when stamping. I stamped in Smoky Slate and then coloured the butterflies in different colours using Stampin' Blends. I used the focal In Colour and other coordinating Blends. 

Featuring Rococo Rose

The butterflies were die cut using the coordinating Brilliant Wings dies. The detailed butterfly dies were used to cut the lacy butterflies in Basic White card-stock - they are delightful. A few little butterflies were also die cut.

Featuring Terracotta Tile

The Brilliant Wings dies have some have cute little accent dies, eg little holes, cross hatch lines and brick work. Different dies have been used on each of the cards. The water-coloured background was mounted on the relevant focal colour. Some white twine from the Snail Mail Combo pack was tied around the mounted background. The coordinating stamped and coloured butterflies were matched with the filagree white butterflies and then adhered together with a Glue Dot

Featuring Seaside Spray

The backgrounds were splattered with a Stampin' Write marker in the focal colour and some Frost White Shimmer Paint. The sentiments were on hand from previously created Many Messages bundle - such a great bundle. Elegant Faceted Gems were added as a finishing touch to add a little shimmer. 

Featuring Purple Posy

I've loved creating these projects, using both In Colour groupings. It was great to be able to bid a fond farewell to the retiring In Colours for 2019-2021. 

That's it from me this month. I hope you are enjoying this Social Stamping Blog Hop which is focussing on the In Colours. If you started at the beginning with our amazing Social Stamping Host, Kelly Kent, then the next talented crafter is Sharni Haines at Stampin at the Maples. Either click on Sharni's name or click on the "next" graphic to be taken to her blog.

To see the full list of participants, click on this link and be taken to Kelly Kent's Host Blog Post at My Papercraft Journey where you will find all the individual links that can take you to each person's blog


I hope to see you again next month, when we will be focussing on the Neutral colour family

Do look after yourself and your loved ones. Stay well, stay safe and be kind to yourself and others in these strange times.

Andrea 😘

Saturday, 27 February 2021

Social Stamping - #21 Brights

Brights with Floating & Fluttering 

Hello. Welcome to Valley Inspirations with Andrea and the first Social Stamping Blog Host for 2021.


For the next 5 months the Social Stamping Blog Hosts are focussing on each of Stampin' Up!'s colour families. This month the nominated set of colours are the Brights. While my go to colours are often a more subtle colour palette, the Brights are a range of gorgeous, vibrant colours, like a rainbow, that is: Poppy Parade, Mango Melody, Daffodil Delight, Granny Apple Green, Coastal Cabana, Bermuda Bay, Pacific Point, Gorgeous Grape, Melon Mambo and Flirty Flamingo. Ten lively colours.


In pondering how I would showcase Stampin' Up!'s Brights, I was reminded of a sketch presented by the Global Design Project a few weeks ago and decided to commence with this layout for my card.
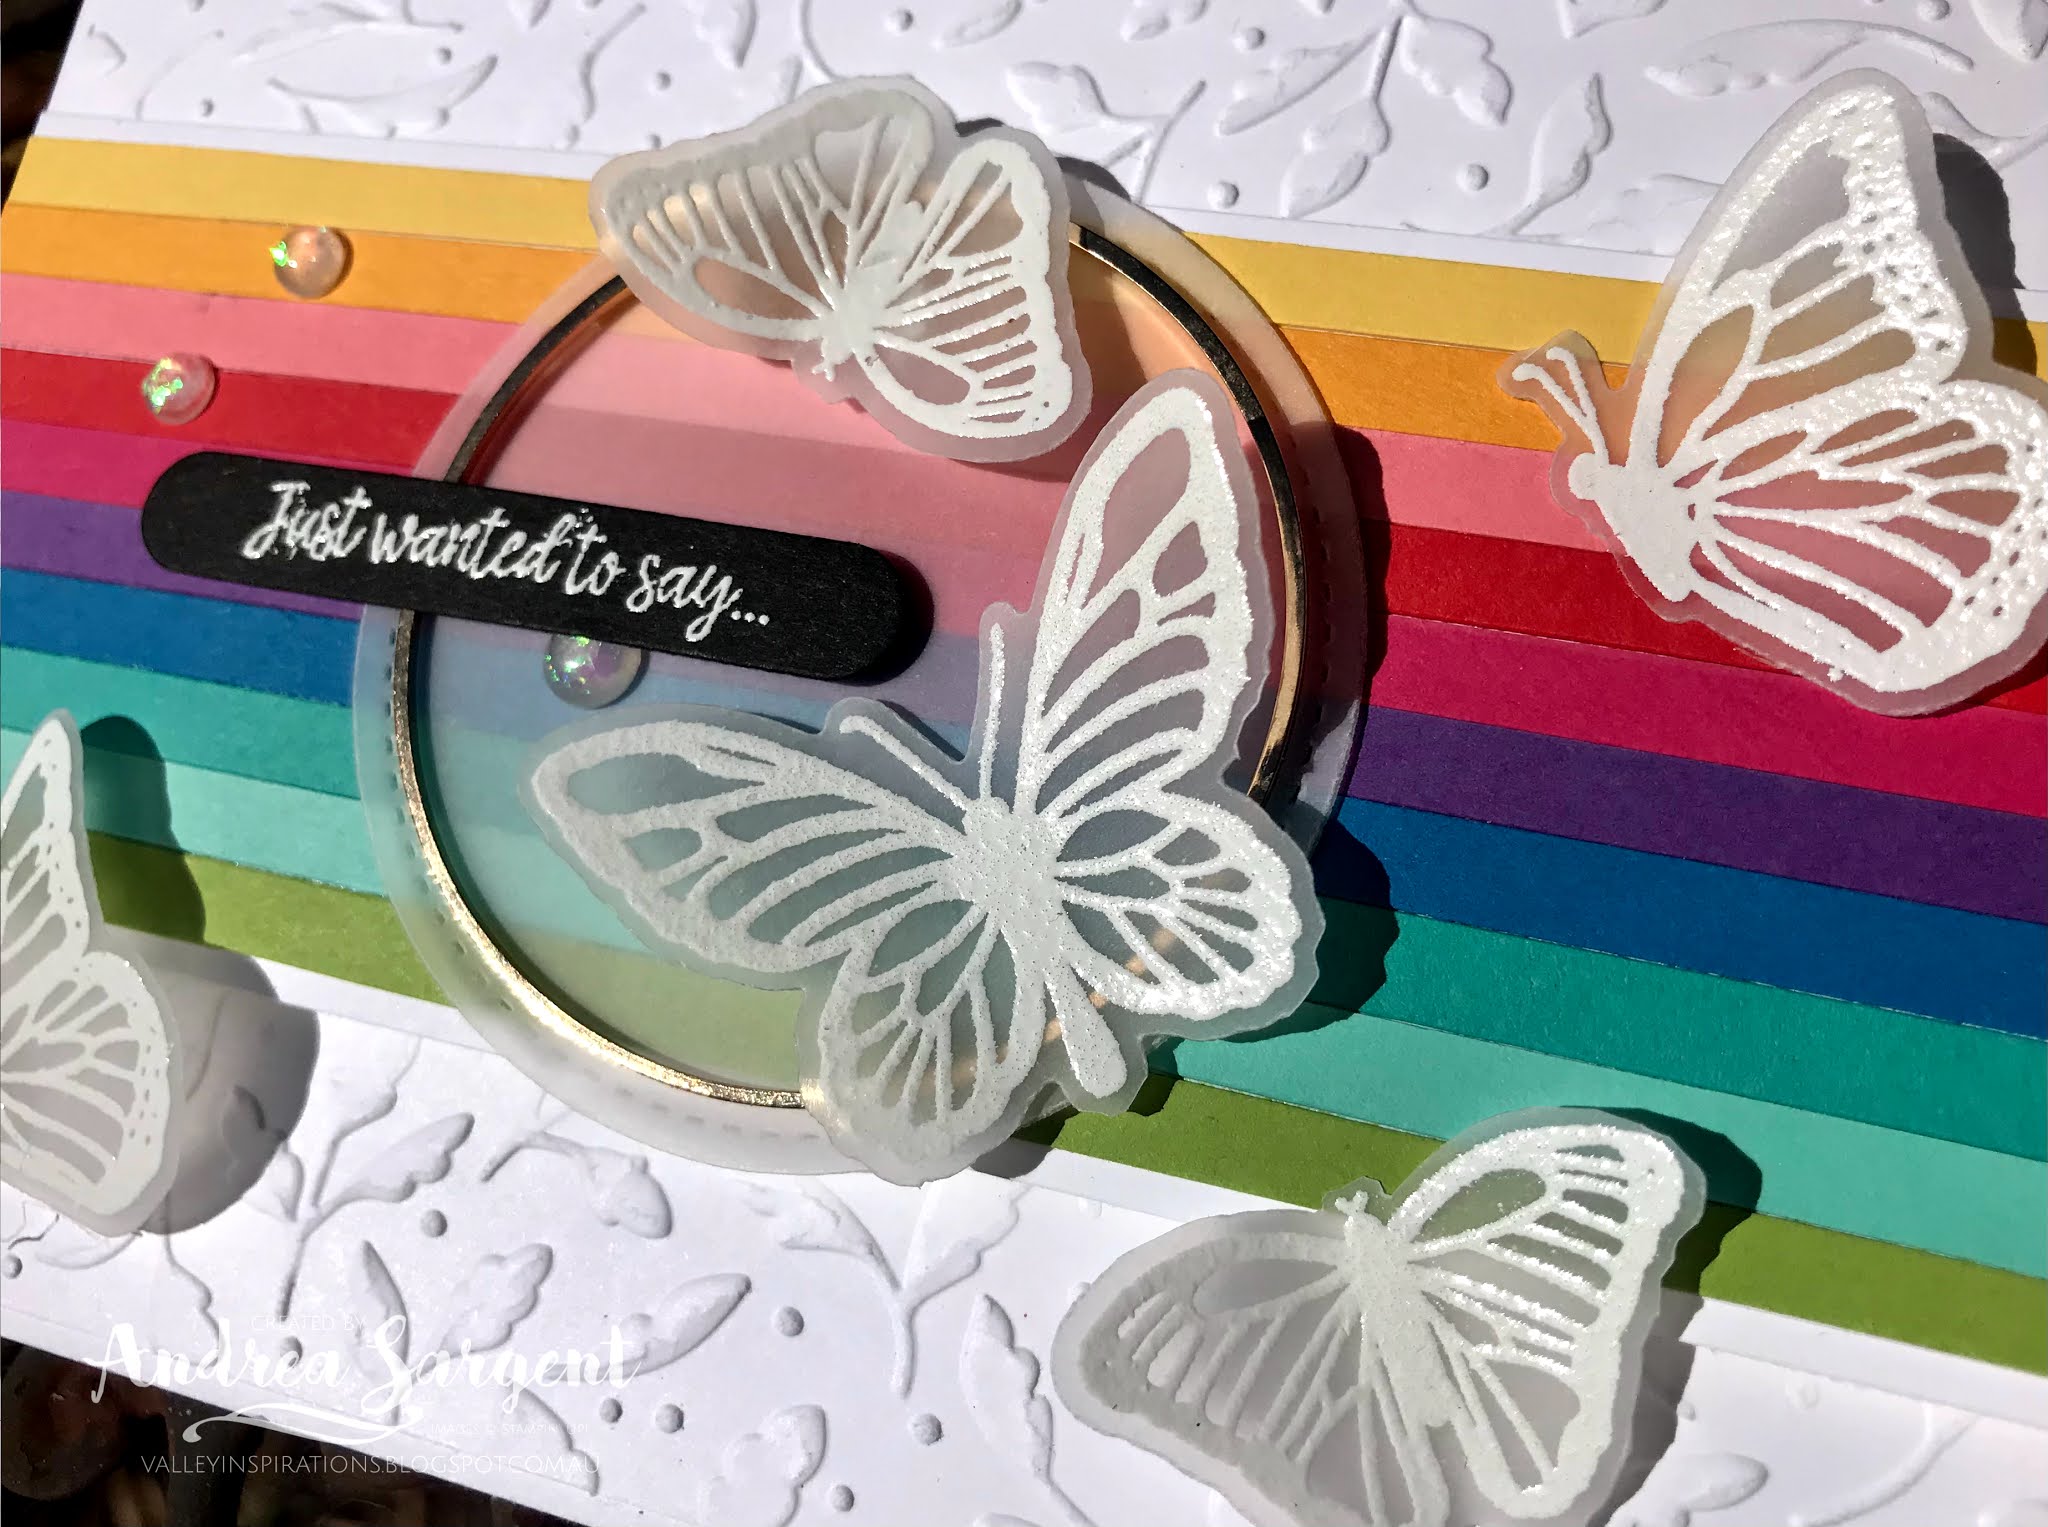
Given the striped panel across the centre of the card, I thought I would use all 10 Brights, so cut 5mm strips from each of the Bright's cardstocks. Each strip was adhered to some Basic White card-stock, leaving a small mount of Basic White at the top and bottom.

A vibrant happy card featuring Stampin' Up! products - the Brights colour family and Floating & Fluttering bundle by Andrea Sargent at Valley Inspirations, Australia.

A piece of Basic White card-stock, that had been cut to card front size, was embossed with the leafy Meadows Moments Embossing Folder. Then it was adhered directly on a Thick Basic White card base. The Brights striped panel spanned across the centre of the card, being adhered in place with Dimensionals.

A vibrant happy card featuring Stampin' Up! products - the Brights colour family and Floating & Fluttering bundle by Andrea Sargent at Valley Inspirations, Australia.

As I was walking my dog, the idea of using Vellum card-stock to add some further interest while allowing the bright stripes to shine. As I have seen many butterflies walking with Gemma, I decided on white embossed butterflies flying across the card. The set of butterflies from the Floating and Fluttering stamp set was stamped a couple of times with Versamark ink on Vellum and heat embossed using White Stampin' Emboss powder. Coordinating dies from the Fluttering dies were used to cut them out together with a tad of sniping to seperate each butterfly.

A vibrant happy card featuring Stampin' Up! products - the Brights colour family and Floating & Fluttering bundle by Andrea Sargent at Valley Inspirations, Australia.

A stitched circle from the Stitched Shapes dies was cut from Vellum and it was adhered in a couple of spots to the striped panel where 
it would be covered by butterflies. A Gold Hoop embellishment was layered on top using rolled Glue Dots. The vellum butterflies were scattered across the card front. That sounds simple, doesn't it, but ... getting the right arrangement was not easy for me. I finally found an arrangement that I was happy with before heading off to bed last night, but the butterflies had been knocked and moved by the time I came to finish the card this morning. And yes, I wasn't able to achieve an arrangement that I was really happy with. 

A vibrant happy card featuring Stampin' Up! products - the Brights colour family and Floating & Fluttering bundle by Andrea Sargent at Valley Inspirations, Australia.

The butterflies were either adhered directly to the card front or popped up on a Mini Dimensional. A sentiment from the Many Messages bundle was added with a Mini Dimensional either side of the Gold Hoop. Previously I had played with the Many Messages bundle and created a set of sentiments with Momento ink on Basic White card-stock and another set heat embossed with Versamark and White Emboss powder on Basic Black card-stock. It is very handy having a bowl of sentiments ready and waiting on my desk.

A vibrant happy card featuring Stampin' Up! products - the Brights colour family and Floating & Fluttering bundle by Andrea Sargent at Valley Inspirations, Australia.

A few gorgeous Opal Rounds were added as a finishing touch. The card inner was created with thin strips of Coastal Cabana, Bermuda Bay, Pacific Point and Gorgeous Grape card-stock layered at the bottom with an embossed vellum butterfly. Some butterflies from the Floating and Fluttering stamp set were stamped in Bermuda Bay Classic Stampin' ink on a C6 Basic White envelope so that the envelope would give a hint of what could be fount inside.

A vibrant happy card featuring Stampin' Up! products - the Brights colour family and Floating & Fluttering bundle by Andrea Sargent at Valley Inspirations, Australia.

That's it from me this month. I hope you are enjoying this Social Stamping Blog Hop which has focussed on the Bright colours. If you started at the beginning with our amazing Social Stamping Host, Kelly Kent, then the next talented crafter is Elizabeth Gross at Lillybet's Papers. Either click on Elizabeth's name or click on the "next" graphic to be taken to her blog.


To see the full list of participants, click on this link and be taken to Kelly Kent's Host Blog Post at My Papercraft Journey where you will find all the individual links that can take you to each person's blog

I hope to see you again next month, when we will be focussing on the In Colours' families

Do look after yourself and your loved ones. Stay well, stay safe and be kind to yourself and others in these strange times. Hopefully improvement is around the corner.

Andrea 😘

Thursday, 31 December 2020

Social Stamping - #20 Oh 2020

Oh 2020 and Darling Donkeys with Oh So Ombre DSP

Hello. Welcome to Valley Inspirations with Andrea and the 20th Social Stamping Blog Host.

This is the final Social Stamping Blog Host for 2020. What a year it has been, however, one of the highlights has been regularly joining with this amazing group of creatives. Paper crafting has helped me maintain a level of sanity during this difficult year and the Social Stamping blog hop has given me specific focus to create. Also, I have learnt more about blogging and become more regular with my posts.

Symbolically, I am really looking forward to the end of 2020 and a fresh start to herald a much better year. Logically I know that a new year will not magically bring the changes we would like. However, I am so thankful that we are in one of the best countries in the world.

Darling Donkeys and Oh So Ombre Stampin Up card, Andrea Sargent, Independent Stampin' Up! Demonstrator, Valley Inspirations, Adelaide foothills, Australia

My project this month is symbolic of my desire to kick away 2020 and celebrate a new year filled with hope for better things. The focal stamp set is new and one of the Sale-a-bration offerings available from 5 January that can be choosen for free with a purchase of $90 worth of Stampin' Up! products. This cute set is called Darling Donkeys. I have seen a couple of projects that show the donkey kicking away 2020. To add my own twist I thought I would add some celebration of the incoming 2021. After creating my card I have seen a number with the same idea - great minds think alike! Time had run out for creating another card so I am sharing my interpretation. 😁

Darling Donkeys and Oh So Ombre Stampin Up card, Andrea Sargent, Independent Stampin' Up! Demonstrator, Valley Inspirations, Adelaide foothills, Australia

This card is a Triangle Fun Fold card created from an A4 sheet of Thick Whisper White card-stock that was scored down the centre, both lengthwise and across the width. Then the sheet is cut in half diagonally from corner to corner. (Two cards can be made from one sheet of A4.) The card-stock was folded and burnished along the score lines so that the diagonal edges meet in the middle. This is the card base.

Darling Donkeys and Oh So Ombre Stampin Up card, Andrea Sargent, Independent Stampin' Up! Demonstrator, Valley Inspirations, Adelaide foothills, Australia

Two of the donkeys were stamped on Whisper White card-stock in Gray Granite Classic Stampin' ink. The donkeys were coloured using Stampin' Blends Combo Packs in Gray Granite, Smoky Slate, Basic Black as well as Ivory and the Colour Lifter. Then both donkeys were fussy cut and shaped a little.

Darling Donkeys and Oh So Ombre Stampin Up card, Andrea Sargent, Independent Stampin' Up! Demonstrator, Valley Inspirations, Adelaide foothills, Australia

A piece of Foam Adhesive Sheet was attached to some Gray Granite card-stock and some Rainbow Glimmer Paper and the numbers 2 and 0 were die cut from Gray Granite and 2, 0, 2, 1 from differing colours of the Rainbow Glimmer. The numbers came from the Playful Alphabet die set. The glimmer numbers had pieces of White twine from the Snail Mail Twine Combo pack attached to the bottom. Later these lengths of twine were adhered to the upright donkey's teeth.

Darling Donkeys and Oh So Ombre Stampin Up card, Andrea Sargent, Independent Stampin' Up! Demonstrator, Valley Inspirations, Adelaide foothills, Australia

The card front was cut from another Sale-a-bration product, one of the Bermuda Bay ombre sheets from the Oh So Ombre Designer Series Paper. The two triangles of DSP were mounted on Gray Granite card-stock, which in turn was mounted on the card base leaving a small boarder of the white card base. The donkeys and numbers were manoeuvred to find the appropriate positioning. To ground the donkeys, some grasses from the Beautiful Moments stamp set were stamped directly onto the DSP card front using Granny Apple Green Classic Stampin' ink (the ink coordinates with one of the colours in the Rainbow Glimmer Paper).

Darling Donkeys and Oh So Ombre Stampin Up card, Andrea Sargent, Independent Stampin' Up! Demonstrator, Valley Inspirations, Adelaide foothills, Australia

The sentiment was created using the New Year's die from the Word Wishes die set. It was cut four times from Whisper White card-stock, with the "s" trimmed off. The pieces were adhered together to create some dimension. Two labels from the Tasteful Labels die set, one from Whisper White card-stock and the other from the remaining Bermuda Bay Oh So Ombre DSP. The trick with the labels is to only adhere part of the bottom label to the upper flap of the card front so that it will still open. In my post-Christmas vagueness I'm so glad I remembered! While the camera has picked up the added Wink of Stella, It makes the words "New Year" look grubby rather than glittery - oh dear. In reality it actually looks quite shimmery.

Darling Donkeys and Oh So Ombre Stampin Up card, Andrea Sargent, Independent Stampin' Up! Demonstrator, Valley Inspirations, Adelaide foothills, Australia

A Whisper White card inner was stamped with the third donkey from the stamp set and coloured with the same colours of Stampin' Blends. To coordinate with the card front the inner was mounted on Gray Granite card-stock leaving a fine mount.  Another 2 and 0 were cut from Gray Granite card-stock (without any foam sheet attached). The gray numbers were adhered  as if they had fallen from the card front and knocked the donkey on the head. To further coordinate with the card front a Whisper White C6 Envelope was stamped with one of the donkeys using Gray Granite Classic Stampin' ink. "Happy" was stamped in Basic Gray Classic Stampin' ink. This stamp was already on my table as it comes from another new stamp set - the Art Gallery set from the new January - June Mini Catalogue. There is so much gorgeousness in this new catalogue and something for everyone.

Darling Donkeys and Oh So Ombre Stampin Up card, Andrea Sargent, Independent Stampin' Up! Demonstrator, Valley Inspirations, Adelaide foothills, Australia

To finish the card ... oops, as I was finishing writing my blog I realised that I forgotten to add some of the gorgeous clear Elegant Faceted Gems. All of the photos above won't show these gorgeous gems, but hopefully the photo below will. I must go and add the gems now and take another photo. 😔

Darling Donkeys and Oh So Ombre Stampin Up card, Andrea Sargent, Independent Stampin' Up! Demonstrator, Valley Inspirations, Adelaide foothills, Australia

I hope you are enjoying this month's Social Stamping Blog Hop which has focused on the "Oh 2020" theme. If you started at the beginning with our amazing Social Stamping Host, Kelly Kent, then the next talented crafter is Narelle Simm at Eleventh Hour Stamping. Click on Narelle's name to be taken to her blog or click on the "next" graphic. 

To to see the full list of participants click on this next link to be taken to Kelly Kent's Host Blog Post at My Papercraft Journey where you will find all the individual links that can take you to each person's blog.


I hope to see you again next year. I'm not sure whether the Social Stamping Blog Host will continue - keep an eye on Kelly Kent's blog.

Do look after yourself and your loved ones. I hope the New Year is a better year for us all with many good things in store. Stay well, stay safe and be kind to yourself and others in these strange times. 

Andrea 😘

Saturday, 28 November 2020

Social Stamping - #19 Merry & Bright

Merry & Bright with In the Pines

Hello. Welcome to Valley Inspirations with Andrea and the 19th and final for 2020 Social Stamping Blog Host. Thank you so much Kelly for instigating and coordinating the Social Stamping Blog Hop. For me, this blog hop has certainly helped me through this very strange year of COVID-19. Sharing paper crafting is such a delight.


This month's Social Stamping theme is Merry & Bright, which I have interpreted as a happy Christmas theme. When thinking about what I would make, I decided to create a card based on a ATC I created earlier in the year - that's right, it was only last month. What is an ATC you ask? The letters stand for Artistic Trading Cards. They are similar to Sporting Trading Cards. I am part of the Art with Heart team and for many years a number of us have been creating ATCs based around a technique or theme to share with others in the share. It has been a brilliant way to learn new techniques and challenge myself to design within  2.5" x 3.5". Here is the ATC I created for the Plaid challenge last month, where we needed to create our own plaid/tartan with watercolour. 

Christmas In the Pines Plaid Stampin' Up! card, Andrea Sargent, Valley Inspirations, Adelaide Foothills, Australia

I have been intending to create full size cards based on my ATCs, but haven't created many, so decided to try with this design. Here is my Christmas card for you in this final 2020 Social Stamping Blog Hop:

Christmas In the Pines Plaid Stampin' Up! card, Andrea Sargent, Valley Inspirations, Adelaide Foothills, Australia

The first task in creating this card was to create a plaid. I used Shimmery White card-stock cut a little bigger than the strip I needed so I could trim it down if the edges were a bit mucky. I painted a stripe every 3/4" in watered down Rococo Rose Classic Stampin' ink using the mid size Water Painter. Then I painted a stripe in Petal Pink Classic Stampin' ink next to the Rococo Rose stripe, leaving an un-inked white stripe. The card-stock piece was turned 90 degrees and the same painting process was carried out. 

Christmas In the Pines Plaid Stampin' Up! card, Andrea Sargent, Valley Inspirations, Adelaide Foothills, Australia

Once dry, Rococo Rose and Petal Pink Stampin' Write markers were used to draw a thin stripe on the edge of the same colour stripe using the thicker nib. Then using the thinest tip of the Rococo Rose marker two thin stripes were drawn near the thicker Rococo Rose stripe. All the stripes were drawn and then the card-stock was again turned 90 degrees and the same stripes were drawn at 90 degrees to the first stripes. As you can see, the plaid is not perfect like a woven tartan or printed design. That's fine - ! love the relaxed water-colour bleeding of colours. 

Christmas In the Pines Plaid Stampin' Up! card, Andrea Sargent, Valley Inspirations, Adelaide Foothills, Australia

The background is a piece of Petal Pink card-stock that was embossed with the Evergreen Forrest 3D embossing folder. Some White Craft ink was lightly dragged over the embossed trees with a Sponge Dauber to delicately highlight the trees in the background. To add some "stars" to the sky, Frost White Shimmer Paint was splattered using the Water Painter. This background was adhered directly to the Rococo Rose card-stock base.

Christmas In the Pines Plaid Stampin' Up! card, Andrea Sargent, Valley Inspirations, Adelaide Foothills, Australia

The plaid piece was positioned with Dimensionals. Three trees were die cut with the Pine Woods dies from Shimmery White card-stock. I little of the Frost White Shimmer Paint was painted on the trees, reminiscent of snow on the tips of the branches, to add a little shimmer. I so love the In the Pines bundle, as you may have guessed if you follow by blog.

Christmas In the Pines Plaid Stampin' Up! card, Andrea Sargent, Valley Inspirations, Adelaide Foothills, Australia

A circle of Vellum, cut with the Layered Circle dies, was adhered to one side over the plaid. The two smaller trees were partially tucked under the Vellum circle and adhered directly to the plaid. The larger tree was placed over the Vellum circle with Mini Dimensionals. A sentiment from the coordinating In the Pines stamp set was stamped in Versamark on Rococo Rose card-stock and heat embossed with White Emboss Powder. The sentiment was fussy cut and positioned with both Multipurpose Liquid Glue and Mini Dimensionals. Snowflake Adhesive-backed Embellishments were added as the finishing touch. They are so pretty.

Christmas In the Pines Plaid Stampin' Up! card, Andrea Sargent, Valley Inspirations, Adelaide Foothills, Australia

A piece of Whisper White card-stock was stamped a couple of times with the group of little trees from the In the Pines stamp set using Petal Pink and Rococo Rose Classic Stampin' inks. The stamp was inked in Petal Pink and then bits of the stamp were daubed with Rococo Rose and then stamped. A thin strip of the plaid was also adhered to the bottom of the card inner. A C6 Whisper White envelope was similarly stamped with the little trees across the bottom front of the envelope.

Christmas In the Pines Plaid Stampin' Up! card, Andrea Sargent, Valley Inspirations, Adelaide Foothills, Australia

I hope you are enjoying this month's Social Stamping Blog Hop which has focused on the "Merry & Bright" theme. If you started at the beginning with our amazing Social Stamping Host, Kelly Kent, then the next in line is the lovely Sandra Collet at Sanzstamps. Use this link to see her gorgeous creation or click on the 'Next' graphic below. If you would prefer to go to the full list of participants click on this link to be taken to Kelly Kent's Host Blog Post at My Papercraft Journey where you will find all the individual links that can take you to each person's blog.

I hope to see you again next year - let's hope it is a better year for us all. I'm not sure whether the Social Stamping Blog Host will continue - keep an eye on Kelly Kent's blog.

Do look after yourself and your loved ones. I hope you enjoy an amazing Christmas and New Year. Stay well, stay safe and be kind to yourself and others in these strange times. 

Andrea 😘


Be Inspired - July 2026 - Creating Backgrounds

Be Inspired Design Team Blog Hop CREATING BACKGROUNDS Welcome to Valley Inspirations with Andrea and the July  Be Inspired Blog Hop  where w...