Art with Heart Wow Tutorials

Showing posts with label Butterfly Brilliance. Show all posts

Wednesday, 22 June 2022

AWHT Colour Creations #8 Bermuda Bay

Bermuda Bay with Butterfly Brilliance

Hello. Welcome to Valley Inspirations with Andrea and the Art with Heart Colour Creations Blog Hop. We continue to work though the Stampin' Up! colours in alphabetical order. 


This week’s Blog Hop is focussing on a deep turquoise called Bermuda Bay. Bermuda Bay is part of the Brights Colour Family and is a strong green-blue (or is that blue-green) colour. Some people classify it as a green while others view it as a blue. Bermuda Bay is gorgeous when used monochromatically with other green-blues such as Pool Party and Coastal Cabana. As the name suggests it is a great colour for water. Surprisingly it looks lovely with Gorgeous Grape or is delightful with Parakeet Party.  


Bermuda Gay is produced in Stampin' Up!'s card-stock, both A4 & 12"x12"Classic Stampin' inks (ink pads re-inkers); Stampin' Write Markers; Watercolour Pencils, Brights Designer Series Paper, Pretty Prints DSP, Robot Buddies Card Kit and Kindness Card Kit. The card below has used Bermuda Bay Classic Stampin' ink, Card-stock and Stampin' Blends plus a range of other non-BB bits and pieces.

Embossed butterflies flying over an alcohol wash of colour is a lovely way to say "thank you".

I recently saw a U-tube where alcohol inks were used with blending solution on acetate. As I watch I wondered if it would also work using Stampin' Up!s Alcohol Blends and high proof Isopropyl Alcohol on Window Sheet. I decided to give it a go and had 2 different designs in mind using two different colour combos. I started with one idea but this design morphed as I played. I have another piece of coloured window sheet but ran out of time to create a 2nd project - It has been one of those weeks!

Embossed butterflies flying over an alcohol wash of colour is a lovely way to say "thank you".

I started by scribbling some Light & Dark Bermuda Bay Blends and Light and Dark Parakeet Party on a piece of Window Sheet (acetate). I spray/dribbled some Isopropyl Alcohol over sections of the colour and then moved the colour around with a hand-squeeze blower tool. You could also blow through a straw. I needed to apply ink in a few layers to build up a stronger colour - following the same process of adding alcohol and blowing the colour around.

Embossed butterflies flying over an alcohol wash of colour is a lovely way to say "thank you".

A stitched frame was die cut using the two largest Stitched Rectangles dies. This was adhered directly to the acetate. Some Mini Dimensionals were added underneath the frame to enable the colour to sit above the background panel. A Basic White piece of card-stock was dry embossed with the Timeworn Type 3D embossing folder. A piece of Basic White card-stock that had been stamped in 2nd generation Bermuda Bay ink with text from the Artfully Layered stamp set was added to a Bermuda Bay card-stock base. 

Embossed butterflies flying over an alcohol wash of colour is a lovely way to say "thank you".

Vellum card-stock was white heat embossed after being stamped in Versamark ink using the Butterfly Brilliance stamp and my trusty Stamparatus. It is interesting that the camera shows the embossing as a more creamy colour than the eye picks up in real life. The butterflies could have been cut with the coordinating Butterfly die but as I was talking with someone, I relaxed and fussy cut them out. The Bermuda Bay "Thank you" sentiment also came from the Artfully Layered stamp set - it was on my desk as the other design I had in mind would have used it. A triple White Bakers Twine bow was tucked under the sentiment and the design was finished off with some delightful Sparkle & Shine Sequins.


As the rain started to fall while I was photographing the card, I wasn't able to photograph the card inner or a peak at the decorated envelope. I added the largest embossed butterfly inside the card and will add some stamped butterflies to the envelope. Initially I had coloured a couple of the smaller butterflies with Bermuda Bay and Parakeet Party Blends but decided not to add them to the card.

Embossed butterflies flying over an alcohol wash of colour is a lovely way to say "thank you".


Thank you so much for dropping by. I do value the time you spent with me.

There is more Bermuda Bay creativity. To continue with the blog hop, click on the "next" graphic below to be taken to the blog of the lovely, Sharon Davern. I always look forward to checking out Sharon's creation (I wonder what she has in store this week - will it be a fancy fold???). I do love seeing everyones' projects - always so much inspiration.

Hope to see you next week when we will be featuring a beautiful deep colour, Blackberry Bliss, as we continue the weekly 2022-2023 Colour Creations blog hops.

Stay well, stay safe and be kind to yourself and others. 

Andrea 💕🐾


If you live in Australia, don't already have a Stampin' Up! demonstrator and would like your own copy of Stampin' Up's 2022-2023 Annual Catalogue and or the new July - December 2022 Mini Catalogue then let me know and I will be delighted to send them to you.  Please don't hesitate to make contact with any other queries about this project or Stampin' Up!. 

If you find a broken link or have come to this blog hop from a different entry point, you can view the full list of participants on Catherine Proctor’s blog @ What Cathy Made. Cathy is our wonderful Art With Heart Team Colour Creations Coordinator.  I so appreciate all she does in coordinating this blog hop each week. She is such an amazing lady. Check out her wonderful creation while you are there.


#colourcreationsbloghop  #stampinup #stampinupaustralia #stampinupsouthpacific #stampinupdemo  #handmadecards #makeacardsendacard #stampinupdemonstrator #papercrafting #artwithheartteam  #papercrafter  #stamper #butterflybrilliance 
#artfullylayered #valleyinspirations

Wednesday, 2 March 2022

AWHT Colour Creations #38 Pumpkin Pie

Pumpkin Pie with Butterfly Brilliance (and Artfully Layered which is coming)

Hello. Welcome to Valley Inspirations with Andrea and the Art with Heart Colour Creations Blog Hop. We are continuing to work though all the Stampin' Up! colours in alphabetical order. Having started mid 2021 this is the last colour starting with "P". 


This week’s Blog Hop is focussing on a strong orange called Pumpkin Pie. Pumpkin Pie is part of the Regals Colour Family and is a straight rich orange. When thinking of using Pumpkin Pie I tend to think of Autumn Leaves. I was planning to use this colour with Bumble Bee, Cherry Cobbler and Garden Green as I was inspired by a nearby tree that is changing to its autumn colours early. While walking with Gemma, I also saw a few traditionally coloured Monarch butterflies, so had also thought of using Pumpkin Pie with Basic Black. That was where I started, but have ended up somewhere quite different.


Pumpkin Pie is produced in Stampin' Up!'s card-stock, both A4 & 12"x12"Classic Stampin' inks (ink pads re-inkers); Stampin' Write Markers; Stampin' Blends, Watercolor Pencils, the Regals Designer Series Papers as well as Flowering Fields & Abstract Beauty Designer Series Paper, the Abstract Beauty Ephemera Pack, Holiday Rhinestone Basic Jewels & Sequins for Everything.  The card below has used Pumpkin Pie Classic Stampin' ink, Card-stock, a Stampin' Write Marker, and Holiday Rhinestone Basic Jewels, plus a range of other non-PP bits and pieces.

I have only finished 1 card showcasing Pumpkin Pie with a water-colour background:

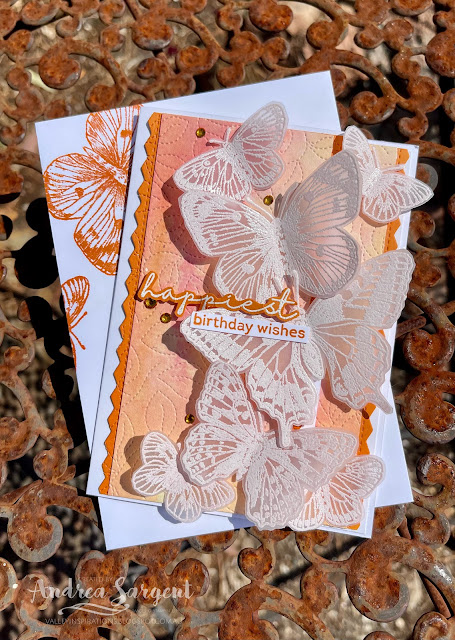
Send a flight of butterfly brilliance to wish the happiest of Birthdays, by Andrea Sargent, Valley Inspirations.

I had started to create a second card but only got as far as water-colouring some leaves. See the photo below. I will try to finish this card in the next couple of days.


Keep an eye out for a card created with these water-coloured leaves.

CARD 1:

Send a flight of butterfly brilliance to wish the happiest of Birthdays, by Andrea Sargent, Valley Inspirations.

This card uses a delightful water-coloured background that was created from the left over ink following the water-colouring of the die cut leaves, shown above. The medium Water Painter was used to apply dabs of Pumpkin Pie, Bumblebee and Cherry Cobbler Classic Stampin' inks. The leaves were lifted onto a piece of paper towel to dry and my work surface was covered with quite a bit of diluted ink - so I took a piece of Fluid 100 Watercolor Paper and lay it on the inky work surface. The sheet of paper was lifted and laid down over another puddle of ink. This was repeated until the sheet was covered with colour.

Send a flight of butterfly brilliance to wish the happiest of Birthdays, by Andrea Sargent, Valley Inspirations.

About an inch was cut off the front of the card base on the RHS so that the right side of the card inner would be seen. A zigzag edging die from the Layered Leaves dies was used to cut the edges off a piece of Pumpkin Pie card-stock. A piece of the water-coloured panel was embossed with the Stitched Greenery die and then mounted on the Pumpkin pie card-stock.

Send a flight of butterfly brilliance to wish the happiest of Birthdays, by Andrea Sargent, Valley inspirations.

While I had initially envisaged black and orange Monarch butterflies I changed to heat embossing Vellum card-stock with Versamark ink and White Emboss Powder. As my pack of Vellum was hiding somewhere and I could only find Vellum scraps I needed to stamp the butterflies from the Butterfly Brilliance stamp set a number of times to be able to get a flight of butterflies. This also meant that I needed to fussy cut them out with my trusty Snips. The were added with Dimensionals or Glue Dots.

Send a flight of butterfly brilliance to wish the happiest of Birthdays, by Andrea Sargent, Valley inspirations.

The sentiment from the Artfully Layered stamp set was stamped twice - ie heat embossed with  Versamark ink and White Emboss Powder on Pumpkin Pie card-stock and also stamped on Basic White card-stock with Pumpkin Pie Classic ink. The word "happiest" was fussy cut from the heat embossed sentiment and "birthday wishes" from the white card-stock.  I love adding ribbon and or twine but I tried and tired to add some ribbon/twine - it just didn't add anything, so I took it off. A number of Pumpkin Pie Holiday Rhinestones Basic Jewels added a bit of sparkle. As I took the photos I kept thinking it needed something else so I also added a splattering of Pumpkin Pie using a Stampin' Write Marker. Sorry there wasn't time to re-photograph. You will have to image the card (including the butterflies) with a little splattering.

Send a flight of butterfly brilliance to wish the happiest of Birthdays, by Andrea Sargent, Valley Inspirations.

The card inner is visible on the right of the card. A strip of the water-coloured panel that had been embossed with the Stitched Greenery die and then layered on two Pumpkin Pie card-stock edges die cut with the Artfully Layered stitched zigzag die. Two small heat embossed butterflies were added to the right of the card inner, ensuring the wings of the butterflies overlapped the shorter card front, thereby helping to hold the card closed. 

Send a flight of butterfly brilliance to wish the happiest of Birthdays, by Andrea Sargent, Valley Inspirations.

A Basic White C6 Envelope was stamped in Pumpkin Pie ink on the envelope corner with a couple of butterflies. I do love decorating the envelope to tie it in with the card it will hold.

Send a flight of butterfly brilliance to wish the happiest of Birthdays, by Andrea Sargent, Valley Inspirations.


Thank you so much for dropping by. I so appreciate you spending time with me.

If you live in Australia, don't already have a Stampin' Up! demonstrator and would like your own copy of Stampin' Up's 2021-2022 Annual Catalogue and or the new January - June 2022 Mini Catalogue & Saleabration Catalogue then let me know and I will be delighted to send them to you.  Please don't hesitate to make contact with any other queries about this project or Stampin' Up!. 

There is more Pumpkin Pie creativity. To continue with the blog hop, click on the "next" graphic below to be taken to the blog of the lovely, Kate Morgan. I always look forward to checking out Kate's creation (I wonder how she has used Pumpkin Pie this week). I do love seeing everyones' projects - so many ideas and such great inspiration.

Hope to see you next week when we will be featuring versatile colour Real Red as we continue the weekly 2021-2022 Colour Creations blog hops.

Stay well, stay safe and be kind to yourself and others. 

Andrea 💕🐾

If you find a broken link or if you want to check out the full list of participants go to Catherine Proctor’s blog, our wonderful Art With Heart Team Colour Creations Coordinator. Cathy is wonderful in coordinating this blog hop each week. She is such a special lady. Check out her wonderful creation while you are there.

#colourcreationsbloghop  #stampinup #stampinupdemo  #staminupdemonstrator #artwithheartteam  #handmadecards #makeacardsendacard #stampinupaustralia #madewithlove #butterflybrilliance


Wednesday, 31 March 2021

Art with Heart Colour Creations Showcase - #42 Rococo Rose

Rococo Rose with Butterfly Brilliance

Hi. Welcome to Valley Inspirations with Andrea and the 42nd 2020/2021 Colour Creations Showcase by members of the Art with Heart Team.


This week we are showcasing a gorgeous colour, Rococo Rose. It is one of the soon to retire In Colours for 2019-2021. It's last day as a Stampin' Up In Colour will be 3 May 2021. I use this colour often so will miss it, however, my sneak peak of the new In Colours for 2021-2023 indicates the 5 colours are also gorgeous.


Please excuse the brevity of tonight's post. I have had numerous commitments this past week and with not feeling well, I have run out of "me" to create for this blog tonight. I had intended to message Cathy saying I would sadly have to pull out. I was soo disappointed but was trying to be practical. However, while I was out today, I realised I hadn't sent the message. Panic. 

Then I remembered I had just made a set of cards with the retiring colours, including Rococo Rose. As 6 cards were shown in the one blog last Saturday - 1 showing the continuing In Colours and 5 cards featuring each of the retiring In Colours I am taking the liberty of just focusing on the Rococo Rose card as, in effect, it was not discussed. Also, the close up photo was not shown in Saturday's blog. Here's my card:


The background water-colour wash used Rococo Rose Classic Stampin' ink on Fluid 100 Water-colour paper. There was some flicking of ink using the Rococo Rose Stampin' Write Marker as well as some Frost White Shimmer Paint. The little holes were die cut using one of the extra textural dies from the Butterfly die set.


A butterfly was stamped in Gray Granite Classic Stampin' ink using the Butterfly Brilliance stamp. The stamp is so gorgeous - really love the detail in the 6 Butterflies. The butterfly was coloured with Stampin' Blends, ie Rococo Rose, Petal Pink and Highland Heather with Gray Granite Combos (including both light and dark shades of each colour). While the detail of the colouring is not really noticeable when looking at the full card; if you take a peak from the side as seen above, the colouring does add to the overall design. The butterfly was die cut using the coordinating Butterfly dies. A detailed die from the same set cut a filagree version of the butterfly from Basic White card-stock. The two butterflies were adhered together just at the body, allowing shaping of the wings to add a sense of movement. A tiny butterfly was also die cut from Basic White card-stock.

The water-coloured background was mounted at an angle onto Rococo Rose card-stock. White twine from the Snail Mail Twine Combo was tied around the mounted panel and finished in a bow. Petal Pink Elegant Faceted Gems add the finishing touch - always love a touch of shimmer. The central panel was then mounted with Dimensionals onto a Thick Basic White card base. The sentiment is from the Many Messages bundle.

If you want to check out more detail on how this card was created you can visit my previous blog for Saturday 27 March.

I will create another Rococo Rose project tomorrow and include it in this blog over the weekend - stay tuned.


Catherine Proctor is the amazing host of the Art with Heart Colour Creations Showcase. If you haven't finished visiting all of the team's colour creations, you can visit/revisit Catherine's page at What Cathy Made, where she hosts the links to the participating blogs so you can find everyone's Rococo Rose creations. Checking out everyone's creations and their interpretation of the amazing Stampin' Up! colours is always a treat. 

I hope to see you again next week when members of the team share projects that hero Terracotta Tile, another one of the retiring In Colours for 2019-2021.

Stay well, stay safe and be kind to yourself and others as these strange times continue. Hopefully life with settle to an improved normality before too long. 

Andrea 💕🐾

Saturday, 27 March 2021

Social Stamping - #22 In Colours

In Colours with Hot Dog and Butterfly Brilliance

Hello. Welcome to Valley Inspirations with Andrea and the second Social Stamping Blog Host for 2021. Currently, we are focussing on each of Stampin' Up!'s Colour families.

This month the nominated sets of colours are the In Colours. To ensure Stampin' Up colours are 'on trend' they introduce a new group of 5 colours every year that stays around for 2 years. There are always 2 sets of In Colours complementing the range of colours. At the moment the In Colours include: for 2020-2022 - Magenta Madness, Misty Moonlight, Just Jade, Bumblebee and Cinnamon Cider; and for 2019-2021 - Seaside Spray, Purple Posy, Rococo Rose, Terracotta Tile and Pretty Peacock.  The latter are about to retire.


PROJECT 1:  A Card featuring 2020-2022 In Colours

I am a bit of a dog tragic and so when I saw the cute little sausage dogs in the Jan-Jun Mini Catalogue I knew the Hot Dog stamp set would make its way home. It is a great set. A friend of mine (who loves her little dogs) has retired recently so I thought I would make this card to celebrate her stepping into the next phase of life. Balloons are often a part of a celebration, so 5 balloons were water-coloured in each of the In Colours.


The balloons and one dog were stamped in Versamark on Shimmery White card-stock and heat embossed with White Stampin' Emboss Powder. Some bones and hearts were also stamped on a card front size piece of Shimmery White card-stock. As mentioned, each balloon was water-coloured using the fine Water Painter with either Just Jade, Bumblebee, Magenta Madness, Cinnamon Cider or Misty Moonlight Classic Stampin' ink. The dog was water-coloured with Crumb Cake ink. The little envelope was stamped in Crumb Cake and the heart coloured in Magenta Madness.


The card front was water-coloured with Seaside Spray ink using the mid-sized Water Painter. The heat embossed bones and hearts resisted the colour to a subtle effect. When almost dry, the card front was embossed with the Tasteful Textures 3D embossing folder. A sentiment from the same stamp set was stamped on a scrap of Shimmery White card-stock and punched out with the Classic Label Punch.


The stamped and coloured balloons were fussy cut, removing the stamped string and pieces of White Twine from the Snail Mail Twine Combo were adhered to the back of each balloon. The balloons, dog (which also had been fussy cut) and sentiment were arranged and then adhered with Dimensionals. The little envelope was added to an edge of the sentiment label. Tail wagging lines were drawn in using a Soft Suede Stampin' Write marker. Little White Resin Hearts were scattered around.


PROJECT 2: A Set of 5 Cards with each card featuring one of the 2019-2021 In Colours. These colours are retiring as of 4th May. They are gorgeous colours and I will miss them, however, I am looking forward to the new In Colours - they are gorgeous too.


The cards are all created with the same process and techniques, just different colours and a few minor changes to give some uniqueness. 

Featuring Pretty Peacock

This card features Pretty Peacock. The background was water-coloured with Pretty Peacock Classic Stampin' ink on Fluid 100 Water-colour paper using the mid-sized Water Painter.  I water-coloured each background at the same time and left them all to dry. The Butterfly Brilliance stamp has all the butterflies joined in one stamp so the Stamparatus is great when stamping. I stamped in Smoky Slate and then coloured the butterflies in different colours using Stampin' Blends. I used the focal In Colour and other coordinating Blends. 

Featuring Rococo Rose

The butterflies were die cut using the coordinating Brilliant Wings dies. The detailed butterfly dies were used to cut the lacy butterflies in Basic White card-stock - they are delightful. A few little butterflies were also die cut.

Featuring Terracotta Tile

The Brilliant Wings dies have some have cute little accent dies, eg little holes, cross hatch lines and brick work. Different dies have been used on each of the cards. The water-coloured background was mounted on the relevant focal colour. Some white twine from the Snail Mail Combo pack was tied around the mounted background. The coordinating stamped and coloured butterflies were matched with the filagree white butterflies and then adhered together with a Glue Dot

Featuring Seaside Spray

The backgrounds were splattered with a Stampin' Write marker in the focal colour and some Frost White Shimmer Paint. The sentiments were on hand from previously created Many Messages bundle - such a great bundle. Elegant Faceted Gems were added as a finishing touch to add a little shimmer. 

Featuring Purple Posy

I've loved creating these projects, using both In Colour groupings. It was great to be able to bid a fond farewell to the retiring In Colours for 2019-2021. 

That's it from me this month. I hope you are enjoying this Social Stamping Blog Hop which is focussing on the In Colours. If you started at the beginning with our amazing Social Stamping Host, Kelly Kent, then the next talented crafter is Sharni Haines at Stampin at the Maples. Either click on Sharni's name or click on the "next" graphic to be taken to her blog.

To see the full list of participants, click on this link and be taken to Kelly Kent's Host Blog Post at My Papercraft Journey where you will find all the individual links that can take you to each person's blog


I hope to see you again next month, when we will be focussing on the Neutral colour family

Do look after yourself and your loved ones. Stay well, stay safe and be kind to yourself and others in these strange times.

Andrea 😘

Thursday, 11 March 2021

Art With Heart Creative Showcase - March 2021

Card Sketch with Butterfly Brilliance and Pierced Blooms

Hello. Welcome to Valley Inspirations with Andrea and the Art with Heart Creative Showcase for March 2021.


This month we are basing our projects on a card sketch. We can interpret the sketch "literally" or go wherever the sketch may take us.


I have created two cards using the sketch - both similar to each other though different dies sets and colours were used.

A couple of personally designed cards based on a card sketch challenge, using Stampin' Up!'s Butterfly Brilliance bundle and Pierced Blooms dies.

CARD 1: The design for the first card had been fluttering around in my heard for a little while. The Butterfly Brilliance suite has been released early by Stampin' Up! to whet our appetites for the coming release of the new 2021-2022 Annual Catalogue. It is such a gorgeous suite - I couldn't resist, especially as I love butterflies. This is the suite used for this card.

A personally designed card based on a card sketch challenge, using Stampin' Up!'s Butterfly Brilliance bundle.

The Butterfly Bijou Designer Series Paper is stunning. One of the beautiful butterfly sheets was cut to provide the lower section of the card design. The background of this piece of DSP has a watercolour effect using Magenta Madness, Calypso Coral and Bermuda Bay, so I decided to water-colour a background piece that would extend from the DSP to the top of the card. I used the same colours of Classic Stampin' ink on a piece of Fluid 100 Water-colour paper. When almost dry, it was embossed using the Brick & Mortar 3D embossing folder

A personally designed card based on a card sketch challenge, using Stampin' Up!'s Butterfly Brilliance bundle.

The embossed water-coloured piece and the DSP were adhered to a Calypso Coral card-stock mount - leaving a very fine border. Some white twine from the Snail Mail Twine Combo was wrapped around the card front twice and tied in a bow. I had a bowl of sentiments on my table and one seemed perfect for this card and it stretched all the way across the card front. The Many Messages stamp set was stamped using Versamark ink on Basic Black card-stock and heat embossed with White Emboss Powder. I just love the way a range of sentiments can be stamped and cut out with this amazing bundle. The sentiment strip was popped up on Dimensionals covering the join between DSP and water-coloured paper.

A personally designed card based on a card sketch challenge, using Stampin' Up!'s Butterfly Brilliance bundle.

Delightful filagree butterflies from the Butterfly Wings die set were cut from the beautiful Pearlescent Speciality paper. The butterflies represented the ink splotches on the sketch however, positioning is a bit different given the size of the butterflies. Two were adhered to the card front and 1 was popped up on a Mini Dimensional. White Elegant Faceted Gems were added to the card front for a little glimmer.

A personally designed card based on a card sketch challenge, using Stampin' Up!'s Butterfly Brilliance bundle.

The card front was adhered to a Thick Basic White card-stock card base with Dimensionals. The card inner was decorated with a strip of the same DSP and 3 fussy cut butterflies. A C6 Basic White envelope is to be stamped with butterflies from the Butterfly Brilliance stamp set. (Not pictured.)

A personally designed card based on a card sketch challenge, using Stampin' Up!'s Pierced Blooms dies

CARD 2: I created a couple of cards for last night's AWHT Colour Creations Showcase featuring Purple Posy. One of the cards wasn't ready for 'go live' and still needs to be finished. That card used stitched flowers from the Pierced Blooms dies.  As there were left over die cut pieces sitting on my table, I designed this card around them, with the flowers replacing the ink splotches on the sketch.

A personally designed card based on a card sketch challenge, using Stampin' Up!'s Pierced Blooms dies,

A card front of Basic White card-stock was passed through the Cut & Emboss machine twice using the leafy Greenery embossing folder. The embossed card front was adhered directly to a Purple Posy card base. A piece of Hydrangea Hill Designer Series Paper was adhered directly at the bottom of the card front. A different pre-stamped and cut sentiment using the Many Messages bundle with Momento ink on Basic White card-stock was popped up on Dimensionals over the edge of the DSP.

A personally designed card based on a card sketch challenge, using Stampin' Up!'s Pierced Blooms dies.

Stitched flowers, pre-cut using the Pierced Blooms dies with Basic White, Purple Posy, Highland Heather and Mint Macaron card-stocks were sponged with White Craft ink on the outer edges. Three large to mid sized flowers had different colour centres adhered in place. The 3 flowers were positioned with Dimensionals similar to the sketch's ink splotches. Five little flowers and a number of white Elegant Faceted Gems were scattered around. 

A personally designed card based on a card sketch challenge, using Stampin' Up!'s Pierced Blooms dies.

A few remaining pierced blooms were adhered to a Basic White card inner. As the card will be hand delivered to a lovely customer who is grieving the loss of a a special friend, a few pierced blooms will be added to the envelope to give a hint of what may be inside. 

A couple of personally designed cards based on a card sketch challenge, using Stampin' Up!'s Butterfly Brilliance bundle and Pierced Blooms dies.

I hope you like the cards. It is a versatile sketch and could be used with a range of Card-stocks, DSP, Stamps and Dies. A sketch is a great starting point if you are looking for inspiration for your project.


I am blessed to be apart of a talented team. Knowing each of my colleagues in this Creative Showcase, I am sure they have amazing projects to share with you that have been inspired by the sketch. Don't miss having a look at each of their blogs. Rachel is our amazing host of the Art with Heart Monthly Creative Showcase, so if you haven't finished visiting all of the team's creations, you can visit/revisit Rachel's page at Handstamped by Rachel, where she hosts all the links to the other Showcase participants. I'm certainly looking forward to checking out everyone's interpretation of the sketch. 


I hope you join us again on the second Thursday of April for our next Showcase. 


Please don't hesitate to contact me if you are in Australia and would like a copy of the coming Stampin' Up! 2021-2022 Annual Catalogue or the continuing January - June Mini Catalogue; or if you have any queries that I could help with. Also, if you are interested in buying Stampin' Up! products, I would delighted to serve you.

Take care of yourself and your loved ones. I hope you stay safe, stay heathy and stay sane in these strange times.

Have a great month.

Andrea 😘

Be Inspired - July 2026 - Creating Backgrounds

Be Inspired Design Team Blog Hop CREATING BACKGROUNDS Welcome to Valley Inspirations with Andrea and the July  Be Inspired Blog Hop  where w...