Art with Heart Wow Tutorials

Showing posts with label Real Red. Show all posts

Wednesday, 13 March 2024

AWH Colour Creations Blog Hop #44 Real Red

Real Red with Flower Card Fancy Fold

Hello. Welcome to Valley Inspirations with Andrea and the Art with Heart Colour Creations Blog Hop. We are working though the Stampin' Up! colours in alphabetical order, focussing on one colour each week.


This week’s Blog Hop is focussing on a a strong red called Real Red. Real Red is part of the Regals Colour Family and is a great red. This colour is wonderful for flowers, hearts and for Christmas to name a few.


Real Red is produced in Stampin' Up!'s card-stock, both A4 & 12"x12"Classic Stampin' inks (ink pads, ink spots re-inkers); Stampin' Write Marker; Stampin’ Blends Combo; Regals Designer Series Paper as well as a number of other products. 


Real Red ink, card-stock, Stampin’ Blends and Stampin’ Write Marker have been used in the creation of this project plus a range of non-Real Red bits and pieces.


I decided to use the Flower Cart bundle as I could see the awnings on the flower cart in red & white stripes, but then as I was putting the card together the red & white awning didn’t make its way onto the card. To show off the little red flower card I chose another fancy fold - a variation of an easel card.


The flowers were stamped in Flirty Flamingo Classic Stampin’ ink, the leaves in 2nd generation Old Olive ink and the pots in Real Red ink.  To carry Old Olive through, it was used to stamp the cobbled stones - they must be moss covered. The coordinating dies made cutting out easy.


The cart was die cut from Real Red card-stock and the wheels from Basic Black card-stock.


To keep the card colour scheme as Real Red, Basic White & Basic Black with a touch of other colours for the flowers, a piece of the Rock & Roll Designer Series Paper was selected for a few of the card panels. A very light touch of blending was added to the DSP and behind the flower on the front panel.


A sentiment from the stamp set was Black heat embossed onto the DSP, fussy cut out and popped up on Mini Dimensionals. A little Real Red splattering was added. I tried using Real Red ribbons but they were too “heavy” so I coloured the Sweet Sorbet twine with a Light Real Red Blend. A few gold Adhesive-backed Dragonflies were added as the final touch - they are an online-only product.


Here is the card folded up and below is the card fully opened.


A panel for writing a personal message was decorated with a couple of pots of flowers.


Similarly, a Basic White C6 envelope was decorated with pots and flowers.


Thank you so much for dropping by on your way around the Colour Creations Blog Hop.


To continue with the Real Red blog hop just click the "next" graphic below to be taken to the blog of a special lady, Kate MorganI am looking forward to checking out Kate’s creation(s). I do love seeing everyone’s' projects - there is always so much inspiration.

I do hope to see you next week when we will be featuring Shaded Spruce as we continue the weekly 2023-2024 Colour Creations Blog Hop series

Stay well, stay safe and be kind to yourself and others.

Andrea 💕🐾


If you find a broken link or would like to view the full list of participants go to Catherine Proctor’s blog @ What Cathy Made. Cathy is our brilliant Art With Heart Team Colour Creations Coordinator.  She is a wonderful lady. Check out her delightful creation while you are there.

If you live in Australia, don't already have a Stampin' Up! demonstrator and would like your own copy of the Stampin' Up 2023-2024 Annual Catalogue and or the new January-April 2024 Mini Catalogue, then let me know and I will be delighted to send them to you.  Please don't hesitate to make contact with any other queries about this project or Stampin' Up!. 


#colourcreationsbloghop  #stampinup #stampinupaustralia #stampinupsouthpacific #stampinupdemo  #handmadecards #makeacardsendacard #stampinupdemonstrator #papercrafting #artwithheartteam  #papercrafter  #valleyinspirations   #flowercart   

Wednesday, 1 March 2023

AWHT Colour Creations #42 Real Red

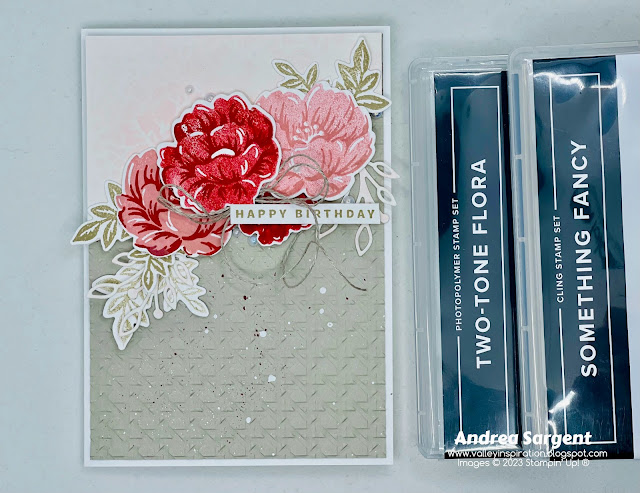
Real Red with Two-Tone Flora & Something Fancy

Hello. Welcome to Valley Inspirations with Andrea and the Art with Heart Colour Creations Blog Hop. We are working though the Stampin' Up! colours in alphabetical order, focussing on one colour each week.


This week’s Blog Hop is focussing on a a strong red called Real Red. Real Red is part of the Regals Colour Family and is a strong primary colour. This colour is lovely when used for flowers or berries, fruit (eg strawberries), hearts, shoes or bright balloons and it is wonderful as a Christmas colour ... plus so much more.


Real Red is produced in Stampin' Up!'s card-stock, both A4 & 12"x12"Classic Stampin' inks (ink pads re-inkers); Stampin' Write Markers; Stampin' Blends Combo; Watercolor Pencils; Regals Designer Series Paper as well as the Christmas Gifting Kit, Christmas Whimsy Card Kit, plus Real Red and Burlap Ribbon Combo, Real Red & Garden Green Ribbon Combo, Real Red Mini Ruffled Ribbon and Pearlized Enamel Effects. There is also a range of products using Real Red in the Clearance Rack - why not check them out.

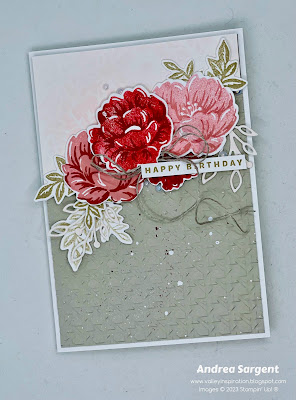
Real Red card-stock, ink and Stampin' Write Marker have been used in these projects plus a range of non-Real Red bits and pieces. Here are my cards:

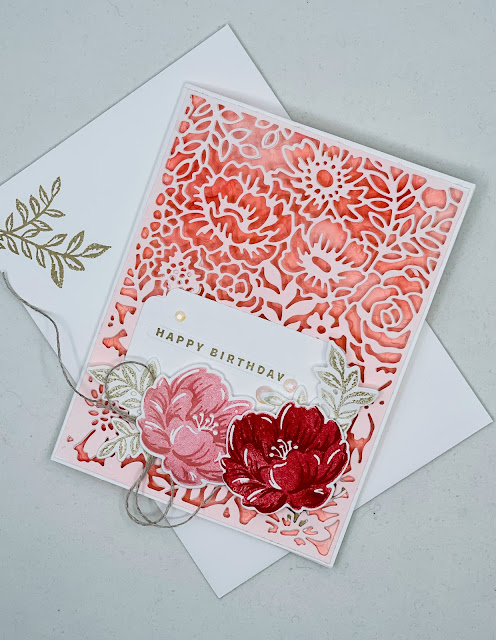
Wish Happy Birthday with a personally created Two-Tone Flora card.

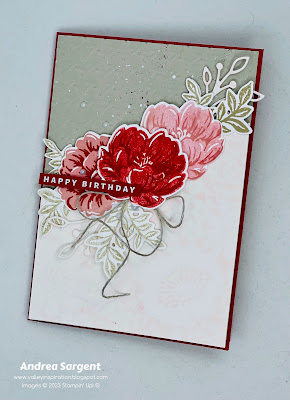
There is actually a third card as well. Here 'tis:

Wish Happy Birthday with a personally created Two-Tone Flora card.


CARDS 1 & 2:

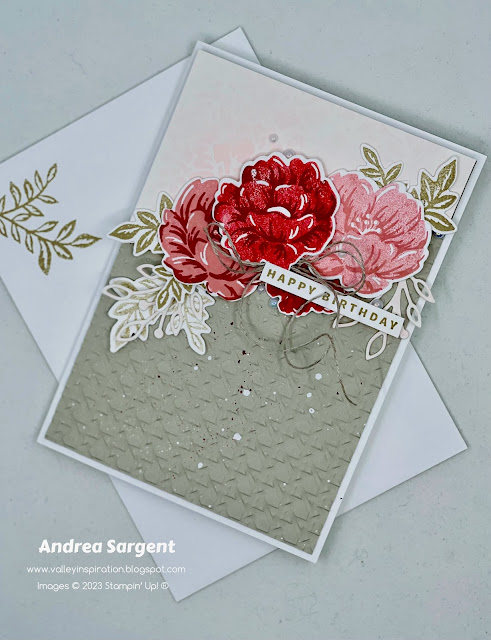
I started with a plan to create one card, but as I was crafting I decided to make a second as there would be quite a few bits and pieces left over. The cards are similar but with a number of  differences. The process for creating cards 1 and 2 was the same it will be discussed once.

Wish Happy Birthday with a personally created Two-Tone Flora card.

The creation process started with cutting the large detailed die out from Basic White card-stock. This acted as a mask and was layered over Shimmery White card-stock. One drop of Real Red Classic Re-inker was added to a Stampin' Mister which was filled with water. A few pumps of mist was sprayed at a height over the die cut mask while it was lying on top of the Shimmery White panel. The trick was to spray enough to provide subtle coverage but not so much that it drenched the mask. I needed a second go to feel happy with the outcome - the first was too light.

Wish Happy Birthday with a personally created Two-Tone Flora card.

A background piece of Sahara Sand card-stock was embossed with the Cane Weave 3D embossing folder. [NB The second card, pictured directly above, used the embossed side, while the first card used the de-bossed design. I love the way we can choose between the embossed and de-bossed sides.] The embossed Sahara Sand panel was lightly splattered using a Real Red Stampin' Write Marker and some White Craft ink (ie using the medium Water Painter) before being adhered directly to the card base; ie Thick Basic White card-stock for card 1 and Real Red card-stock for card 2. Once dry, the delicately misted panel was cut diagonally with Stampin' Up!s Paper Trimmer. The top piece was added to card 1 with Dimensionals and similarly, the bottom section to card 2.

Wish Happy Birthday with a personally created Two-Tone Flora card.

The Two-Tone Flora stamps create beautiful 2 step flowers using a base stamp with a detailed layer. The stamp set includes a number of different flowers - all lovely. I prefer stamping the detailed stamp first in the darker colour and then align the lighter full flower stamp over the top, however, some stampers prefer stamping the layers in the opposite order. Which way do you prefer? The colour combos used for these flowers were a) Real Red stamped in full strength for the detailed layer and stamped off for the base layer, b) Real Red stamped in full strength for the detailed layer and Blushing Bride for the base layer, c) Blushing Bride stamped in full strength for the detailed layer and stamped off Blushing Bride for the base layer. The leaves were stamped in Sahara Sand Classic ink; some full strength and some stamped off. Each of the flowers and leaves have coordinating dies.

Wish Happy Birthday with a personally created Two-Tone Flora card.

The flowers and leaves were arranged and adhered with either Dimensionals or Glue Dots. I felt it needed an extra bit of "lightness" so die cut some detailed leaves from the Fitted Florets dies. They were die cut from the discarded misted panel. A Linen Twine bow was tucked under the edge of a flower using a Glue Dot. A sentiment from the Something Fancy stamp set was stamped in Sahara Sand ink on Basic White card-stock (card 1) and white heat embossed on Real Red card-stock (card 2). Iridescent Pearl Basic Jewels were added as the finishing touch.

Wish Happy Birthday with a personally created Two-Tone Flora card.

A strip of Real Red card-stock was added to a Basic White card inner, with some remaining flowers and leaves adhered directly in place.

Wish Happy Birthday with a personally created Two-Tone Flora card.

C6 Basic White envelopes were stamped with leaves in Sahara Sand ink on both the envelope front and back flap.

Wish Happy Birthday with a personally created Two-Tone Flora card.

CARD 3:

After creating the two cards above, the misted pale pink die cut mask was "staring at me". My first thought was "I must do something with that later." I don't know about you, but I have said that with so many bits and pieces - and they are still around ... somewhere. So I determined to create a third card for this blog hop.

Wish Happy Birthday with a personally created Two-Tone Flora card.

The large detailed die from the Two-Tone Flora dies was used to cut the front of a Thick Basic White card base. The coloured die cut was adhered directly over the die cut front. I used tiny dabs of Multi Purpose Liquid Glue on the thicker bits and the edges. 

Wish Happy Birthday with a personally created Two-Tone Flora card.

Stamped and die cut flowers and leaves were arranged over a Basic White card-stock label that had been cut with one of the Something Fancy dies. A sentiment from the Something Fancy stamp set was stamped in Sahara Sand ink. A Linen Twine bow and a few Iridescent Basic Rhinestone Jewels finished the card front design.

Wish Happy Birthday with a personally created Two-Tone Flora card.

A panel of Shimmery White card-stock was water-coloured (wet on wet technique) with Real Red and Blushing Bride inks. As the panel was drying, it was embossed with the Pretty Flowers embossing folder. When dry, it was directly adhered inside the card on the back panel. Another die cut label was positioned inside the card directly beneath the label on the card front. A brief personal message could be written here. A smaller left over flower and some leaves were adhered to the side of the inner label. While not really seen in the photograph, an extra label was adhered directly behind the top label to give a better finish inside the card.

Wish Happy Birthday with a personally created Two-Tone Flora card.

As mentioned above, a C6 Basic White envelope was stamped with leaves in Sahara Sand ink on both the envelope front and back flap.

Wish Happy Birthday with a personally created Two-Tone Flora card.

I hope you like this set of cards featuring Real Red (combined with Blushing Bride and Sahara Sand) together with the Two-Tone Floral and Something Fancy bundles. I love the lacy look of the die cut card front of Card 3 - it is something different. Having said that, I think Card 1 is my fav. Do you have a favourite???

Wish Happy Birthday with a personally created Two-Tone Flora card.


There is more Real Red creativity. To continue with the blog hop, click the  "onto the next" graphic below and be taken to the blog of the very special Kate MorganI always look forward to checking out Kate’s creations. I do love seeing everyones' projects - there is always inspiration.

I hope to see you next week when we will be featuring Rich Razzleberryanother of the Regals Colour family as we continue the weekly 2022-2023 Colour Creations Blog Hops.  

Stay well, stay safe and be kind to yourself and others. 

Andrea 💕🐾


If you find a broken link or have come to this blog hop from a different entry point, you can view the full list of participants on Catherine Proctor’s blog @ What Cathy Made. Cathy is our  Art With Heart Team Colour Creations Coordinator.  She is an amazing lady. Check out her delightful creation while you are there.

If you live in Australia, don't already have a Stampin' Up! demonstrator and would like your own copy of Stampin' Up's 2022-2023 Annual Catalogue and or the January - April 2023 Mini Catalogue then let me know and I will be delighted to send them to you.  Please don't hesitate to make contact with any other queries about this project or Stampin' Up!. 

#colourcreationsbloghop  #stampinup #stampinupaustralia #stampinupsouthpacific #stampinupdemo  #handmadecards #makeacardsendacard #stampinupdemonstrator #papercrafting #artwithheartteam  #papercrafter  #stamper  #valleyinspirations   #twotoneflora #somethingfancy 

Wednesday, 9 March 2022

AWHT Colour Creations #39 Real Red

Real Red with Flowering Tulips 

Hello. Welcome to Valley Inspirations with Andrea and the Art with Heart Colour Creations Blog Hop. We are continuing to work though all the Stampin' Up! colours in alphabetical order. Having started mid 2021 this blog hop features the a colour starting with "R". 


This week’s Blog Hop is focussing on a a bright red called Real Red. Real Red is part of the Regals Colour Family and is pretty close to a pure Red. It is a great Stampin' Up! colour although its not a colour I tend to reach for unless I'm preparing for Christmas or thinking of using a rainbow of colours. Real Red is dramatic when used with Basic Black and Basic White. And it goes well with a range of neutrals as well as with its complementary colour, green. I have used Real Red and Garden Green & Granny Apple Green with Smoky Slate and gold in this project.


Real Red is produced in Stampin' Up!'s card-stock, both A4 & 12"x12"Classic Stampin' inks (ink pads re-inkers); Stampin' Write Markers; Stampin' Blends, Water-colour Pencils,   Regals Designer Series Papers as well as Sweet Talk Designer Series Paper & Red Rhinestone Basic Jewels, From My Heart Faceted Gems, Sequins for Everything, Faux Linen Ribbon, Stitched Satin Ribbon, Mini Ruffles Trim, Playful Pets Trim Combo and the Christmas Whimsy Card Kit. The card below has used Real Red Classic Stampin' ink, a Stampin' Write Marker, plus a range of other non-RR bits and pieces.

Here is my card:


I love playing with water-colour and Real Red. The tulip flowers were only coloured using Real Red Classic Stampin' ink and water. Isn't the colour range gorgeous.

CARD 1:

I had been trying hard to resist the Flowering Tulips Bundle as I had already purchased the gorgeous Daffodil Daydream bundle. Even though I had decided to only have either the Daffodil Daydream bundle Or the Flowering Tulips bundle, I was convinced on how wonderful the tulips were thanks to a friend and colleague. I'm so glad I weakened and purchased the tulips. They are delightful. I love the dimension you can achieve.

Say Thank you with a personally created Flowering Tulips card.

Using off cuts of Fluid 100 Watercolor Paper that were just wide enough for the Tulip dies to fit, water was laid down and drops of Real Red ink was added. Some were to be really light and so became light pink, and there was areas of vanilla with patches of pink - so, so beautiful. Another off-cut became deeper red and an extra  piece became a bit lighter. A couple of off cuts were also coloured with Garden Green and Granny Apple Green for the leaves and stems

Here is the photo that inspired my colouring:


Tulip dies, in their various combinations, die cut the water-coloured paper and the flowers were assembled with a mix of Glue Dots & Mini Dimensionals. I so enjoyed water-colouring paper for the tulips and leaves.

Say Thank you with a personally created Flowering Tulips card.

A Basic White card front was lightly stamped in Smoky Slate ink with a little background stamp - stamping in the top left and bottom right. Then this panel was embossed with the Hive 3D Embossing Folder and a strip of the Crane of Fortune Speciality Designer Series Paper - ie a design using Smoky Slate, White and touches of Gold - was adhered across the centre. 

Say Thank you with a personally created Flowering Tulips card.

The second largest scolloped rectangle from the Scalloped Contour dies was used to cut a Basic White panel. Three tulips were arranged on the panel together with stems and leaves. I must admit that I had planned to sit the flower heads higher on the white panel and the leaves were to be arranged a little differently - I must have been in some form of daze, thinking of something else when I adhered the pieces in place. I'm only noticing it as I write the blog. Hmm, the mind has unknown depths. Some Gold Simply Elegant Trim was wrapped around the panel twice and adhered to the back, with a bow to be added later once the sentiment was in place.

Say Thank you with a personally created Flowering Tulips card.

The card front was finished with a sentiment from the same stamp set that was Gold heat embossed on Basic White card-stock, Gold Stampin' Emboss Powder and a Heat Gun. The "Thank you" was fussy cut and adhered with Mini Dimensionals. A few Brushed Brass Butterflies and Iridescent Rhinestone Basic Jewels were scattered around. I have just realised that I forgot to add the bow of Simply Elegant Trim over the wrapped trim and near the sentiment. Oops!!!  How embarrassing - it's too late to rephotograph as the light has changed outside. Check back tomorrow for the updated photos. No wonder I thought it was missing something, so I added some Real Red Splattering with a Real Red Stampin' Write Marker.

Say Thank you with a personally created Flowering Tulips card.

The card inner is a piece of Basic White card-stock with a couple of thin strips of the Symbols of Fortune Speciality Designer Series Paper and a half circle of the words "You are so thoughtful" from the same sentiment that "Thank You" had came from. The flap of a Basic White C6 Envelope was decorated with the same design of the Symbols of Fortune SDSP. A simple but effective way to decorate an envelope.

Say Thank you with a personally created Flowering Tulips card.

I had such fun water-colouring and creating the tulips for this card. I hope it's given you some ideas to mull over.

Thank you so much for dropping by. I appreciate the time you spent with me.

If you live in Australia, don't already have a Stampin' Up! demonstrator and would like your own copy of Stampin' Up's 2021-2022 Annual Catalogue and or the new January - June 2022 Mini Catalogue & Saleabration Catalogue then let me know and I will be delighted to send them to you.  There is only a short time of Sale-a-brations remaining as it finished on 16th March. Also, please don't hesitate to make contact with any other queries about this project or Stampin' Up!. 

There is more Real Red creativity. To continue with the blog hop, click on the "next" graphic below to be taken to the blog of the lovely, Kate Morgan. I always look forward to checking out Kate's creation (I wonder what she has in store this week). I do love seeing everyones' projects - so many ideas and such great inspiration.

Hope to see you next week when we will be featuring another versatile colour Rich Razzleberry as we continue the weekly 2021-2022 Colour Creations blog hops.

Stay well, stay safe and be kind to yourself and others. 

Andrea 💕🐾

If you find a broken link or have come to this blog hop from a different entry point, you can view the full list of participants on Catherine Proctor’s blog, our wonderful Art With Heart Team Colour Creations Coordinator.  I so appreciate all Cathy does in coordinating this blog hop each week. She is such a special lady. Check out her wonderful creation while you are there.

#colourcreationsbloghop  #colourcreationsbloghop2022  #stampinup #stampinupdemo  #artwithheartteam  #handmadecards #makeacardsendacard #floweringtulips #stampinupaustralia


Wednesday, 17 March 2021

Art with Heart Colour Creations Showcase - #40 Real Red

Real Red with Love You Always Suite & Many Messages

Hello. Welcome to Valley Inspirations with Andrea and the 40th 2020/2021 Colour Creations Showcase by members of the Art with Heart Team.


The week we are showcasing a strong primary colour, Real RedReal Red is part of Stampin' Up! Regals colour collection. This colour is a true red. Real Red is produced in Stampin' Up!'s card-stock, both A4 & 12"x12"Classic Stampin' inks (ink pads, re-inkers & ink spot); Stampin' Write Markers; Stampin' Blends, Watercolour pencils; a number of Designer Series Papers, including Snail Mail & Playful Pets Designer Series Papers; Resin Hearts embellishments and Double Stitched Satin Ribbon and Red Rhinestones Basic Jewels.


Red is a great colour and one I used to love to wear when I was young. These days it isn't my "go to colour" especially when creating, however, I still love it as a colour. I have a bright red rose in my garden and it is currently flowering again (which is quite something as I hardly water my garden). This beautiful rose inspired my choices this week and led me to use the True Love Designer Series Paper with my Stampin' Blends.


I have created two cards using similar products, so they are similar but different.


CARD 1: I started by colouring flowers on one of the sheets of True Love DSP. This DSP is so gorgeous and only uses black and white. A number of the designs are great for colouring. I coloured a few groups of flowers using the Real Red Stampin' Blends combo, together with light Flirty Flamingo, dark So Saffron, light Mossy Meadows and Old Olive combo and of course, the Colour Lifter.


I coloured a piece of Basic White card-stock using a Blending Brush with Real Red Classic Stampin' Ink, giving an ombre effect. This sheet of hand coloured card-stock was then flicked with water. The effect isn't noticeable on this card but one of the photos of the second project provides a close up. A label was cut using the larger elongated die from Hippo & Friends dies.

A card front was cut from Basic White card-stock and de-bossed with the Dainty Diamonds 3D embossing folder. De-bossing means the "other" side of the embossed card-stock was placed up-ward to be seen. Both sides are equally gorgeous - it just depends on the desired effect for your design. I was wanting some subtle interest, so decided the flatter side worked well. The de-bossed card front was adhered directly to the Thick Basic White card base.


A background of a white with black dot design from the True Love DSP was mounted on a slightly larger Basic Black card-stock mount. This was centralised and adhered with Dimensionals on the de-bossed card front. The hand coloured die cut label was also attached with Dimensionals.


The coloured flowers were all fussy cut out and arranged over the label and card front. The flowers were shaped a little with fingers and a Bone Folder. This gives added life and dimension. The flowers were adhered with Tombow Multi-purpose Liquid Glue.


A previously prepared sentiment strip was added using Mini Dimensionals together with 3 Matte Black Dots as the finishing touch. The sentiment label was created at a recent card class on the Stamparatus using Versamark ink on Basic Black card-stock and heat embossed using a Heat Gun and White Stampin' Emboss powder. The Stamparatus is brilliant when stamping the Many Messages stamp as it is a large stamp and if all of the sentiments do not come out clearly, the Stamparatus enables the image to be stamped again in the same place over the initial image. A whole set of messages is created when the messages image is die cut with one pass through the Cut & Emboss Machine using the coordinating dies. All of my students went away with a set of sentiments to use on other cards. They were delighted.


The card inner was created from Basic White card-stock with a thin strip of Basic Black card-stock and a very thin strip that had been trimmed off when neatening the piece of red blended card. An arrangement of partial flowers from the edge of the DSP were fussy cut. They are perfect for the card inner.

A C6 Basic White envelope was stamped with flowers from the coordinating stamp set, Forever & Always stamps. I so love Stampin' Up!s coordination of products.


CARD 2: As mentioned, the same/similar products were used for this second card but he card layout is different. As with other strong colours, I wanted to hero Real Red but didn't want it to be overpowering. I added a second challenge to creating these projects, that is also working with black. For some reason in the past, I have avoided using black on my projects, instead using dark colours that coordinate with the projects colour scheme. Of late, I have consciously endeavoured to incorporate black. I really appreciate the dramatic effect of black in project designs by others, but for some reason, I have had an aversion. Basic Black and Basic White can be stunning with Real Red, so I decided to use this as the base colour way for this week's projects.

A Basic White card front was also embossed with the Dainty Diamonds 3D embossing folder. This was adhered directly to the Thick Basic White card base.


A strip of the hand blended Real Red card was adhered to the embossed card front and a thin strip of Basic Black card-stock was adhered over the edge. See below for a close-up of the effect of water being sprinkled over the Real Red blended card. I love the way the water droplets lift the colour and in this case, there is an orangey edge around the lighter circle. I find colour and the effects of various techniques fascinating.


A double flower spray, that had been coloured with blends (at the same time as flowers from Card 1), was fussy cut. Another leaf was coloured with light Mossy Meadow, light & dark Old Olive Stampin' Blends and the Colour Lifter. Leaves and budded twigs from the coordinating Always In My Heart bundle were die cut from Basic Black card-stock. The flowers, leaves and die cut pieces were arranged and adhered with Multi-purpose Liquid Glue.


A different sentiment from the pre-prepared sentiments using the Many Messages bundle was adhered with Mini Dimensionals along part of the black card-stock strip. Matte Black Dots were added as the finishing touch.


Similar to the first card, the card inner was created from Basic White card-stock with a thin strip of Basic Black card-stock. An arrangement of partial flowers from the edge of the DSP were fussy cut and adhered abutting the black strip. The perfect touch for the card inner and the partial flowers are not wasted.


A C6 Basic White envelope was stamped with flowers from the coordinating stamp set, Forever & Always stamps, as with the first project.


As i was taking photos of my projects late morning, my fur family, Gemma was relaxing watching me - from a distance. Normally she would be much closer, but she was reinforcing her earlier communication - that it was time for a walk. So cute. (Thank you for indulging me with a tale of my fur companion.)

I love colouring and enjoyed creating these two cards - and am becoming more comfortable using black. Thank you for spending time on the Valley Inspirations blog. I hope you have found something of interest.

Catherine Proctor is the wonderful host of the Art with Heart Colour Creations Showcase. If you haven't finished visiting all of the team's colour creations, you can visit/revisit Catherine's page at What Cathy Made, where she hosts every link to the participating blogs so you can find everyone's Real Red creations. Checking out everyone's creations and their interpretation of the amazing Stampin' Up! colours is always a highlight. 

I hope to see you again next week when members of the team share projects that hero Rich Razzleberry. 

Stay well, stay safe and be kind to yourself and others as these strange times continue. Hopefully life with settle to an improved normality before too long. 

Andrea 💕🐾


AWH Heart of Christmas Blog Hop # 1

Christmas with the Modern Christmas suite Hello. Welcome to  Valley Inspirations with Andrea  and the first  Art with Heart Team Heart of Ch...