Art with Heart Wow Tutorials

Showing posts with label Masculine Cards. Show all posts

Sunday, 10 August 2025

CASEing the Catty #532 - CASE An Project Featuring Animals

CASE A Project Featuring Animals meets Hugs & Healing


Hello, Welcome to Valley Inspirations with Andrea and #532 Challenge with CASEing the Catty.


I am so glad you have dropped by. You may have come from Rebecca Scurr, as you take this week’s Blog Hop or perhaps arrived directly here; either way I am delighted you are here. At the end of my blog, I have linked to Monique Fielder so you can continue with the Blog Hop.

At CASEing the Catty we love to use the samples from the Stampin' Up! Catalogues as inspiration and each week we have a different theme to guide our CASEing. To CASE is to "Copy And Selectively Edit" or some say "Copy And Share Everything". This week we are CASE-ing projects that feature animals. The card I CASED can be found on page 95 of the 2025-2026 Stampin' Up! Annual Catalogue.


Here is my card adjacent to the  card I CASEd in the Annual Catalogue


I have been time poor & not well so I decided to create a simple CASE of a card on page 95 - one with a line drawing of a little dog. I couldn’t resist using a different dog as the focal point. The Hugs & Healing stamp set include really cute images and as I only recently heard about a friends illness this image seemed perfect.


I coloured this cute little dog with Stampin’ Blends combos, ie Cloud Cover, Misty Moonlight, Crumb Cake and Secret Sea plus my trusty Colour Lifter. He was then fussy cut.


The card base is Basic Beige as is the panel spanning the card with the sentiment. A Basic White card-stock panel was layered on the front then a smaller piece of dappled Basic Beige DSP (from the coming Peaceful Garden DSP) was dry embossed with the Mini Corrugated Embossing Folder. This embossing folder is now on the “Last Chance List” so if you like it act quickly before it sells out.


Finishing touches included adding some Basic Beige paw prints, a little Secret Sea splattering, Secret Sea Faux Linen Ribbon and some Secret Sea In Colour Flat Pearls.


Thank you so much for calling in on your way around the Blog Hop for CASEing the Catty Challenge #532.


Don’t miss any of the inspiration from this creative CASEing The Catty Crew. The next blog in the hop is by the wonderful Monique Fielder. Just click on the "next" graphic below to be taken to her blog. I wonder which project she has CASEd - I am sure her project will be something special.


Join In The Challenge: We would love you to share a project that you have created for this Challenge which has been inspired by any project featuring animals. To share, all you need to do is go to the CASEing The Catty Challenge Group on Facebook. If you aren't a member, it’s easy to request to join and once anpproved all you need to do is upload a photo of your project to the main section. You can click on the graphic below to be taken to the group on Facebook. We would so love to see your creation that you especially created for this challenge.


#ctc532 #stampinup #stampinupaustralia #stampinupsouthpacific #stampinupdemo  #handmadecards #makeacardsendacard #stampinupdemonstrator #papercrafting #papercrafter  #valleyinspirations  #hugs&healing  #caseingthecatty #artisandesignteam2025  #artisandesignteam


Thursday, 10 September 2020

Art with Heart Creative Showcase - September 2020

Masculine Theme with World of Good

Hello. Welcome to Valley Inspirations with Andrea and the September 2020 Art with Heart Creative Showcase

This month we are focusing on projects suitable to give fellas. I have created a card using Stampin' Up!s gorgeous World of Good Suite. I have had an idea floating around my brain ever since I first saw this Suite, so I'm delighted to try it out for this Creative Showcase. As I created this card, I also had a special guy in mind who will be celebrating his birthday soon. He is someone who has spent much of his life helping others.

World of Good Masculine Stampin Up card, Andrea Sargent, Independent Stampin Up Demonstrator, South Australia

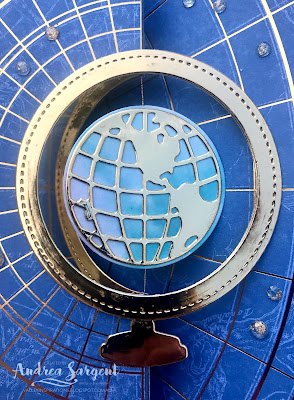
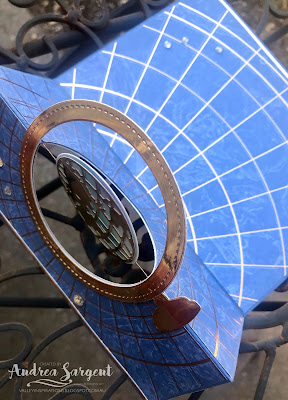
I've been wanting to create a spinner card, that is to have part of the design spin when the card is opened. In this case it is the "world". I don't know about you, but at times I am feeling that the world is spinning too fast. We are in strange times...

A friend helped me take a video to help you see the card when it opens. I was crafting with friends - one in person and our other friend online; but needed to leave before this card was finished, so you may notice that there were no gems on the card in the video.


The World of Good Suite includes beautiful World of Good Speciality Designer Series Paper (SDSP), with a number of the designs having brass highlights. The sheet I chose has brass consecutive circles on a Misty Moonlight design. I cut the SDSP so that the centre of the circles would be in the middle of the card front ... and then I die cut a circle in the centre! 

How did this card come together ...?

World of Good Masculine Stampin Up card, Andrea Sargent, Independent Stampin Up Demonstrator, South Australia

A card base of Misty Moonlight card-stock (normal portrait size card in Australia) was scored in half and then the front was scored in half again. The World of Good SDSP sheet was cut so that one piece would fit the top front. The second piece - the same size as the first, was cut for the inner front. A third piece was to fit the bottom half of the card. Care was taken to ensure the pieces were kept in order so the circles continued on. Two very thin strips of Brass Foil card-stock were adhered to the beginning and end of the SDSP on the card.

World of Good Masculine Stampin Up card, Andrea Sargent, Independent Stampin Up Demonstrator, South Australia

A circle was cut from the centre of the front of the card using a circle die from the Stitched Shapes dies.  Two of the circular dies were used to cut two metallic round frames and the small pedestal out of the Brass Metallic card-stock. Half of the pedestal and one side of a round frame were adhered around the circular hole on the top folded section, that is, half was adhered directly, the other half hung over and across the card.

World of Good Masculine Stampin Up card, Andrea Sargent, Independent Stampin Up Demonstrator, South Australia

To create the world, a piece of Shimmery White card-stock was water-coloured with Seaside Spray, Pretty Peacock and Highland Heather Classic ink and the mid-size Water Painter. While the water-coloured card-stock was drying, the two world dies from the World Map dies were used to cut two spheres of the world out of Brass Metallic card-stock. I was excited when I first saw this die set - it was great to see Australia represented. Once the water-coloured piece was dry, two circles were die cut. This circle die was included in the World Map dies.

World of Good Masculine Stampin Up card, Andrea Sargent, Independent Stampin Up Demonstrator, South Australia

Each metallic world sphere was adhered to a watercolour circle. I wanted to use a fine thread that wouldn't dominate the design as the structural thread to suspend the world in space. I couldn't find a clear sewing thread (used many years ago) but found some retired Stampin' Up! Copper Thread. 

World of Good Masculine Stampin Up card, Andrea Sargent, Independent Stampin Up Demonstrator, South Australia

This was centred across the back of one of the world spheres and the other sphere adhered over it so the thread was completely stuck through the centre. The metallic thread was then adhered along the fold at the back of the card front. Another piece of SDSP then was adhered to the back of the card front, to ensure the thread was firmly attached and all card surfaces were decorated. The second metallic frame was adhered at the edge of the hole.

World of Good Masculine Stampin Up card, Andrea Sargent, Independent Stampin Up Demonstrator, South Australia

I usually add a sentiment on the card front. I tried numerous approaches, including gold heat embossing on Misty Moonlight card-stock; water-colouring more Shimmery White card-stock and either stamping or heat embossing on it; using a label or fussy cutting the sentiment, different size sentiments, etc. Nothing seemed to work - it just detracted from the SDSP design and that sense of outer space around our world. Yet I kept looking at the front of the card - it needed something. To finish the card a number of Wonderful Gems were scattered over the outer space to represent stars and planets and add a little sparkle. These embellishments are so delightful. A pack includes gems in both red and clear, with little specks of gold floating within the gems. Delicious.

World of Good Masculine Stampin Up card, Andrea Sargent, Independent Stampin Up Demonstrator, South Australia

A piece of Whisper White card-stock was stamped with a sentiment from the Beautiful World stamp set and the feather pen was added to the corner - all stamped in Misty Moonlight Classic ink. The feather pen was also stamped on a Whisper White C6 Envelope to tie it in with the card.

World of Good Masculine Stampin Up card, Andrea Sargent, Independent Stampin Up Demonstrator, South Australia

I had fun creating this card, even though it didn't just fall into place. There was a bit of nutting out how to create the effect that I wanted to achieve. Must admit, I was excited to see my world spinning around and practiced a number of times - only to find that the thread seemed to pull/stretch and my world started to fall - it was no longer centred in its space. It took a bit of fiddling to return it to its right position. Obviously, I'm no Atlas (ie the Greek god, Atlas).

World of Good Masculine Stampin Up card, Andrea Sargent, Independent Stampin Up Demonstrator, South Australia

Thank you for visiting Valley Inspirations. I really appreciate you spending time on my blog.


I am so blessed to be apart of such a talented team. Knowing each of my colleagues in this Creative Showcase, I am sure that they have some amazing projects to share with you. Don't miss checking out each of their blogs. Rachel is our wonderful host of the Art with Heart Monthly Creative Showcase. If you haven't finished visiting all of the team's amazing masculine creations, you can visit/revisit Rachel's page at Handstamped by Rachel, where she hosts all the links to the other Showcase participants. I'm certainly looking forward to checking out everyone's creations. I always find inspiration.


I hope you join us again next month for October's Art With Heart Team Creative Showcase. I'm not sure what we will be showcasing but I know it will be fun and inspiring given my colleagues and the Stampin' Up products we love. 


Please don't hesitate to contact me if you are in Australia and would like a copy of the  Stampin' Up! 2020-2021 Annual Catalogue or the August - December Mini Catalogue; or if you have any queries that I could help with. Also, if you are interested in buying Stampin' Up! products I would delighted to serve you.

Take care of yourself and your loved ones. Stay safe and stay heathy and sane.

Andrea 😘


Thursday, 27 February 2020

Art With Heart Monthly Blog Hop - February 2020

Masculine Cards for Fellas

How can the year be passing so quickly? February is almost at an end and I've been creating masculine cards. I am so glad you have dropped by to see some cards to give to fellas.

Welcome to the second Creative Showcase for 2020 with the Art With Heart Team. Yes, we have changed the name from a 'Blog Hop' to a 'Creative Showcase'. This month we are featuring Masculine themed projects. We have many masculine themed products in the Stampin’ Up! range including Stamp Sets and coordinating Dies, Designer Series Papers, Embellishments and Embossing Folders. The Art With Heart Team have a wonderful selection of projects to inspire you to create Masculine Masterpieces.


Tonight I am sharing three cards. I don't find creating masculine cards particularly easy, so  I took this Creative Showcase Theme as a challenge that I was determined to meet (I do like a creative challenge that stretches me). My February Paper Crafting class on the first Monday of the month occurred before Valentines Day so my mind went to creating a Valentines Day card to give to a fella. Something simple with neutral colours, dry embossing (I love this technique to add texture and interest without clutter) and a simple heart or two. Then the Sunday morning prior to class I was talking to a delightful lady who would be coming to class the following day, who said she really needed two birthday cards - one for a special female friend and one for a male friend that she had known for many, many years. One of the cards that had been planned for class would be just right for her female friend, but the masculine Valentine's Day card I'd designed wouldn't be right. So ... arriving home mid Sunday afternoon, I set about designing a masculine card - its the second card in this blog. The third card is hot off the press and has been made with my brother in mind.

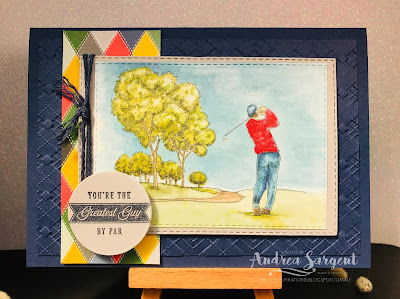
I will detail the cards in the reverse order to the way they were referenced above. This initial card has been created with my brother in mind. He is a dedicated golfer, so I was really excited when I first saw Stampin' Up!'s Mini Catalogue and that there was a golfing suite of amazing products. I have featured the gorgeous Country Club Designer Series Paper (DSP), the Absolutely Argyle 3D Embossing Folder and a piece of the Night of Navy Bakers Twine (from the Country Club Twine Combo Pack), with 2 of the sentiments from the Clubhouse Stamp set. The whole stamp set is fantastic and there are also delightful wooden Country Club elements that are also part of the Country Club Suite.
Country Club, Absolutely Argyle, masculine card, Stampin Up, Art with Heart, blog hop, Andrea Sargent, AWHT

The DSP includes 2 sheets with black lined images that can be coloured. I chose one of these images and coloured it with Stampin Blends. The image was then cut out using a die from the Stitched Rectangle Die set and mounted on a die cut piece of Sahara Sand Cardstock. Some Night of Navy Bakers Twine was wrapped around a couple of times and tied with a simple knot. The card base and card front were both cut from Night of Navy  cardstock with the card front dry embossed using the Absolutely Argyle 3D Embossing Folder. This picture doesn't really show the embossed paper well. It is really gorgeous. The other side of the DSP lined images has a colourful stitched diamonds design. A small rectangle of this DSP was adhered near the left side of the embossed card front and then the coloured and mounted picture of a golfer was adhered using Dimensionals. A sentiment from the Clubhouse Stamp set was stamped in Night of Navy on Smokey Slate cardstock. The sentiment was also embossed with Clear Emboss powder to give it some extra impact. and then was cut with a circle die from the Layering Circles Die set, to be reminiscent of a round golf ball.


Absolutely Argyle embossing, Country Club, masculine card, Stampin Up, Art with Heart, blog hop, Andrea Sargent, AWHT

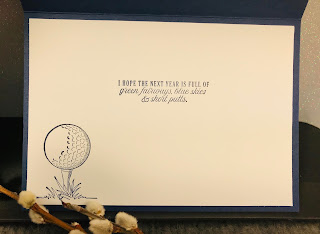
I always like to decorate the card inner. My sincere apologies for the quality of this picture and others in this blog. I have been house & dog sitting elsewhere and only arrived back early afternoon, so the lighting for my photos was not as good as photos usually taken in the morning.

Absolutely Argyle embossing, Country Club, masculine card, Stampin Up, Art with Heart, blog hop, Andrea Sargent, AWHT

The second card shown in this blog is the card that was designed, created and prepared for a card class the following morning. At that time I was extremely thankful for a layout by one of Stampin' Up!'s amazing Artisan team, Narelle Farrugia. I altered numerous components to personalise the card. Here it is:

Geared Up Garage, masculine card, Stampin Up, Art with Heart, blog hop, Andrea Sargent, AWHT, embossing

The card base is Thick Whisper White cardstock and the Whisper White card front was cut a little smaller than the card base and dry embossed with an amazing embossing folder that is only available during the Sale-a-bration promotion - this Stone 3D Embossing folder comes together with the lovely Power of Hope stamp set and they are free with a purchase of Stampin' Up! products to the value of $180. 

Some "cogs" were die cut from Night of Navy cardstock with the Garage Gears dies. Parts of this cog image were pressed into a Versamark ink pad and then sprinkled with Gold Emboss Powder and heat set to give a "shabby" look. It was then adhered directly to the card front. Two small pieces of Come Sail Away DSP were adhered with Dimensionals and a very thin strip of Gold Foil was added on top. A circle of Vellum that was die cut with one of the Stitched Shapes dies was layered over. The car was stamped using the Geared Up Garage stamp set and heat embossed in Versamark and Gold Emboss powder. It was raised on Dimensionals. The sentiment was stamped in Night of Navy and then fussy cut into 2 pieces. This was adhered with Mini Dimensionals. As a final touch, a little key embellishment (with a little gold heat embossing) from the Classic Metal elements, was tied with a piece of Night of Navy/Sahara Sand Bakers Twine and adhered with a couple of Glue Dots.

Geared Up Garage, masculine card, Stampin Up, Art with Heart, blog hop, Andrea Sargent, AWHT, embossing

The card inner used another sentiment and the toolbox from the Geared Up Garage stamp set and a very thin strip of navy cardstock was added at the base.


Geared Up Garage, masculine card, Stampin Up, Art with Heart, blog hop, Andrea Sargent, AWHT, embossing

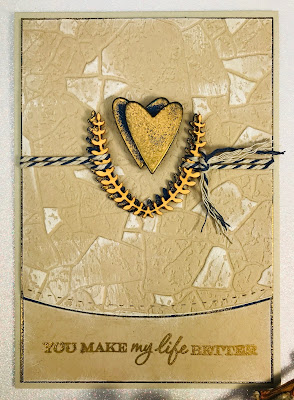
My last card for this blog was designed as a masculine card for Valentines Day. As mentioned, I wanted something simple with neutral colours, dry embossing to add texture and interest plus a simple heart or two. Here is what I came up with:
embossing, masculine card, Stampin Up, Art with Heart, blog hop, Andrea Sargent, AWHT

The card base and the card front is Crumb Cake cardstock, with the card front (cut a little smaller than the card base), die cut with a stitched curve and dry embossed with the Stone 3D Embossing Folder. The Whisper White Craft Stampin ink pad was lightly dragged across the embossed card front so the raised sections picked up some white ink. One of the wooden elements from the Country Club Elements was tied around the card front with Night of Navy/Sahara Sand Bakers Twine and the ends were frayed a little. The sentiment from Heart to Heart stamp set was gold heat embossed on the lower un-embossed piece of the card front. Both these pieces were mounted on a piece of Night of Navy that was also gold heat embossed around the edges. The embossed card front was adhered in place with Dimensionals. Finally, hearts were die cut using the Stitched Be Mine stamp set from Night of Navy cardstock. A number of hearts were glued together to create 2 thick hearts. One heart was gold heat embossed across the front and the other heart was gold embossed around the edges. Then they were adhered together leaving some of the lower heart showing. The two hearts were adhered with Dimensionals to further highlight them.


Thank you so much for calling in to check out the Valley Inspirations Blog, as part of February's Art with Heart Creative Showcase. I would love to hear your thoughts - please comment below. Let me know if you would like further details on the projects shown here. Also, I would love to earn you business, so please contact me if you have any queries about Stampin' Up! or if I can help with a purchase of any Stampin' Up! products.

The next demonstrator to share their Masculine project with you is the very talented Sharon Davern. Click on the arrow below to be taken to Rhapsody in Craft to discover Sharon's creations. I am looking forward to see her projects.


If you have a broken link or have come to this Creative Showcase midway, you can view all the participants by clicking on their names below:

Andrea Sargent  - you are here

Be Inspired - Bright & Bold

  Be Inspired Design Team Blog Hop Welcome to Valley Inspirations with Andrea and the August Be Inspired Blog Hop. BRIGHT AND BOLD This Blog...