Art with Heart Wow Tutorials

Showing posts with label Artfully Layered. Show all posts

Wednesday, 22 June 2022

AWHT Colour Creations #8 Bermuda Bay

Bermuda Bay with Butterfly Brilliance

Hello. Welcome to Valley Inspirations with Andrea and the Art with Heart Colour Creations Blog Hop. We continue to work though the Stampin' Up! colours in alphabetical order. 


This week’s Blog Hop is focussing on a deep turquoise called Bermuda Bay. Bermuda Bay is part of the Brights Colour Family and is a strong green-blue (or is that blue-green) colour. Some people classify it as a green while others view it as a blue. Bermuda Bay is gorgeous when used monochromatically with other green-blues such as Pool Party and Coastal Cabana. As the name suggests it is a great colour for water. Surprisingly it looks lovely with Gorgeous Grape or is delightful with Parakeet Party.  


Bermuda Gay is produced in Stampin' Up!'s card-stock, both A4 & 12"x12"Classic Stampin' inks (ink pads re-inkers); Stampin' Write Markers; Watercolour Pencils, Brights Designer Series Paper, Pretty Prints DSP, Robot Buddies Card Kit and Kindness Card Kit. The card below has used Bermuda Bay Classic Stampin' ink, Card-stock and Stampin' Blends plus a range of other non-BB bits and pieces.

Embossed butterflies flying over an alcohol wash of colour is a lovely way to say "thank you".

I recently saw a U-tube where alcohol inks were used with blending solution on acetate. As I watch I wondered if it would also work using Stampin' Up!s Alcohol Blends and high proof Isopropyl Alcohol on Window Sheet. I decided to give it a go and had 2 different designs in mind using two different colour combos. I started with one idea but this design morphed as I played. I have another piece of coloured window sheet but ran out of time to create a 2nd project - It has been one of those weeks!

Embossed butterflies flying over an alcohol wash of colour is a lovely way to say "thank you".

I started by scribbling some Light & Dark Bermuda Bay Blends and Light and Dark Parakeet Party on a piece of Window Sheet (acetate). I spray/dribbled some Isopropyl Alcohol over sections of the colour and then moved the colour around with a hand-squeeze blower tool. You could also blow through a straw. I needed to apply ink in a few layers to build up a stronger colour - following the same process of adding alcohol and blowing the colour around.

Embossed butterflies flying over an alcohol wash of colour is a lovely way to say "thank you".

A stitched frame was die cut using the two largest Stitched Rectangles dies. This was adhered directly to the acetate. Some Mini Dimensionals were added underneath the frame to enable the colour to sit above the background panel. A Basic White piece of card-stock was dry embossed with the Timeworn Type 3D embossing folder. A piece of Basic White card-stock that had been stamped in 2nd generation Bermuda Bay ink with text from the Artfully Layered stamp set was added to a Bermuda Bay card-stock base. 

Embossed butterflies flying over an alcohol wash of colour is a lovely way to say "thank you".

Vellum card-stock was white heat embossed after being stamped in Versamark ink using the Butterfly Brilliance stamp and my trusty Stamparatus. It is interesting that the camera shows the embossing as a more creamy colour than the eye picks up in real life. The butterflies could have been cut with the coordinating Butterfly die but as I was talking with someone, I relaxed and fussy cut them out. The Bermuda Bay "Thank you" sentiment also came from the Artfully Layered stamp set - it was on my desk as the other design I had in mind would have used it. A triple White Bakers Twine bow was tucked under the sentiment and the design was finished off with some delightful Sparkle & Shine Sequins.


As the rain started to fall while I was photographing the card, I wasn't able to photograph the card inner or a peak at the decorated envelope. I added the largest embossed butterfly inside the card and will add some stamped butterflies to the envelope. Initially I had coloured a couple of the smaller butterflies with Bermuda Bay and Parakeet Party Blends but decided not to add them to the card.

Embossed butterflies flying over an alcohol wash of colour is a lovely way to say "thank you".


Thank you so much for dropping by. I do value the time you spent with me.

There is more Bermuda Bay creativity. To continue with the blog hop, click on the "next" graphic below to be taken to the blog of the lovely, Sharon Davern. I always look forward to checking out Sharon's creation (I wonder what she has in store this week - will it be a fancy fold???). I do love seeing everyones' projects - always so much inspiration.

Hope to see you next week when we will be featuring a beautiful deep colour, Blackberry Bliss, as we continue the weekly 2022-2023 Colour Creations blog hops.

Stay well, stay safe and be kind to yourself and others. 

Andrea 💕🐾


If you live in Australia, don't already have a Stampin' Up! demonstrator and would like your own copy of Stampin' Up's 2022-2023 Annual Catalogue and or the new July - December 2022 Mini Catalogue then let me know and I will be delighted to send them to you.  Please don't hesitate to make contact with any other queries about this project or Stampin' Up!. 

If you find a broken link or have come to this blog hop from a different entry point, you can view the full list of participants on Catherine Proctor’s blog @ What Cathy Made. Cathy is our wonderful Art With Heart Team Colour Creations Coordinator.  I so appreciate all she does in coordinating this blog hop each week. She is such an amazing lady. Check out her wonderful creation while you are there.


#colourcreationsbloghop  #stampinup #stampinupaustralia #stampinupsouthpacific #stampinupdemo  #handmadecards #makeacardsendacard #stampinupdemonstrator #papercrafting #artwithheartteam  #papercrafter  #stamper #butterflybrilliance 
#artfullylayered #valleyinspirations

Wednesday, 30 March 2022

AWHT Colour Creations #42 Shaded Spruce

Shaded Spruce with Artfully Layered and Water-colour

Hello. Welcome to Valley Inspirations with Andrea and the Art with Heart Colour Creations Blog Hop. We are continuing to work though all the Stampin' Up! colours in alphabetical order. Having started mid 2021 currently we are working through colours starting with "S", with only 4 more Blog Hops in the 2021-2022 round of Stampin' Up! colours. 

This week’s Blog Hop is focussing on a rich green (that has a touch of blue) called Shaded Spruce. Shaded Spruce is part of the Regals Colour Family and is a delightful green. This colour is gorgeous on its own or when used with other greens such as Pool Party and Mint Macaron.  


Shaded Spruce is produced in Stampin' Up!'s card-stock, both A4 & 12"x12"Classic Stampin' inks (ink pads, Spots re-inkers); Stampin' Write Markers; Stampin' Blends, Regals Designer Series Papers, Sequins for Everything and Holiday Rhinestone Basic Jewels. The cards below have used Shaded Spruce Classic Stampin' ink (both re-inker and Stamp Pad) and Card-stock plus a range of other non-PP bits and pieces.

I have created 2 cards to showcase Shaded Spruce:

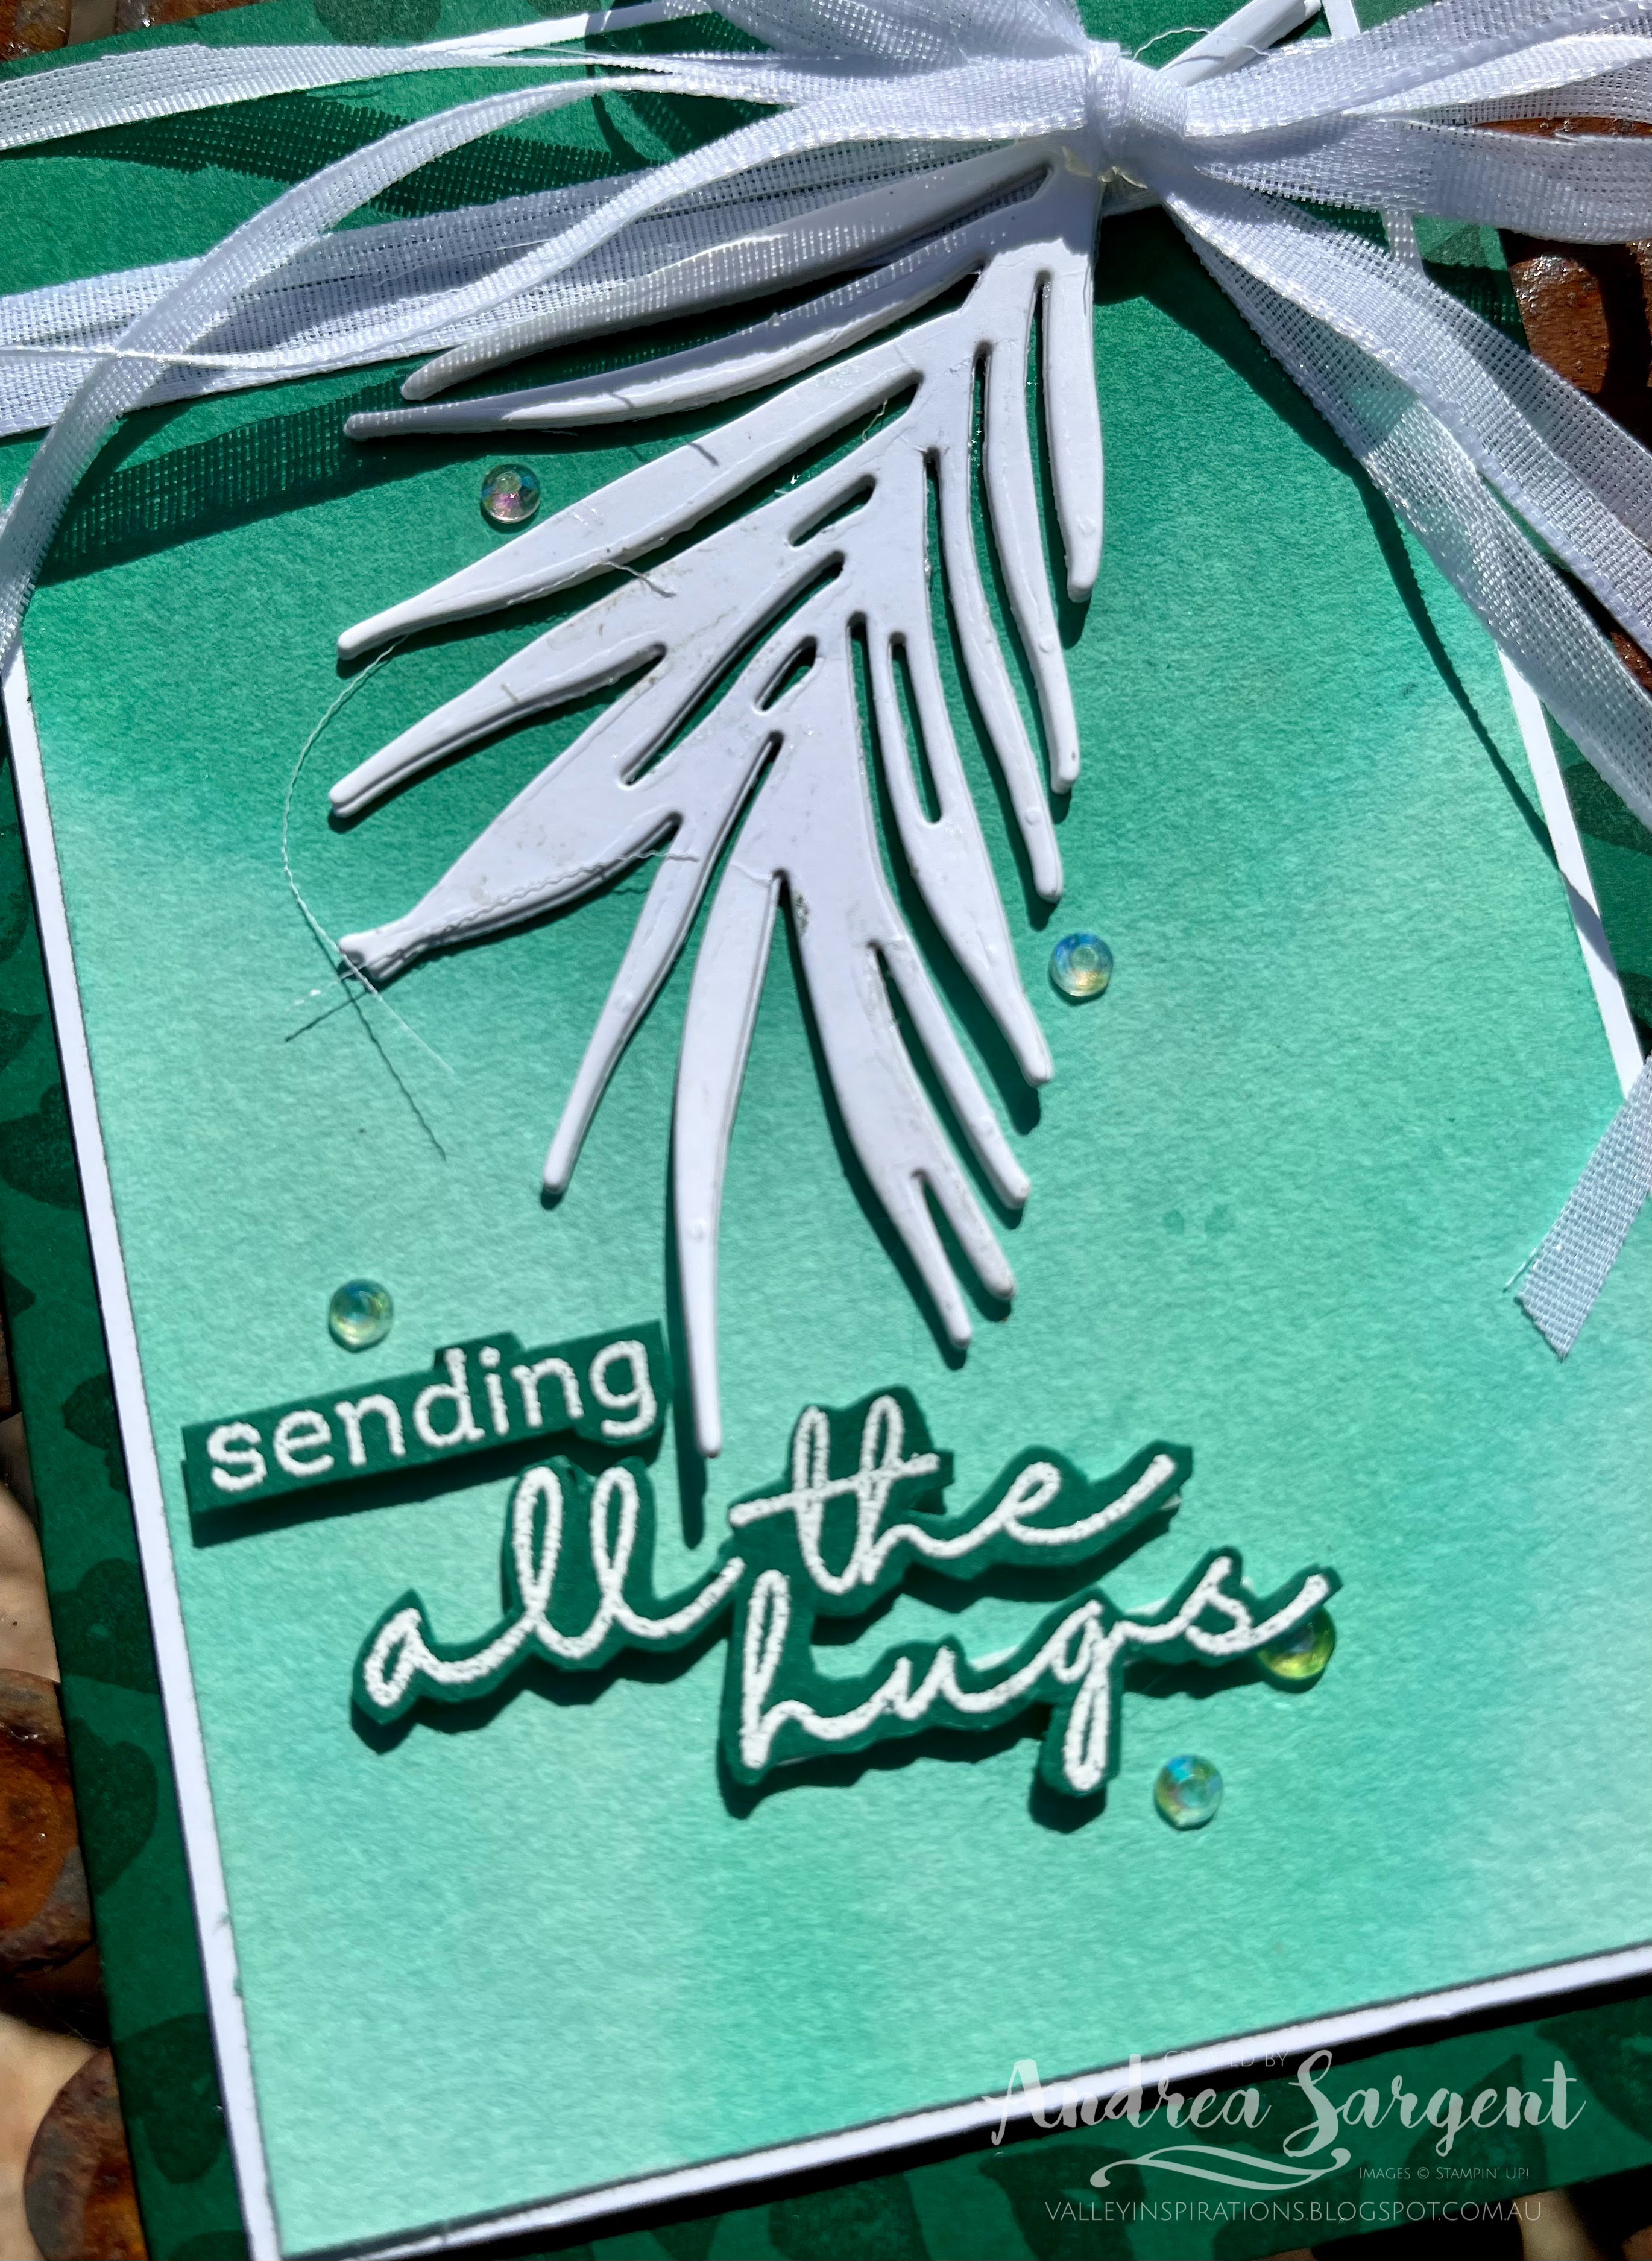
Show how much you care with a simple white palm frond over water-colour.

Send happiest birthday wishes to a special friend.

Isn't Shaded Spruce a lovely colour.  

CARD 1:

This card shows the beauty of Shaded Spruce through a water-coloured ombre panel.

Show how much you care with a simple white palm frond over water-colour.

A half panel of Fluid 100 Watercolor Paper was watered down and then ink from a Shaded Spruce Re-inker was applied to the top of the panel with a mid-sized Water Painter, allowing the ink to run/drip down to the bottom. I had recently seen Emma Goddard, a UK Stampin' Up! Demonstrator and previous Artisan Team member, demonstrate this technique with Pacific Point. As I watched Emma, I thought of this coming blog hop and decided to try it out with Shaded Spruce. I had so much fun and ! love the effect. I ended up with green ink on my fingers - the only time I could genuinely say I had green fingers!  The water-coloured panel was mounted to slightly larger piece of Basic White card-stock.  A Shaded Spruce card-stock card base was stamped on the front panel with the tiny leaves stamp from the Artfully Layered stamp set in Shaded Spruce ink. 

Show how much you care with a simple white palm frond over water-colour.

A piece of
 gorgeous soft White Faux Linen Ribbon (from the Flowers for Every Season Combo Pack) was cut into three lengthwise, wrapped around the mounted water-coloured panel and tied into a bow. Three palm leaf die-cuts were adhered together, one on top of the other, to give the leaf some dimension. The white palm leaf was adhered in place with the stem tucked under the ribbon. This centre panel was added to the card base with Dimensionals.

Show how much you care with a simple white palm frond over water-colour.

The card front was finished with a sentiment from the same stamp set that had been White heat embossed on Shaded Spruce card-stock. Some Iridescent Rhinestone Basic Jewels added some shimmer, together with a little Wink of Stella (its so hard to capture in the photos).

Show how much you care with a simple white palm frond over water-colour.

A piece of Basic White card-stock was adhered into the inner card base that had been similarly stamped with the little leaves.  The back flap of a Basic White C6 Envelope was stamped with the tiny leaves stamp in Shaded Spruce ink. As those who follow my cards know, I love to coordinate the envelope with the card inner, with both coordinating with the card front design.

Show how much you care with a simple white palm frond over water-colour.


CARD 2:

This second card features more water-coloured Shaded Spruce including Water-coloured stripes and die cut leaves coloured with Pool Party, Mint Macaron and touches of Shaded Spruce.

Send happiest birthday wishes to a special friend.

A piece of Shimmery White card-stock was painted with Shaded Spruce ink in stripes using the largest wide-brush Water Painter. The trimmed down striped panel was mounted on a slightly larger piece of Shaded Spruce card-stock. Three different leaf dies from the Tropical Layers die set were used to cut leaves from a piece of Fluid 100 Watercolor paper. As was mentioned, the leaves were water-coloured with Pool Party, Mint Macaron and Shaded Spruce Classic inks.

Send happiest birthday wishes to a special friend.

A piece of Basic White card-stock was embossed with the Splatters Embossing Folder from the 3D Stripes & Splatters Embossing Folders. A piece of Vellum card-stock was similarly embossed. The water-coloured Palm leaf was added onto the striped panel and the embossed Vellum adhered over. The other 2 water-coloured leaves were adhered in place and a piece of White Frayed ribbon was cut in half lengthwise and further frayed before being adhered directly to the Vellum.

Send happiest birthday wishes to a special friend.

A sentiment from the Artfully Layered stamp set was White heat embossed on Shaded Spruce card-stock, fussy cut and added with Mini Dimensionals over the White Frayed ribbon. Faux Sea Glass Shapes were sprinkled around for that touch of very subtle bling.

Send happiest birthday wishes to a special friend.

The Basic White card inner had a thin strip of stripes adhered to the LHS together with a die cut Basic White sprig of leaves.  A Basic White C6 Envelope was stamped with a leaf from the same stamp set in Shaded Spruce.

Send happiest birthday wishes to a special friend.


Thank you so much for dropping by. I do value the time you spent with me.

If you live in Australia, don't already have a Stampin' Up! demonstrator and would like your own copy of Stampin' Up's 2021-2022 Annual Catalogue or the coming 2022-2023 Annual Catalogue and or the January - June 2022 Mini Catalogue then let me know and I will be delighted to send them to you.  Please don't hesitate to make contact with any other queries about these projects or Stampin' Up!. 

There is more Shaded Spruce creativity. To continue with the blog hop, click on the "next" graphic below to be taken to the blog of the lovely, Tina Gellespi. I always look forward to checking out Tina's creation (I wonder what she has in store this week - she is amazing). I do love seeing everyones' projects - always so many ideas.

Hope to see you next week when we will be featuring another versatile colour, Smoky Slate, as we continue the weekly 2021-2022 Colour Creations blog hops.

Stay well, stay safe and be kind to yourself and others. 

Andrea 💕🐾

If you find a broken link or have come to this blog hop from a different entry point, you can view the full list of participants on Catherine Proctor’s blog, our wonderful Art With Heart Team Colour Creations Coordinator.  I so appreciate all Cathy does in coordinating this blog hop each week. She is such a special lady. Check out her wonderful creation while you are there.

#colourcreationsbloghop  #colourcreationsbloghop2022  #stampinup #stampinupdemo  #artwithheartteam  #handmadecards #makeacardsendacard #artfullylayered #stampinupdemonstrator


Wednesday, 23 March 2022

AWHT Colour Creations #41 Sahara Sand

Sahara Sand with Waves of Inspiration and Artfully Layered

Hello. Welcome to Valley Inspirations with Andrea and the Art with Heart Colour Creations Blog Hop. We are continuing to work though all the Stampin' Up! colours in alphabetical order. 


This week’s Blog Hop is focussing on a soft faun called Sahara Sand. Sahara Sand is part of the Neutrals Colour Family and is a lovely sandy colour. It is another versatile Stampin' Up! colour. As with most neutrals, this colour is delightful when used with so many colours. I have combined it with sea colours, White and Early Expresso and it also works well with Petal Pink, Calypso Coral and White.  


Sahara Sand is produced in Stampin' Up!'s card-stock, both A4 & 12"x12"Classic Stampin' inks (ink pads re-inkers); Stampin' Write Markers; Neutrals Designer Series Papers as well as the Tidings of Christmas DSP. The cards below have used Sahara Sand Classic Stampin' ink, Card-stock, a Stampin' Write Marker and Linen Twine (which is the same colour), plus a range of other non-PP bits and pieces.

I have created 2 cards to showcase Sahara Sand in different ways. Here they are:


As you can see, Sahara Sand is a great colour to use. 

CARD 1:

This card features part of the Waves of Inspiration bundle which is an exciting early release from the coming 2022-2023 Annual Catalogue


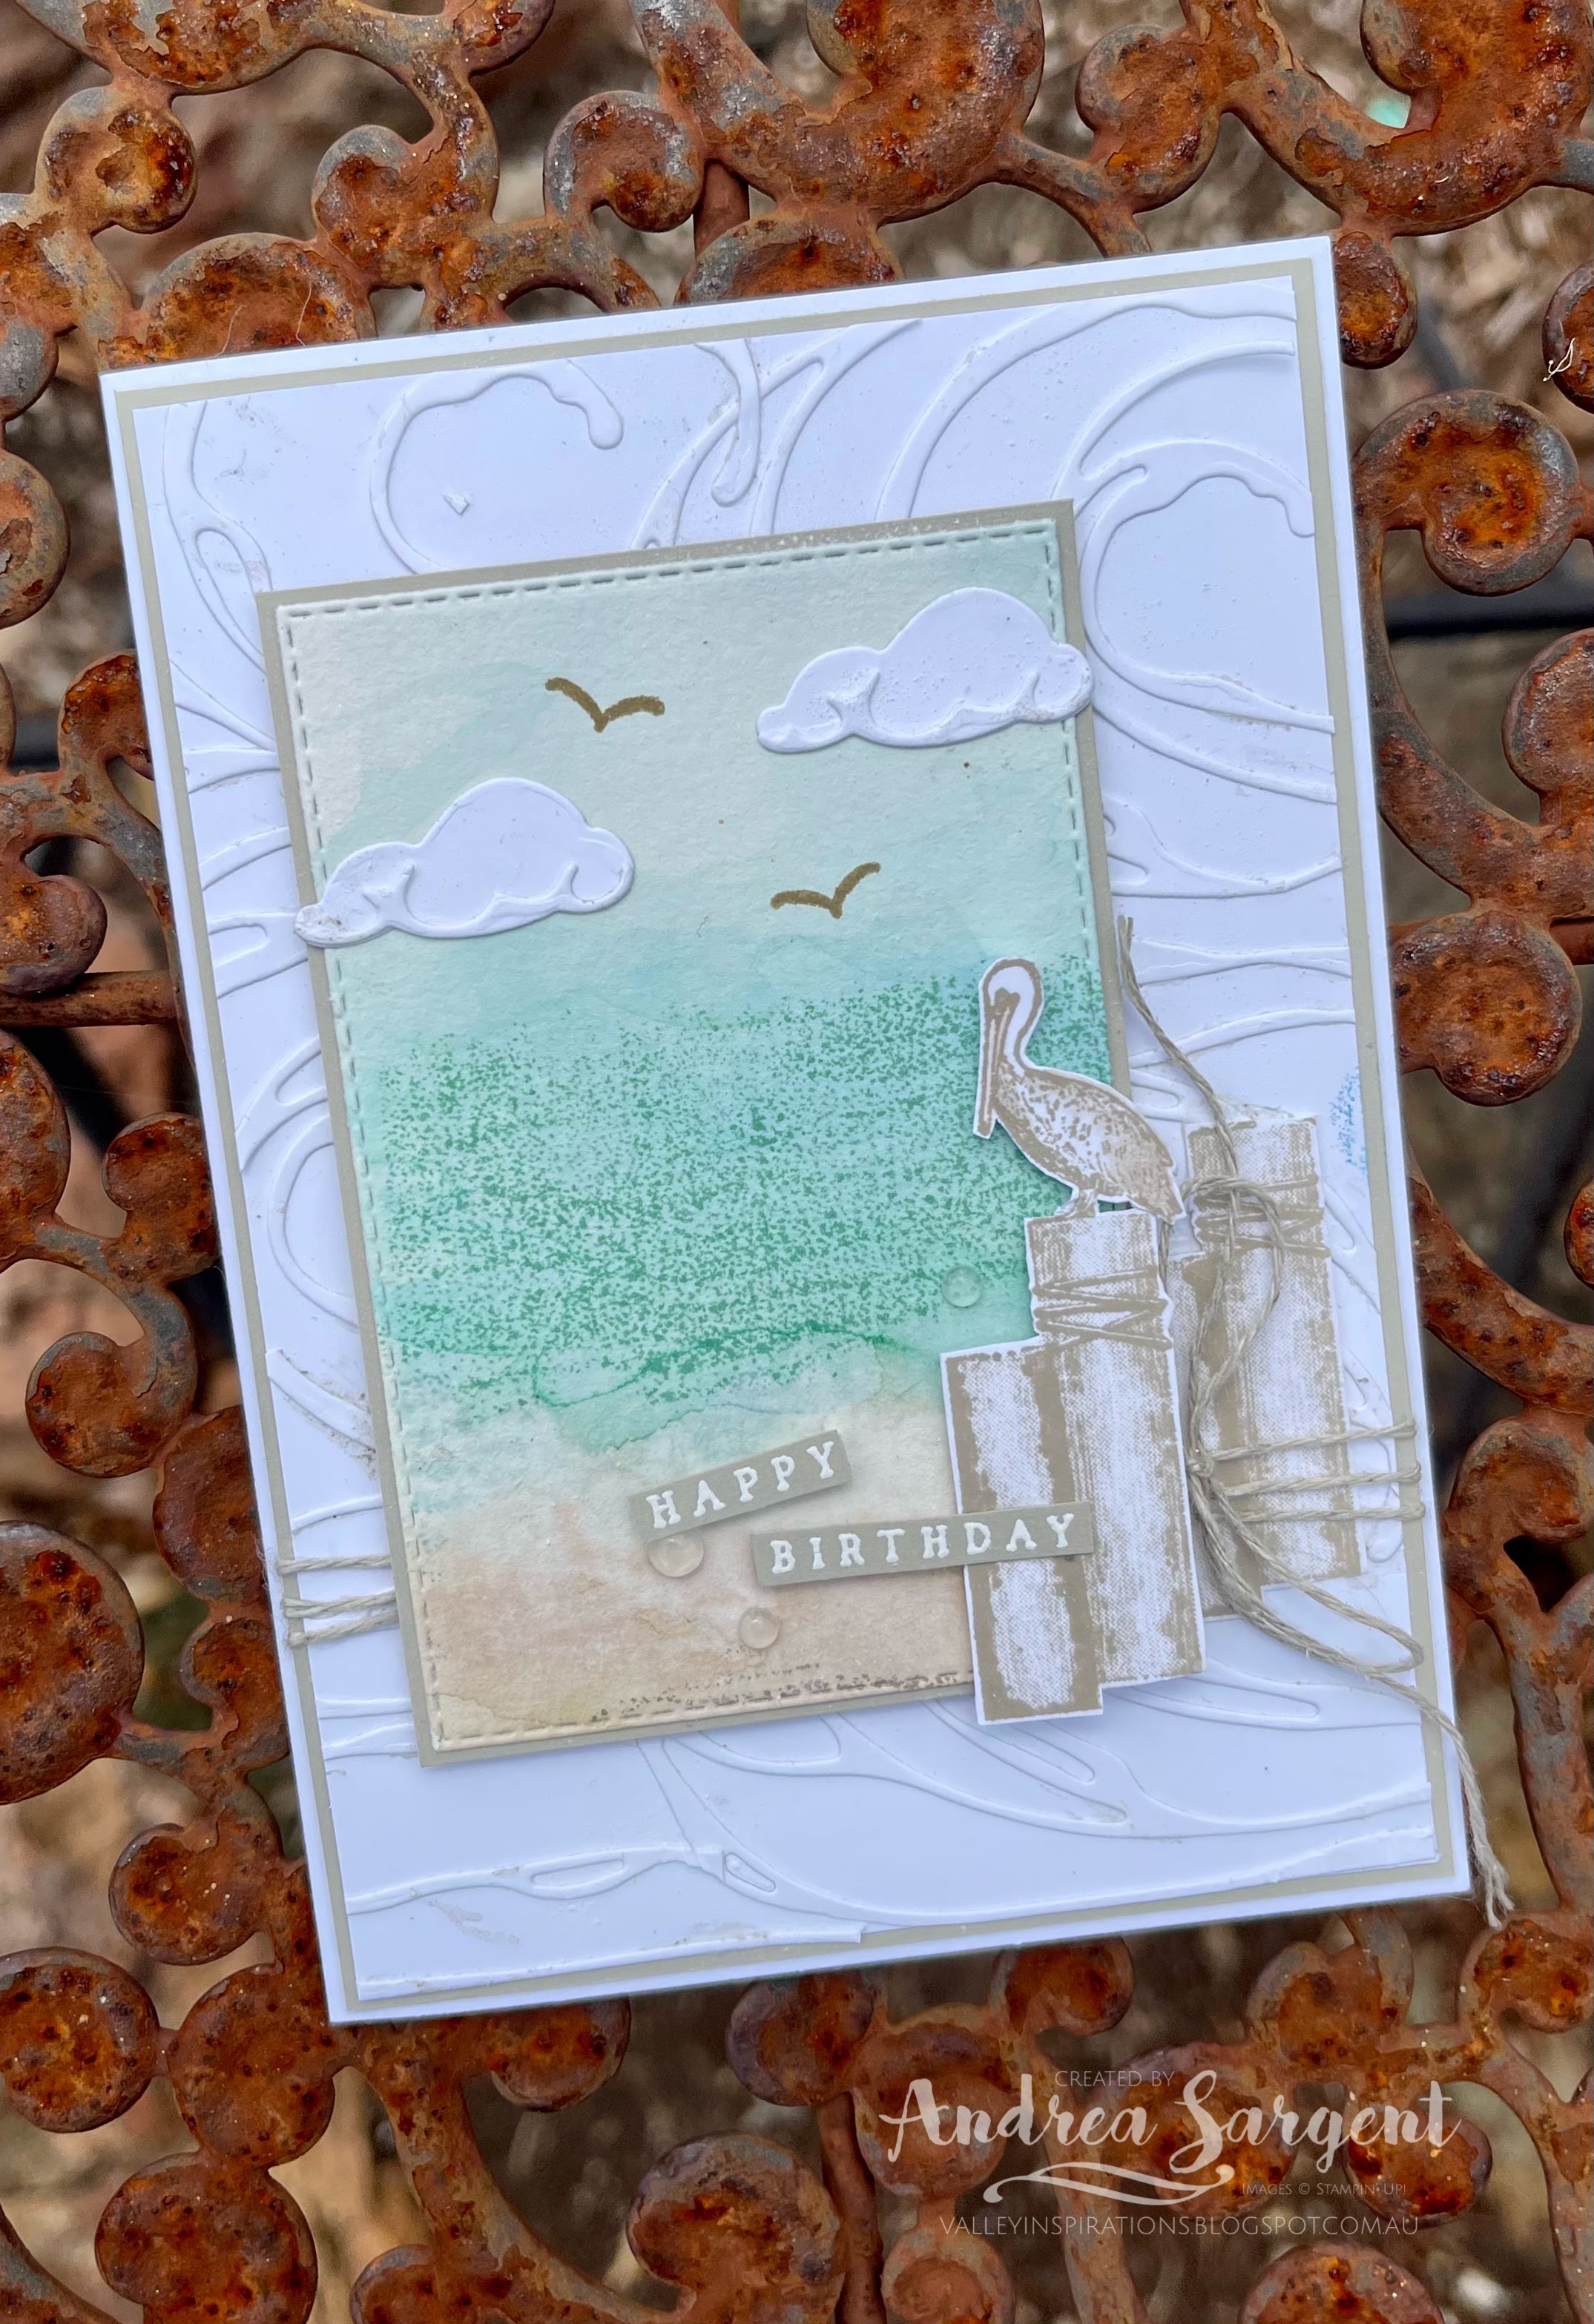
A half piece of Fluid 100 Watercolor Paper was water-coloured with a range of colours indicative of sand, sea and sky. The colours used included Sahara Sand, Crumb Cake, Pool Party, Coastal Cabana and Balmy Blue Classic Stampin' inks, as well as a touch of White Craft ink to represent sea foam. This was die cut with a mid-sized Stitched Rectangle die and mounted on a slightly larger piece of Sahara Sand card-stock.


The background was created with a piece of Basic White card-stock that was mounted on a slightly larger piece of Sahara Sand card-stock. A number of die cut waves cut out of Basic White card-stock with the coordinating Waves dies were adhered directly to the Basic White layer. Linen Twine was wrapped around this background layer and tied in a bow to the side.


The pelican sitting on a wooden pole was stamped twice on Basic White card-stock with Sahara Sand ink and fussy cut. Seagulls were stamped directly on the water-colour panel. The clouds and shading pieces were cut from Basic White card-stock.


The card front was finished with a sentiment from the same stamp set that was White heat embossed on Sahara Sand card-stockClear Polished Dots added a little shimmer, together with a little Wink of Stella. It is disappointing that the Wink of Stella shimmer isn't picked up by the camera.


The Basic White card inner also was mounted on a piece of Sahara Sand card-stock. The white panel had been stamped with the pelican sitting on a pole. Similarly, a Basic White C6 Envelope was stamped with the pelican on a pole image in Sahara Sand ink


CARD 2:

This second card features Sahara Sand with White and a touch of Early Expresso. I started with the aim of a clean and simple card but couldn't resist the addition of vellum and ribbon and twine. 


I had a Thick Basic White card base sitting on my desk - it's different dimensions than I normally use, but couldn't remember why I first prepared it so thought I would use it for this card. It will fit within a standard C6 envelope.


The focal panel was cut from a piece of Sahara Sand card-stock with a mid-sized Stitched Rectangle die (though a smaller one than used in the card above). It was embossed with the splatters design from the Stripes and Splatters 3D Embossing Folder. I love this set of EFs. Some White Craft ink splatters were added using a Water Painter.


One of the leaf dies from the Tropical Layers dies cut 3 images of the same design from Basic White card-stock. The 3 pieces were adhered together to give the leaves some dimension. After it was adhered across the centre of the panel a piece of Linen Twine was wrapped around twice and tied in a bow to the side.


A sentiment from the Artfully Layered stamp set was White heat embossed on Early Expresso  card-stock, fussy cut and "Hey" was added with Mini Dimensionals. The sentiment was stamped again in Early Expresso ink on Sahara Sand card-stock and "there" was fussy cut and added with Mini Dimensionals. A few Clear Round Dots were added for that touch of bling. 


Some Layering Designs Vellum was added to the card base (I felt it just needed something). A piece of White Frayed Ribbon was cut in half and frayed a little more before being added over the Vellum. The centre panel was popped in the centre with Dimensionals.


The Basic White card inner had some stamping in Sahara Sand and a thin strip of Layering Designs Vellum was added near the bottom.  Similarly, a Basic White C6 Envelope also had some Sahara Sand stamping added across the back flap.


Thank you so much for dropping by. I do value the time you spent with me.

If you live in Australia, don't already have a Stampin' Up! demonstrator and would like your own copy of Stampin' Up's 2021-2022 Annual Catalogue or the coming 2022-2023 Annual Catalogue; and or the January - June 2022 Mini Catalogue Catalogue then let me know and I will be delighted to send them to you.  Please don't hesitate to make contact with any other queries about these projects or Stampin' Up!. 

There is more Sahara Sand creativity. To continue with the blog hop, click on the "next" graphic below to be taken to the blog of the lovely, Kate Morgan. I always look forward to checking out Kate’s creations (I wonder what she has in store this week). I do love seeing everyones' projects - so many ideas and such great inspiration.

Hope to see you next week when we will be featuring another colour starting with "S" - Shaded Spruce, as we continue the weekly 2021-2022 Colour Creations blog hops.

Stay well, stay safe and be kind to yourself and others. 

Andrea 💕🐾

If you find a broken link or have come to this blog hop from a different entry point, you can view the full list of participants on Catherine Proctor’s blog, our wonderful Art With Heart Team Colour Creations Coordinator.  Cathy is amazing and does a wonderful job in coordinating this blog hop each week. She is a special lady. Check out her wonderful creation while you are there.

#colourcreationsbloghop  #colourcreationsbloghop2022  #stampinup #stampinupdemo  #stampinupdemonstrator  #artwithheartteam  #handmadecards  #makeacardsendacard #papercrafting #wavesofinspiration #artfullylayered


Wednesday, 2 March 2022

AWHT Colour Creations #38 Pumpkin Pie

Pumpkin Pie with Butterfly Brilliance (and Artfully Layered which is coming)

Hello. Welcome to Valley Inspirations with Andrea and the Art with Heart Colour Creations Blog Hop. We are continuing to work though all the Stampin' Up! colours in alphabetical order. Having started mid 2021 this is the last colour starting with "P". 


This week’s Blog Hop is focussing on a strong orange called Pumpkin Pie. Pumpkin Pie is part of the Regals Colour Family and is a straight rich orange. When thinking of using Pumpkin Pie I tend to think of Autumn Leaves. I was planning to use this colour with Bumble Bee, Cherry Cobbler and Garden Green as I was inspired by a nearby tree that is changing to its autumn colours early. While walking with Gemma, I also saw a few traditionally coloured Monarch butterflies, so had also thought of using Pumpkin Pie with Basic Black. That was where I started, but have ended up somewhere quite different.


Pumpkin Pie is produced in Stampin' Up!'s card-stock, both A4 & 12"x12"Classic Stampin' inks (ink pads re-inkers); Stampin' Write Markers; Stampin' Blends, Watercolor Pencils, the Regals Designer Series Papers as well as Flowering Fields & Abstract Beauty Designer Series Paper, the Abstract Beauty Ephemera Pack, Holiday Rhinestone Basic Jewels & Sequins for Everything.  The card below has used Pumpkin Pie Classic Stampin' ink, Card-stock, a Stampin' Write Marker, and Holiday Rhinestone Basic Jewels, plus a range of other non-PP bits and pieces.

I have only finished 1 card showcasing Pumpkin Pie with a water-colour background:

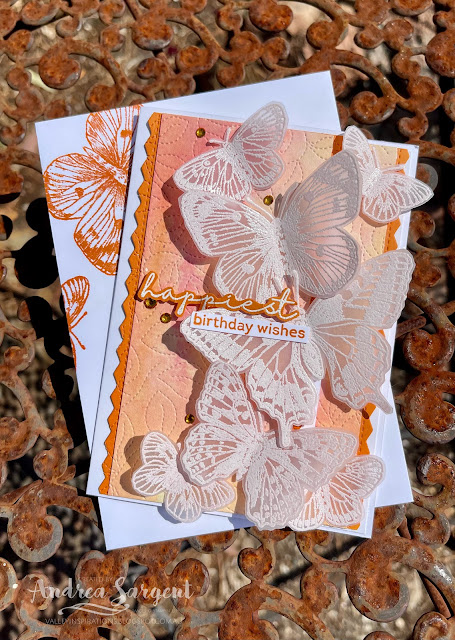
Send a flight of butterfly brilliance to wish the happiest of Birthdays, by Andrea Sargent, Valley Inspirations.

I had started to create a second card but only got as far as water-colouring some leaves. See the photo below. I will try to finish this card in the next couple of days.


Keep an eye out for a card created with these water-coloured leaves.

CARD 1:

Send a flight of butterfly brilliance to wish the happiest of Birthdays, by Andrea Sargent, Valley Inspirations.

This card uses a delightful water-coloured background that was created from the left over ink following the water-colouring of the die cut leaves, shown above. The medium Water Painter was used to apply dabs of Pumpkin Pie, Bumblebee and Cherry Cobbler Classic Stampin' inks. The leaves were lifted onto a piece of paper towel to dry and my work surface was covered with quite a bit of diluted ink - so I took a piece of Fluid 100 Watercolor Paper and lay it on the inky work surface. The sheet of paper was lifted and laid down over another puddle of ink. This was repeated until the sheet was covered with colour.

Send a flight of butterfly brilliance to wish the happiest of Birthdays, by Andrea Sargent, Valley Inspirations.

About an inch was cut off the front of the card base on the RHS so that the right side of the card inner would be seen. A zigzag edging die from the Layered Leaves dies was used to cut the edges off a piece of Pumpkin Pie card-stock. A piece of the water-coloured panel was embossed with the Stitched Greenery die and then mounted on the Pumpkin pie card-stock.

Send a flight of butterfly brilliance to wish the happiest of Birthdays, by Andrea Sargent, Valley inspirations.

While I had initially envisaged black and orange Monarch butterflies I changed to heat embossing Vellum card-stock with Versamark ink and White Emboss Powder. As my pack of Vellum was hiding somewhere and I could only find Vellum scraps I needed to stamp the butterflies from the Butterfly Brilliance stamp set a number of times to be able to get a flight of butterflies. This also meant that I needed to fussy cut them out with my trusty Snips. The were added with Dimensionals or Glue Dots.

Send a flight of butterfly brilliance to wish the happiest of Birthdays, by Andrea Sargent, Valley inspirations.

The sentiment from the Artfully Layered stamp set was stamped twice - ie heat embossed with  Versamark ink and White Emboss Powder on Pumpkin Pie card-stock and also stamped on Basic White card-stock with Pumpkin Pie Classic ink. The word "happiest" was fussy cut from the heat embossed sentiment and "birthday wishes" from the white card-stock.  I love adding ribbon and or twine but I tried and tired to add some ribbon/twine - it just didn't add anything, so I took it off. A number of Pumpkin Pie Holiday Rhinestones Basic Jewels added a bit of sparkle. As I took the photos I kept thinking it needed something else so I also added a splattering of Pumpkin Pie using a Stampin' Write Marker. Sorry there wasn't time to re-photograph. You will have to image the card (including the butterflies) with a little splattering.

Send a flight of butterfly brilliance to wish the happiest of Birthdays, by Andrea Sargent, Valley Inspirations.

The card inner is visible on the right of the card. A strip of the water-coloured panel that had been embossed with the Stitched Greenery die and then layered on two Pumpkin Pie card-stock edges die cut with the Artfully Layered stitched zigzag die. Two small heat embossed butterflies were added to the right of the card inner, ensuring the wings of the butterflies overlapped the shorter card front, thereby helping to hold the card closed. 

Send a flight of butterfly brilliance to wish the happiest of Birthdays, by Andrea Sargent, Valley Inspirations.

A Basic White C6 Envelope was stamped in Pumpkin Pie ink on the envelope corner with a couple of butterflies. I do love decorating the envelope to tie it in with the card it will hold.

Send a flight of butterfly brilliance to wish the happiest of Birthdays, by Andrea Sargent, Valley Inspirations.


Thank you so much for dropping by. I so appreciate you spending time with me.

If you live in Australia, don't already have a Stampin' Up! demonstrator and would like your own copy of Stampin' Up's 2021-2022 Annual Catalogue and or the new January - June 2022 Mini Catalogue & Saleabration Catalogue then let me know and I will be delighted to send them to you.  Please don't hesitate to make contact with any other queries about this project or Stampin' Up!. 

There is more Pumpkin Pie creativity. To continue with the blog hop, click on the "next" graphic below to be taken to the blog of the lovely, Kate Morgan. I always look forward to checking out Kate's creation (I wonder how she has used Pumpkin Pie this week). I do love seeing everyones' projects - so many ideas and such great inspiration.

Hope to see you next week when we will be featuring versatile colour Real Red as we continue the weekly 2021-2022 Colour Creations blog hops.

Stay well, stay safe and be kind to yourself and others. 

Andrea 💕🐾

If you find a broken link or if you want to check out the full list of participants go to Catherine Proctor’s blog, our wonderful Art With Heart Team Colour Creations Coordinator. Cathy is wonderful in coordinating this blog hop each week. She is such a special lady. Check out her wonderful creation while you are there.

#colourcreationsbloghop  #stampinup #stampinupdemo  #staminupdemonstrator #artwithheartteam  #handmadecards #makeacardsendacard #stampinupaustralia #madewithlove #butterflybrilliance


CASEing the Catty #578 - Case July On-line Exclusives

CASE Stampin’ Up!s July On-line Exclusives meets Butterfly Flight Hello, welcome to Valley Inspirations with Andrea &  #578 Challenge wi...