Art with Heart Wow Tutorials

Showing posts with label vellum. Show all posts

Wednesday, 10 May 2023

AWH Colour Creations Blog Hop #2 Copper Clay

Copper Clay with Nested Friends & Some Water-colour

Hello. Welcome to Valley Inspirations with Andrea and the Art with Heart Colour Creations Blog Hop. We are working though the Stampin' Up! colours in alphabetical order, focussing on one colour each week. We have started with new colours, including the 2023-2025 In Colours.


This week’s Blog Hop is focussing on a rich rusty terracotta called Copper Clay. Copper Clay is part of the new 2023-2025 In Colour Family and is a great colour. This colour would be lovely when used for earthen ware pots, autumn leaves and some animals. I’m still exploring coordinating colours but it is delightful with Petal Pink and Old Olive (as used in the card below).


Copper Clay is produced in Stampin' Up!'s card-stock, both A4 & 12"x12"Classic Stampin' inks (ink pads re-inkers); Stampin' Write Marker; Stampin' Blends Combo; In Color Designer Series Paper as well as Fresh As A Daisy, Earthen Elegance Designer Series Papers; plus In Color Luster Speciality Paper, Treat Bags and Grid Paper; In Color Textured Ribbon & Jute Trim;  In Color Dots and Adhesive-Backed Solid Gems.

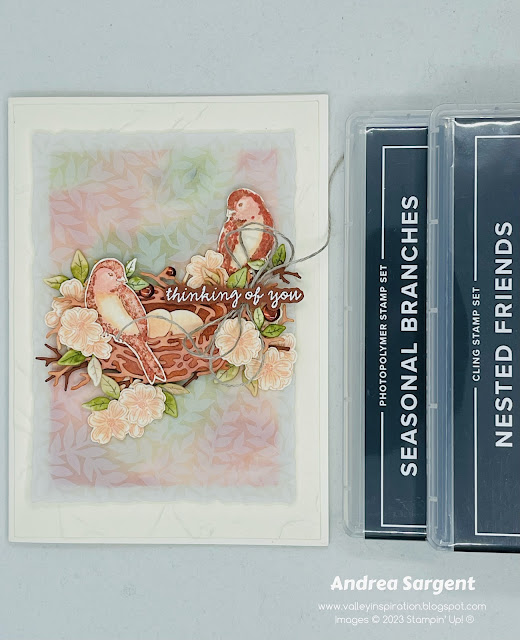
A beautiful bird’s nest with some pretty flowers is a delightful way to send a friend a card to let them know you are thinking of them.

Copper Clay card-stock, ink, Blends Combo and In Color Dots have been used in the creation of this project plus a range of non-Copper Clay bits and pieces.

A beautiful bird’s nest with some pretty flowers is a delightful way to send a friend a card to let them know you are thinking of them.

While I liked Copper Clay as a colour I needed to really think about how I would use the colour and which colours I would coordinate with it. As I love to do when trying out a new colour, I decided to create a water-coloured panel. As we are in Autumn and I see many Autumn leaves on my walks with Gemma, my choice of colours had Autumn leaves in the back of my mind. Here is the water-colour panel I created using Copper Clay, Petal Pink and Old Olive Classic Stampin’ inks, a broad brush Water Painter and Fluid 100 Watercolor Paper.


While I loved the water-colour panel, it was rather dominant so I decided to layer a panel of … Vellum over it. Both panels were cut with Deckled Rectangles dies. I was also inspired by Cindy Schuster, a Stampin’ Up! Demonstrator, current Stampin’ Up! concept artist and past Artisan who recently posted a delightful card featuring the Nested Friends bundle

A beautiful bird’s nest with some pretty flowers is a delightful way to send a friend a card to let them know you are thinking of them.

Using the Nested Friends dies, I cut the 2 layers of a bird’s nest and some eggs from Fluid 100 Watercolor Paper. The bird nest pieces were water-coloured using Copper Clay ink ensuring there was colour variation. The eggs were water-coloured with Petal Pink ink. I intended to add some speckling to the eggs with stamped off Copper Clay ink but became so engrossed with card creation it slipped my mind till now - oops! Die cut leaves using dies from the coordinating Nested Friends dies were coloured with Old Olive ink and some Petal Pink and diluted Copper Clay inks - reminiscent of Autumn leaves. A couple of twigs were die cut from Copper Clay card-stock using dies from the new Seasonal Branches dies.

A beautiful bird’s nest with some pretty flowers is a delightful way to send a friend a card to let them know you are thinking of them.

Flowers were stamped on Very Vanilla card-stock - thick and a panel of Very Vanilla card-stock was dry embossed using the Painted Texture 3D Embossing Folder (I so love this embossing folder). Flowers from the Seasonal Branches stamp set were stamped in Petal Pink ink onto Very Vanilla card-stock. A bird from the Nested Friends stamp set was stamped in second generation Copper Clay ink and another was stamped in reverse using a Silicone Craft Sheet. The flowers and birds were coloured with Stampin’ Blends, incl Copper Clay, Petal Pink, Calypso Coral combos plus the Colour Lifter. There are coordinating dies for the flowers and birds.

A beautiful bird’s nest with some pretty flowers is a delightful way to send a friend a card to let them know you are thinking of them.

All the pieces were layered and arranged using a mix of Dimensionals, Multipurpose Liquid Glue and Glue Dots

A beautiful bird’s nest with some pretty flowers is a delightful way to send a friend a card to let them know you are thinking of them.

A sentiment from the Nested Friends stamp set was heat embossed onto Copper Clay card-stock using Versamark ink, White Emboss Powder and a Heat Tool. This sentiment was fussy cut including cutting off one of the words. I only wanted “thinking of you” not “Always thinking of you”. This was added with Mini Dimensionals. A double Linen Thread bow had been tucked underneath the sentiment. Some Copper Clay In Colour Dots were added to give a touch of sparkle. 

A beautiful bird’s nest with some pretty flowers is a delightful way to send a friend a card to let them know you are thinking of them.

A Very Vanilla piece of card-stock was topped and bottomed with a left over bit of the water-coloured panel. The bird’s nest was stamped in 3rd generation Copper Clay ink. A C6 Basic White envelope (my Very Vanilla envelopes had disappeared) also was stamped with the bird’s nest. 

A beautiful bird’s nest with some pretty flowers is a delightful way to send a friend a card to let them know you are thinking of them.

Thank you so much for dropping in. I so appreciate it.  

A beautiful bird’s nest with some pretty flowers is a delightful way to send a friend a card to let them know you are thinking of them.

There is more Copper Clay creativity so do continue through the blog hop. Just click the "next" graphic below to be taken to the blog of the very special Kate Morgan. I am looking forward to checking out Kate’s creation. I do love seeing everyones' projects - there is always so much inspiration.

I hope to see you next week when we will be featuring Moody Mauveanother of the new 2023-2025 In Colour family, as we continue the weekly 2023-2024 Colour Creations Blog Hop series

Stay well, stay safe and be kind to yourself and others.

Andrea 💕🐾

If you find a broken link or would like to view the full list of participants go to Catherine Proctor’s blog @ What Cathy Made. Cathy is our brilliant Art With Heart Team Colour Creations Coordinator.  She is a wonderful lady. Check out her delightful creation while you are there.

If you live in Australia, don't already have a Stampin' Up! demonstrator and would like your own copy of the new Stampin' Up 2023-2024 Annual Catalogue, then let me know and I will be delighted to send it to you.  There are so many gorgeous products available in this catalogue. Please don't hesitate to make contact with any other queries about this project or Stampin' Up!. 

#colourcreationsbloghop  #stampinup #stampinupaustralia #stampinupsouthpacific #stampinupdemo  #handmadecards #makeacardsendacard #stampinupdemonstrator #papercrafting #artwithheartteam  #papercrafter  #valleyinspirations   #seasonalbranches #nestedfriends #deckledrectangles


Saturday, 27 February 2021

Social Stamping - #21 Brights

Brights with Floating & Fluttering 

Hello. Welcome to Valley Inspirations with Andrea and the first Social Stamping Blog Host for 2021.


For the next 5 months the Social Stamping Blog Hosts are focussing on each of Stampin' Up!'s colour families. This month the nominated set of colours are the Brights. While my go to colours are often a more subtle colour palette, the Brights are a range of gorgeous, vibrant colours, like a rainbow, that is: Poppy Parade, Mango Melody, Daffodil Delight, Granny Apple Green, Coastal Cabana, Bermuda Bay, Pacific Point, Gorgeous Grape, Melon Mambo and Flirty Flamingo. Ten lively colours.


In pondering how I would showcase Stampin' Up!'s Brights, I was reminded of a sketch presented by the Global Design Project a few weeks ago and decided to commence with this layout for my card.
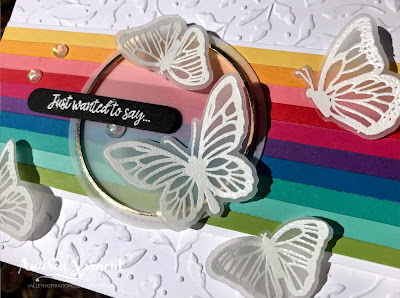
Given the striped panel across the centre of the card, I thought I would use all 10 Brights, so cut 5mm strips from each of the Bright's cardstocks. Each strip was adhered to some Basic White card-stock, leaving a small mount of Basic White at the top and bottom.

A vibrant happy card featuring Stampin' Up! products - the Brights colour family and Floating & Fluttering bundle by Andrea Sargent at Valley Inspirations, Australia.

A piece of Basic White card-stock, that had been cut to card front size, was embossed with the leafy Meadows Moments Embossing Folder. Then it was adhered directly on a Thick Basic White card base. The Brights striped panel spanned across the centre of the card, being adhered in place with Dimensionals.

A vibrant happy card featuring Stampin' Up! products - the Brights colour family and Floating & Fluttering bundle by Andrea Sargent at Valley Inspirations, Australia.

As I was walking my dog, the idea of using Vellum card-stock to add some further interest while allowing the bright stripes to shine. As I have seen many butterflies walking with Gemma, I decided on white embossed butterflies flying across the card. The set of butterflies from the Floating and Fluttering stamp set was stamped a couple of times with Versamark ink on Vellum and heat embossed using White Stampin' Emboss powder. Coordinating dies from the Fluttering dies were used to cut them out together with a tad of sniping to seperate each butterfly.

A vibrant happy card featuring Stampin' Up! products - the Brights colour family and Floating & Fluttering bundle by Andrea Sargent at Valley Inspirations, Australia.

A stitched circle from the Stitched Shapes dies was cut from Vellum and it was adhered in a couple of spots to the striped panel where 
it would be covered by butterflies. A Gold Hoop embellishment was layered on top using rolled Glue Dots. The vellum butterflies were scattered across the card front. That sounds simple, doesn't it, but ... getting the right arrangement was not easy for me. I finally found an arrangement that I was happy with before heading off to bed last night, but the butterflies had been knocked and moved by the time I came to finish the card this morning. And yes, I wasn't able to achieve an arrangement that I was really happy with. 

A vibrant happy card featuring Stampin' Up! products - the Brights colour family and Floating & Fluttering bundle by Andrea Sargent at Valley Inspirations, Australia.

The butterflies were either adhered directly to the card front or popped up on a Mini Dimensional. A sentiment from the Many Messages bundle was added with a Mini Dimensional either side of the Gold Hoop. Previously I had played with the Many Messages bundle and created a set of sentiments with Momento ink on Basic White card-stock and another set heat embossed with Versamark and White Emboss powder on Basic Black card-stock. It is very handy having a bowl of sentiments ready and waiting on my desk.

A vibrant happy card featuring Stampin' Up! products - the Brights colour family and Floating & Fluttering bundle by Andrea Sargent at Valley Inspirations, Australia.

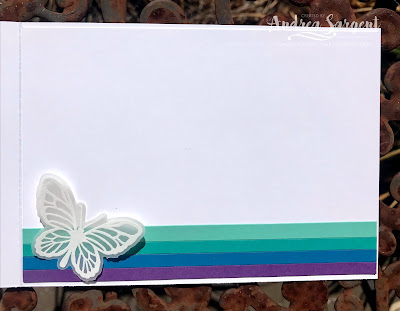
A few gorgeous Opal Rounds were added as a finishing touch. The card inner was created with thin strips of Coastal Cabana, Bermuda Bay, Pacific Point and Gorgeous Grape card-stock layered at the bottom with an embossed vellum butterfly. Some butterflies from the Floating and Fluttering stamp set were stamped in Bermuda Bay Classic Stampin' ink on a C6 Basic White envelope so that the envelope would give a hint of what could be fount inside.

A vibrant happy card featuring Stampin' Up! products - the Brights colour family and Floating & Fluttering bundle by Andrea Sargent at Valley Inspirations, Australia.

That's it from me this month. I hope you are enjoying this Social Stamping Blog Hop which has focussed on the Bright colours. If you started at the beginning with our amazing Social Stamping Host, Kelly Kent, then the next talented crafter is Elizabeth Gross at Lillybet's Papers. Either click on Elizabeth's name or click on the "next" graphic to be taken to her blog.


To see the full list of participants, click on this link and be taken to Kelly Kent's Host Blog Post at My Papercraft Journey where you will find all the individual links that can take you to each person's blog

I hope to see you again next month, when we will be focussing on the In Colours' families

Do look after yourself and your loved ones. Stay well, stay safe and be kind to yourself and others in these strange times. Hopefully improvement is around the corner.

Andrea 😘

Saturday, 4 July 2020

Social Stamping - #15 Change

Change with Lovely You & Forever Flourishing

Hello. Welcome to Valley Inspirations with Andrea and the 15th Social Stamping Blog Host. This is the last blog hop of the weekly Social Stamping Block Host where our themes reflect life with COVID-19, however, Kelly Kent, our amazing Coordinator and Blog Host has offered to continue in this role on a monthly basis with more recognised themes.


This week our theme is "Change". They say, change is a constant, and yes, change is always with us in some form. In the past I would become anxious at change, until it dawned on me that while change may mean we enter into the unknown, it can also mean that the situation improves. Well it wasn't that easy, but I did relax more and became more proactive. Often there is an opportunity to be involved in the change or at least be proactive in handling the change. This can provide some form of influence and potential control at least over how the change may affect you. Change is often small and incremental rather than cataclysmal.

In current times we have certainly experienced change and living with COVID will be different from life pre-COVID. While for many, life has been difficult, we have also learnt much - about ourselves and those we interact with, about general hygiene principals, about technological ways of keeping in touch, the list could go on. 

So what does all this mean in terms of this weeks projects? I have chosen a layout that I first saw Emma Goddard use. After starting my cards I realised that "Just Add Ink" are using a similar layout for their challenge this week.


I started with 3 card front panels that were all the same size. One was a piece of Whisper White card-stock that had been stamped all over with the Lovely You stamp set using the Baby Wipe technique. I had used bottles of Re-inkers, ie Blackberry Bliss, Rococo Rose and Blushing Bride; dripping these colours randomly onto folded baby wipes. This became my stamp pad. I love the soft blending of colours created using this method. The other panels were Blackberry Bliss card-stock and a piece of Rainbow Glimmer paper. Each of the front panels were stacked together and two cuts were made creating 3 angled pieces in each panel. These pieces were swapped around so that new card fronts would be created using one of each of the different panels. 


This changing of panel pieces, created 3 different and individual card fronts. Each is unique and each is beautiful in its own way. This change created a new beauty.


To reinforce and support the beauty of the differences, the cards were further created with different features. The front panels of the cards directly above and below were adhered to a Rococo Rose card front with a small gap between the angled pieces and a small boarder around the edge. They were directly adhered to the Blackberry Bliss card-stock base. The labels for these 2 cards were created using the Lovely Labels Pick a Punch, although one sentiment was heat embossed with Whisper White Emboss Powder while the other was stamped in Blackberry Bliss. Differing card-stock was also used.


Different die cut pieces using the Forever Flourishing dies were added as focal pieces, that is different leaf sprays cut from different card-stock. The embellishments were different as well, as the first card has a bow from discontinued Whisper White Bakers Twine. I used the Bakers Twine as it has a similar look to the white embossed sentiment. The second card has a bow created from Whisper White Crinkled Seam Binding that was coloured with Blackberry Bliss (Dark) Blend. Both card fronts were finished with a few Basic Rhinestone Jewels that were also coloured with the Dark Blend.


With the 3rd card, the card front pieces were adhered directly to the Blackberry Bliss card-stock card base and no gap was left between pieces.


The sentiment from the Forever Fern stamp set was stamped in Blackberry Bliss ink on a label die cut from the Tasteful Label dies and a circle punched out using a 2" Circle punch. All the labels were popped up on Dimensionals. A leaf spray was cut from the Rainbow Glimmer paper using a different die from the Forever Flourishing dies. Coloured Basic Rhinestones were also added, but no ribbon.


All cards have a similar card inner with a softly variegated leaf spray stamped on the inner panel and a thin strip of Rainbow Glimmer paper. You may notice in some of the photos, that I also like to stamp on the envelope so that it ties in with the card it holds. A leaf spray was stamped on each envelope in Blackberry Bliss ink.


The set of cards are all similar, however, numerous aspects have been changed. For me, these changes are interesting and create different, though still lovely, effects. Changes we face may not be easy, but we can make the best of them if we face the changes positively and proactively. Thank you for allowing me to share one of the lessons I have learnt over many years.

I do appreciate that you have taken time to visit the Valley Inspirations blog. Please contact me if you would like any further information about the cards in this blog; or if you live in Australia and would like a new Annual Catalogue posted to you; or if I can help in any other way.

I hope you are enjoying this week's Social Stamping Blog Host that has focused on the theme - "Change". If you started at the beginning with our amazing Social Stamping Host, Kelly Kent, then you can either click here to be transferred to Shannon Kissane at the Crafting Engineer to see her gorgeous creation or click on the 'Next' graphic below; or if you would prefer to go to the full list of participants click on this link to be taken to Kelly Kent's Host blog post at My Papercraft Journey where you will find individual links that can take you to each person's blog.

Do look after yourself and your loved ones in these changing times. 

Hope to see you again later in the month (Saturday, 25 July) when the Social Stamping Blog Host theme is "sympathy". This will be the first blog hop of our monthly Social Stamping Blog Hop.

Andrea 😘


List of Products used to create these cards:

Stamps, Dies & Punches
  • Lovely You stamp set - #152525
  • Forever Flourishing dies - #152714
  • Tasteful Labels dies - #152886
  • Lovely Labels Pick a Punch - #152883
  • 2" Circle Punch - #133782
Inks & Applicators
  • Blackberry Bliss ink pad - #147092
  • Blackberry Bliss Classic ink refill - #133648
  • Petal Pink ink refil - #147169
  • Rococo Rose ink refil - #150089
  • Versamark ink pad - #102283
  • White Stampin' Emboss Powder - #109132
  • White Craft Stampin ink pad - #147277
  • Sponge Daubers - #133773
  • Blackberry Bliss Stampin Blends Combo -  #154877
Paper
  • Whisper White card-stock - #106549
  • Blackberry Bliss card-stock - #133682
  • Rococo Rose card-stock - #150888
  • Vellum Card-stock - #106584
  • Rainbow Glimmer Paper- #153056
  • C6 Whisper White envelopes - #106589
Embellishments
  • Rhinestone Basic Jewels - #144220
  • Whisper White Crinkled Seam Binding - #151326
  • Whisper White Butchers Twine - Discontinued
Adhesives
  • Multipurpose Liquid Glue - #110755
  • Mini Glue Dots - #103683
  • Tear & Tape Adhesive - #138995
  • Mini Stampin' Dimensionals - #144108
  • Stampin' Dimensionals - #104430
Tools
  • Take Your Pick Tool - #144107
  • Bone Folder - #102300
  • Paper Snips - #103579
  • Paper Trimmer - #152392
  • Stamparatus - #148187
  • Block D - #118485
  • Block E - #118484
  • Block H - #118490
  • Grid Paper - #130148
  • Silicone Craft Mat - #127857
  • Stamping Sponge - #141337
  • Simple Shammy - #147042
  • Heat Tool - #129056
  • Stampin Cut & Emboss Machine - #149653
  • Magnetic Cutting Plate - #149656

Wednesday, 1 July 2020

Art With Heart Colour Creations Showcase - #5 Blushing Bride

Blushing Bride and Prized Peony

Hello. Welcome to Valley Inspirations with Andrea and the 5th Colour Creations Showcase by members of the Art With Heart Team.


This week we are hero-ing a very pretty colour, that is Blushing Bride. This colour is a soft light pink. It sits within Stampin' Up!'s Subtle's colour range.  I do love the way Stampin' Up! coordinate colours and take a colour through a range of their products. In my project I have used Blushing Bride in card-stock, ink pad and re-inker. Another Blushing Bride product is Designer Series Paper as one of the colours of the Subtles Designer Series Paper.  

When thinking of this week's project, one of the beautiful new suites came to mind, the Prized Peony Suite. The flowers in the stamp set are super gorgeous and I have been looking forward to working with this lovely suite ever since it caught my eye in the new Stampin' Up! Annual Catalogue. The suite including the DSP used a different pink but I was sure that Blushing Bride with a different colour combination would also come up well. I started with a plan for one card but ended up creating two cards. I hope you like them.

Andrea Sargent, Stampin' Up!, Art With Heart, Blog Hop, Prized Peony, Blushing Bride, Dainty Diamonds Embossing, Water-colour

The idea for my first card turned into the card on the right hand side (RHS), ie with the Thick Whisper White card base. As I created this card, other ideas came to mind and I also had some pieces left over and so the second card was birthed, ie the card on the LHS with the Blushing Bride card base.

Andrea Sargent, Stampin' Up!, Art With Heart, Blog Hop, Prized Peony, Blushing Bride, Dainty Diamonds Embossing, Water-colour

I started by stamping a range of flowers from the Prized Peony stamp set in Versamark onto Fluid 100 Watercolour Paper and then heat embossing it with Gold Emboss Powder. I water-coloured the flowers and leaves using Blushing Bride with the new Water Painters (they were a joy to work with). Touches of Rococo Rose added some depth and So Saffron was used for the flower centres. The leaves were coloured with Soft Sea Foam and Pear Pizzaz. I wanted to have a subtle striped background so painted my own stripes with Soft Sea Foam. I used the middle sized Water painter as I didn't want a wide stripe. Once dry, the striped panel was trimmed down to cover the bottom 2/3rds of the card front. I used Whisper White cardstock for the top panel and embossed it with the super gorgeous Dainty Diamonds Embossing Folder. The card front stretches from top to bottom of the card base and is narrower in width. Two stripes of Gold Foil were added on either side of the card front.

Andrea Sargent, Stampin' Up!, Art With Heart, Blog Hop, Prized Peony, Blushing Bride, Dainty Diamonds Embossing, Water-colour

As I was fussy cutting the flowers, I realised that the accompanying die set included dies to cut out each of the stamped flowers and leaves - but, sigh, I had already started. The embossed Whisper White card front panel was adhered directly to the card base, while the striped panel was popped up on Dimensionals. The flowers and leaves were arranged, with a couple of  flowers adhered directly, one flower was popped up on Dimensionals and another flower popped up further with a mix of single and double Dimensionals.

Andrea Sargent, Stampin' Up!, Art With Heart, Blog Hop, Prized Peony, Blushing Bride, Dainty Diamonds Embossing, Water-colour

The sentiment came from the Lovely Moments stamp set. I am wanting to use this card to wish a special friend "Happy Birthday". The sentiment was stamped in Versamark onto an off-cut of the striped watercolour paper and gold heat embossed, before being fussy cut. The card front was finished off with a bow, using stamped Whisper White Crinkle Seam Binding and Gold Trim. The Whisper White ribbon was stamped randomly with Soft Sea Foam leaves as the bow had looked a bit stark at first try. A few Gilded Gems were added as the final touch. Some flowers were stamped and gold embossed on the card inner panel.

Andrea Sargent, Stampin' Up!, Art With Heart, Blog Hop, Prized Peony, Blushing Bride, Dainty Diamonds Embossing, Water-colour

I thought of using Blushing Bride card-stock as the card base on my first card but found Thick Whisper White card-stock worked better. Also, after completing the first card (above) I still had the water-coloured Peony spray and some of the water-coloured Soft Sea Foam striped paper. And so, the card, below, was created.

Andrea Sargent, Stampin' Up!, Art With Heart, Blog Hop, Prized Peony, Blushing Bride, Dainty Diamonds Embossing, Water-colour

A card front was cut from Vellum card-stock and embossed with the Dainty Diamonds Embossing Folder. I have fallen in love with the effect created by embossing vellum, and this embossing folder is delightful. 

Andrea Sargent, Stampin' Up!, Art With Heart, Blog Hop, Prized Peony, Blushing Bride, Dainty Diamonds Embossing, Water-colour

The remaining water-coloured striped piece was scalloped on 2 edges with the scallop die in the Peony die set. Thin strips of Gold Foil was also scalloped with the same die and adhered under the water-coloured stripe panel. This panel was popped up on Dimensionals. A label from the Tasteful Labels dies was stamped with a sentiment from the Prized Peony stamp set and heat embossed with Gold Emboss Powder. This label was also popped up on Dimensionals. The water-coloured Peony was positioned with differing layers of Dimensionals (ie 1 or 2 layers of dimensionals or glued directly to the label with liquid glue). Three Elegant Faceted Gems were added as a finishing touch.

Andrea Sargent, Stampin' Up!, Art With Heart, Blog Hop, Prized Peony, Blushing Bride, Dainty Diamonds Embossing, Water-colour

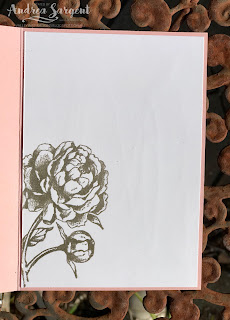
The same Peony stamp was used to gold emboss on the card inner to tie the centre of the card with the card front. You may have noticed from an earlier photo that the envelope was also stamped with the same peony, though in Blushing Bride ink.

Andrea Sargent, Stampin' Up!, Art With Heart, Blog Hop, Prized Peony, Blushing Bride, Dainty Diamonds Embossing, Water-colour

Thank you for visiting the Valley Inspirations blog. I do appreciate you spending time with me. Please contact me if you would like any further information about the projects; or if you live in Australia and would like either a new Annual Catalogue and or the coming August - December Mini Catalogue posted to you; or if I can help in any other way.

I hope you are enjoying this week's Colour Creations Showcase that has focused on the colour - Blushing Bride. 

The lovely Catherine Proctor is hosting the Art with Heart Colour Creations Showcase each week. If you haven't finished checking out all of the team's colour creations, you can visit/revisit Catherine's page at What Cathy Made, where she hosts all the links to the other Showcase participants. I'm certainly looking forward to being inspired by everyone's creations.

Look after yourself and your loved ones.

Hope to see you again next week when members of the Art With Heart Team will share projects that hero one of the new In Colours for 2020-2022, "Bumblebee".

Have a great week.   

Andrea 😘 


List of Products used to create these cards:

Stamps, Dies & Punches
  • Prized Peony stamp set - #152504
  • Lovely You stamp set - #152525
  • Peony dies - #152701
  • Tasteful Labels dies - #152886
Inks & Applicators
  • Blushing Bride ink pad - #147100
  • Blushing Bride Classic ink refill - #131157
  • Soft Sea Foam ink pad - #147102
  • Soft Sea Foam Classic ink refil - #147166
  • Pear Pizazz Classic ink refil - #131160
  • So Saffron Classic ink refil - #105225
  • Rococo Rose Classic ink refil - #150089
  • Versamark ink pad - #102283
  • Gold Emboss Powder - #109129
  • Water Painters - #151298 (new)
Paper
  • Whisper White card-stock - #106549
  • Blushing Bride card-stock - #131287
  • Whisper White Thick card-stock - #140490
  • Fluid 100 Watercolour paper - #149612
  • Vellum Card-stock - #106584
  • C6 Whisper White envelopes - #106589
Embellishments
  • Gilded Gems - #152478 
  • Elegant Faceted Gems - #152464
  • Whisper White Crinkled Seam Binding - #151326
  • Gold Trim from Forever Greenery Trim Combo Pack - #152475
Adhesives
  • Multipurpose Liquid Glue - #110755
  • Mini Glue Dots - #103683
  • Tear & Tape Adhesive - #138995
  • Mini Stampin' Dimensionals - #144108
  • Stampin' Dimensionals - #104430 
Tools
  • Dainty Diamonds Embossing Folder - #152702
  • Take Your Pick Tool - #144107
  • Bone Folder - #102300
  • Paper Snips - #103579
  • Paper Trimmer - #152392
  • Stamparatus - #148187
  • Block D - #118485
  • Block E - #118484
  • Block H - #118490
  • Grid Paper - #130148
  • Silicone Craft Mat - #127857
  • Stamping Sponge - #141337
  • Simple Shammy - #147042
  • Heat Tool - #129056
  • Stampin Cut & Emboss Machine - #149653
  • Magnetic Cutting Plate - #149656

AWH Heart of Christmas Blog Hop #3

Christmas with the Road to Christmas Kit + Alternatives Hello. Welcome to  Valley Inspirations with Andrea  and the third  Art with Heart Te...