Art with Heart Wow Tutorials

Showing posts with label Natures Prints. Show all posts

Wednesday, 14 December 2022

AWHT Colour Creations #33 Old Olive

Old Olive with a Nature’s Prints Wreath

Hello. Welcome to Valley Inspirations with Andrea and the Art with Heart Colour Creations Blog Hop. We are working though the Stampin' Up! colours in alphabetical order, focussing on one colour each week.


This week’s Blog Hop is focussing on a muted green called Old Olive. Old Olive is part of the Regals Colour Family and as the name suggests is a olive green colour. This colour is lovely when used for leaves, trees, etc and works with so many colours. 


Old Olive is produced in Stampin' Up!'s card-stock, both A4 & 12"x12"Classic Stampin' inks (ink pads re-inkers); Stampin' Write Markers; Stampin' Blends Combo; Watercolor Pencils; Regals Designer Series Paper as well as Happy Forest Friends, Design A Daydream, Artfully Composed, Gingerbread & Peppermint and Beauty of the Earth DSPs; plus Old Olive & Sahara Sand Twill Ribbon Combo Pack, Glitter Washi Four Pack and Faux Sea Glass Shapes. That’s a solid list demonstrating the colour's versatility.

Old Olive card-stock, ink, Stampin' Write Marker and Twill Ribbon have been used in this project plus a range of non-Old Olive bits and pieces. Here is my card:

Send a personally created wreath card to wish family or friends Christmas greetings.

I have created another Christmas card - as I am running low on cards and still a few more to send. Two wreaths were cut from Shimmery White card-stock using the wreath die from the Natural Prints dies. A number of smaller stems were also die cut. They were all water-coloured with Old Olive Classic Stampin’ ink, ensuring variation of colour. One wreath was coloured much lighter. All the pieces were put aside to dry naturally.

Send a personally created wreath card to wish family or friends Christmas greetings.

The flower from the Nature’s Prints stamp set was stamped a number of times and gold heat embossed on Shimmery White card-stock, using Versamark ink, Gold Emboss Powder and a Heat Tool. The flower was water-coloured. You may not easily guess the colour that was used - its Cherry Cobbler!  It has dried with a more orange tinge similar to Calypso Coral. I promise its not Calypso Coral but Cherry Cobbler. Once dry, the flowers were fussy cut.

Send a personally created wreath card to wish family or friends Christmas greetings.

A Basic White card-stock panel was embossed with the pine EF from the Wintry 3D Embossing Folder set. The same size panel was cut from Old Olive card-stock and they were layered onto a Thick Basic White card base. The various pieces of foliage and flowers were arranged. The lighter wreath was positioned first, then the 2nd wreath. Some of the stems were layered on top. Three of the flowers were arranged to one side and the other 2 flowers were tucked between foliage layers. 

Send a personally created wreath card to wish family or friends Christmas greetings.

A bow was tied with Old Olive Twill Ribbon that had been cut in half lengthwise and a second bow was tied with Gold Elegant Trim. They were tucked between the flowers. Gold Holy Leaves were added here and there and 2 Flat Jingle Bell Trinkets were adhered under the floral arrangement. A sentiment from the Brightest Glow stamp set was stamped in Old Olive ink on Shimmery White card-stock and fussy cut, before being adhered with Mini Dimensionals.


The inside of the card also layered Basic White card-stock over Old Olive card-stock. A gold embossed flower and a remaining water-coloured stem were added to link the theme of the card front to the inside. A C6 Basic White envelope was gold heat embossed using the flower stamp. Just a simple touch to tie the envelope to the card it will carry. 

Send a personally created wreath card to wish family or friends Christmas greetings.

Thank you for spending time with me on my blog. I have really enjoyed sharing projects for you during the year.  This is the last Colour Creations Blog Hop for 2022. After a short break we will be back in the New Year to continue this round of Stampin’ Up!s amazing colour range.

Send a personally created wreath card to wish family or friends Christmas greetings.

There is more Old Olive creativity. To continue with the blog hop, click the  "onto the next" graphic below and be taken to the blog of the lovely and talented Tina Gillespie
I always look forward to checking out Tina’s creations. I do love seeing everyones' projects - there is always inspiration.

I hope to see you early in 2023 when we will be featuring Pacific Point, one of the Brights Colour family as we continue the weekly 2022-2023 Colour Creations Blog Hops.  

Stay well, stay safe and be kind to yourself and others. I wish you the happiest of Christmases.

Andrea 💕🐾


If you find a broken link or have come to this blog hop from a different entry point, you can view the full list of participants on Catherine Proctor’s blog @ What Cathy Made. Cathy is our  Art With Heart Team Colour Creations Coordinator.  She is an wonderful lady. Check out her delightful creation while you are there.

If you live in Australia, don't already have a Stampin' Up! demonstrator and would like your own copy of Stampin' Up's 2022-2023 Annual Catalogue and or the new January - April 2023 Mini Catalogue then let me know and I will be delighted to send them to you.  Please don't hesitate to make contact with any other queries about this project or Stampin' Up!. 

#colourcreationsbloghop  #stampinup #stampinupaustralia #stampinupsouthpacific #stampinupdemo  #handmadecards #makeacardsendacard #stampinupdemonstrator #papercrafting #artwithheartteam  #papercrafter  #stamper  #valleyinspirations   #naturesprints #brightestglow 

Wednesday, 31 August 2022

AWHT Colour Creations #18 Early Expresso

Early Espresso with Abigail Rose Fancy Fold

Hello. Welcome to Valley Inspirations with Andrea and the Art with Heart Colour Creations Blog Hop. We are working though the Stampin' Up! colours in alphabetical order. 


This week’s Blog Hop is focussing on a deep brown called Early Espresso. Early Espresso is part of the Neutrals Colour Family and is a dark chocolate colour. This colour is lovely when used for trees, chocolate or coffee and so much more. It is a great colour for cards for fellas, going brilliantly with Cajun Craze, Pumpkin Pie, Crushed Curry and the like. It also goes with pinks, blues like Tahitian Tide and other neutrals such as Crumb Cake and is great with Gold. 


Early Espresso is produced in Stampin' Up!'s card-stock, both A4 & 12"x12"Classic Stampin' inks (ink pads re-inkers); Stampin' Write Markers; Water-colour Pencils; Neutrals Designer Series Paper as well as Storybook Gnomes, Rustic Harvest, Santa Express, Abigail Rose, He's The Man and Painted Christmas DSPs; plus Faux Suede Trim, Festive Felt; Abigail Rose File Folders, Cozy & Bright Card Kit, and Santa Express Memories & More Cards & Envelopes. 

To feature Early Espresso I decided to create a fancy fold and use the delightful Abigail Rose DSP, colouring some of the flowers with Stampin' Blends. Here is the card standing open:


I am not sure of the name of this fold as I have only seen it called a Vertical Freestanding Fun Fold (or Fancy Fold). I'm not sure if it has another name but do love the fold. It was not a difficult fold and I love the impact. I watched Emma Goddard create this fold during one of her recent (paid) classes - as always thanks for the inspiration Emma. I believe Susan Campfield, a US Demonstrator, has a uTube where she created this fold. I haven't watched the video but other of her videos are easy to follow. Here is a photo of the card looking down from the top.


Three pieces of Early Espresso card-stock were cut and scored. Two different designs of the Abigail Rose DSP were trimmed to fit appropriate panels. I used the Early Espresso/Very Vanilla/Crumb Cake tulip design for panels facing forward and the Memorandum lined design for the other panels to be covered with DSP.


My front panel of the card has an embossed Very Vanilla card-stock panel that is slightly smaller than the Early Espresso front panel. The Very Vanilla piece was embossed with one of my favourite Embossing Folders - the Timeworn Type 3D EF. As I was photographing the card, I wondered if I should have added some Petal Pink or Calypso Coral splatters - what do you think?


Two of the circular Stylish Shapes Dies were used to cut a ring from a Rose Gold sheet of the Gold & Rose Gold Metallic Speciality Paper. This was added to the card front with Mini Dimensionals. Tulips and a few leaves from the Tulip design of the DSP were coloured with Stampin' Blends, ie Petal Pink, Calypso Coral, So Saffron & Old Olive combos. Once coloured, they were fussy cut with Paper Snips.


As I was arranging the tulips I thought something else was needed (partly because I had "lost" most of the coloured leaves), so I die cut the wreath from the Natural Prints dies in Basic White card-stock. This is such a gorgeous wreath. It was coloured with Mint Macaron and Pear Pizzazz Classic Stampin' inks and a Blending Brush. The coloured wreath was cut into sections that could be tucked under flowers at different places. All the pieces were arranged and adhered with either Glue Dots, Dimensionals or Multipurpose Liquid Glue.


A sentiment from the Cottage Rose stamp set was white heat embossed using Versamark ink, White Emboss Powder and a Heat Tool. A piece of Gold Simply Elegant Trim was coloured with a Dark Calypso Coral Blend to tied it in with the Rose Gold metallic ring. A double bow was added with Glue Dots. Some Petal Pink Elegant Faceted Gems gave touches of shimmer.


Some Very Vanilla card-stock was stamped with a sentiment and leaves from the Cottage Rose stamp set in Early Expresso ink. This panel was adhered to the centre back panel of the card. Some extra coloured tulips were adhered over some of the stamping. A Very Vanilla C6 envelope was stamped with the smaller flower in Early Expresso ink.


Thank you very much for calling by.

There is more Early Expresso creativity. To continue with the blog hop, click the "onto the next" graphic below to be taken to the blog of the lovey Rachel Palmieri. I always look forward to checking out Rachel's creations. I do love seeing everyones' projects - there is always so much inspiration.

Hope to see you next week when we will be featuring Evening Evergreen as we continue the weekly 2022-2023 Colour Creations blog hops.  Also, don't forget that we are joining the Heart of Christmas Blog Hop on Monday evenings to share many delightful Christmas projects. 

Stay well, stay safe and be kind to yourself and others. 

Andrea 💕🐾
    

If you find a broken link or have come to this blog hop from a different entry point, you can view the full list of participants on Catherine Proctor’s blog @ What Cathy Made. Cathy is our wonderful Art With Heart Team Colour Creations Coordinator.  She is an amazing lady. Check out her delightful creation while you are there.

If you live in Australia, don't already have a Stampin' Up! demonstrator and would like your own copy of Stampin' Up's 2022-2023 Annual Catalogue and or the July - December 2022 Mini Catalogue then let me know and I will be delighted to send them to you.  Please don't hesitate to make contact with any other queries about this project or Stampin' Up!. 

#colourcreationsbloghop  #stampinup #stampinupaustralia #stampinupsouthpacific #stampinupdemo  #handmadecards #makeacardsendacard #stampinupdemonstrator #papercrafting #artwithheartteam  #papercrafter  #stamper  #valleyinspirations   #abigailrose #cottagerose #fancyfold 

Monday, 22 August 2022

AWH Heart of Christmas #8

Heart of Christmas Blog Hop: Nature’s Prints

Hello. Welcome to Valley Inspirations with Andrea and the eighth Art with Heart Team Heart of Christmas Blog Hop for 2022. 

I am so glad you are joining us for our this 2022 Heart of Christmas Blog Hop. I had fun creating a fancy fold card using both Christmas and non Christmas products. Here is my card:

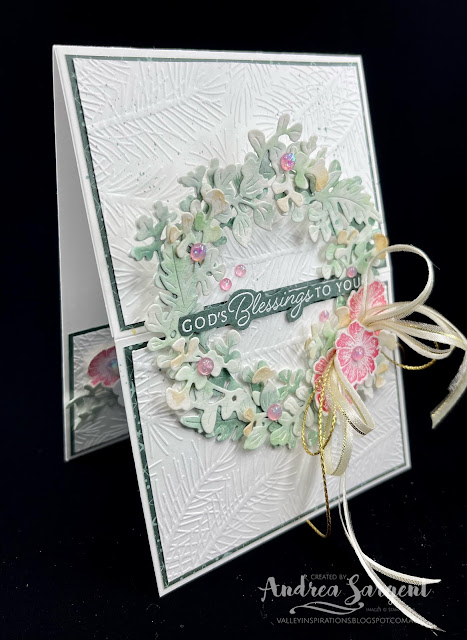
Send Christmas Blessings to someone special with an elegant personally created Easel Fancy Fold Christmas card.

It has been raining for much of the day today so it has been impossible to take my photos in outside light. This encouraged me to try out my light box. I’m not sure about the black background but will need to make time to play with backgrounds and camera angles etc. Hopefully the photo backgrounds will improve quickly.

Here is a look at the card closed. The background and bottom section of the card inner were created with embossed panels using Basic White card-stock, the Pine EF from the Wintry Embossing Folders and my Cut and Emboss machine. The embossed panels were splattered with Soft Succulent ink from a Stampin’ Write Marker before being mounded onto a slightly larger piece of Lights Aglow Speciality Designer Series Paper. The beauty of this SDSP is not really appreciated with such a small mount so I would probably just use Evening Evergreen card-stock if I was to repeat this card.
 
Send Christmas Blessings to someone special with an elegant personally created Easel Fancy Fold.

The wreath die from the Natural Prints dies was used to cut 4 wreaths, 2 from Shimmery White card-stock and 2 from Thick Basic White card-stock. A number of little leaves and leaf twigs were also die cut from Shimmery White card-stock. The Shimmery White wreaths were water-coloured with either Evening Evergreen or Soft Succulent Classic Stampin’ ink and a Water Painter. The same inks were used for the smaller leaf die cuts plus a little Crumb Cake ink was added to the little leaves. The flower from the Natures Prints stamp set was white heat embossed a number of times onto Shimmery White card-stock using Versamark, White Emboss Powder and a Heat Tool. The flowers were water-coloured with Cherry Cobbler ink.
Send Christmas Blessings to someone special with an elegant personally created Easel Fancy Fold.

The 2 white card-stock wreaths were adhered together and then to the back of the Evening Evergreen wreath. The lighter Soft Succulent wreath was adhered over the darker wreath ensuring it was turned 180 degrees so part of the wreath below showed through. Then the lower section of the wreath was adhered to the lower section of the background so that when the card front is bent the top section of the wreath would stand up.

Send Christmas Blessings to someone special with an elegant personally created Easel Fancy Fold.

A sentiment from the Hope & Peace stamp set was white heat embossed on Evening Evergreen card-stock and then fussy cut. A sentiment from the Brightest Glow stamp set was stamped in Evening Evergreen ink on Basic White card-stock before being die cut with a label from the Seasons Labels dies. This label was popped up on Dimensionals and a flower with some leaves were tucked under one side of the label. 

Send Christmas Blessings to someone special with an elegant personally created Easel Fancy Fold.

A bow was tied with Gold &Vanilla Satin-edged ribbon and Gold Simply Elegant Trim and added to the wreath with Glue Dots. Flowers and little leaves were arranged and some In Colour Opal Rounds were sprinkled around. A couple of remaining leaf twigs were added to a C6 Basic White Envelope and the last twig was adhered to the area for a personal message.

Send Christmas Blessings to someone special with an elegant personally created Easel Fancy Fold.

Thank you for dropping in. I hope you have found something that peaked your interest.

It is always a delight to see everyone's creations and I am sure there will be gorgeous Christmas projects on show so don't miss checking out each blog. To continue with the blog hop, click the "onto the next" graphic below to be taken to the blog of the very special Kate Morgan. I always look forward to checking out Kate’s creations together with everyone else's. 

Don't forget the weekly Colour Creations Blog Hop by the Art with Heart Team that launches every Wednesday at 8.00pm AEST. 

Stay well, stay safe and be kind to yourself and others.

Andrea XXX


If at any time you find a broken link and the next blog doesn’t come up or you started part way through, please head to the blog of our Heart of Christmas Blog Hop Host, the amazing Sharon Davern, and she will have the list of all Art With Heart Team members who are participating in this blog hop. Check out her beautiful creation while you are there.

If you are in Australia, don't already have a Stampin' Up! demonstrator and would like your own copy of Stampin' Up's 2022-2023 Annual Catalogue and or the July - December Mini Catalogue then let me know and I will be delighted to send them to you. Pease don't hesitate to contact me with any other queries about these projects or Stampin' Up!. 

#heartofchristmas #heartofchristmas2022  #awhtheartofchristmas #Stampin'Up! #stampinupaustralia #stampinupsouthpacific #stampinupdemo  #handmadecards #makeacardsendacard #stampinupdemonstrator #papercrafting #artwithheartteam  #papercrafter  #stamper  #valleyinspirations #hope&peace #naturesprints #brightestglow  

Wednesday, 18 May 2022

AWHT Colour Creations #3 Starry Sky

Starry Sky with Nature's Prints and Water-colour

Hello. Welcome to Valley Inspirations with Andrea and the Art with Heart Colour Creations Blog Hop for 2022-2023. Earlier this month we commenced working though all the Stampin' Up! colours, starting with the new In Colours for 2022-2024.


This week’s Blog Hop is focussing on a rich and beautiful junior blue called Starry Sky. As mentioned Starry Sky is part of the new 'In Colour' Colour Family and is one of my favourite new In Colours - it is fighting it out with Orchid Oasis. This colour is gorgeous in a monochromatic project or would be amazing with pinks or yellows or so many other combinations. 


Starry Sky is produced in Stampin' Up!'s card-stock, both A4 & 12"x12"Classic Stampin' inks (ink pads re-inkers); Stampin' Write Markers; Stampin' Blends, In Colour Designer Series Papers and Tea Boutique, Sun Prints, Butterfly Kisses DSPs, Metallic Woven Ribbon, In Colour BakersTwine and Matte Decorative Dots, Fun Flower Resin Dots and Tea Boutique Cards & Envelopes. The card below has used Starry Sky Classic Stampin' ink (both re-inker and Stamp Pad), Card-stock and Stampin' Blends plus a range of other non-PP bits and pieces.
Here is this week's card to showcase Starry Sky:


Isn't Starry Sky a delightful colour.  It is such a relief that this blog is completed on time as I have been without power for nearly all of the day and my phone ran out of power nearing the end of the day. At the last moment SA Power came and fixed my connection to the power source. Phewwww.

CARD 1:

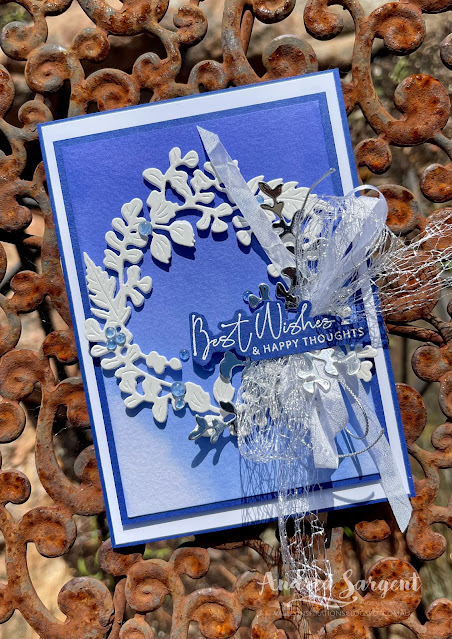
This card shows the beauty of Starry Sky through a water-coloured ombre  background panel.


A half panel of Fluid 100 Watercolor Paper was watered down and then ink from a Starry Sky Re-inker was applied to the top of the panel with a large Water Painter, allowing the ink to run/drip down to the bottom. I have so much fun with this technique and I love the effect. It is a great way to get to know a new colour as water-colouring can show the different hues that make up the colour. The water-coloured panel was mounted to slightly larger piece of Starry Sky card-stock.  A piece of Basic White card-stock was adhered directly to the Starry Sky card base


A wreath from the Nature’s Prints dies was die cut 3 times using Thick Basic White card-stock and a 4th time from Mother of Pearl Speciality Paper. The wreaths were then layered directly one on top of the other with the Mother of Pearl wreath on top. Pieces of gorgeous Metallic Mesh Ribbon, the White Crinkled Seam Binding and the Silver Simply Elegant Trim were tied into bows and adhered with Glue Dots on the right side of the wreath. Some extra sprigs from the same set of dies were die cut from Silver Foil and tucked in and around the bow. This mounted centre panel was added to the card base with Dimensionals.


The card front was finished with a sentiment from the Nature’s Prints stamp set that had been White heat embossed on Starry Sky card-stock. Some Clear Polished Dots were coloured with a Light Starry Sky Blend and added around the sentiment and on the wreath to give a little shimmer.


A piece of Basic White card-stock that had been stamped  with the leaf from the stamp set was adhered into the inner card base.  The front and the back flap of a Basic White C6 Envelope also was stamped with the same leaf stamp in Starry Sky ink.


I had a second card design in mind using a new (to me) fun fold but my power outage changed my plans for the day. I still want to play with this fun fold so it is likely to turn up sometime in the next few weeks. Keep an eye out.

Thank you so much for dropping by. I do value the time you take out of your day to spend with me.


If you live in Australia, don't already have a Stampin' Up! demonstrator and would like your own copy of the new 2022-2023 Annual Catalogue and or the January - June 2022 Mini Catalogue then let me know and I will be delighted to send them to you.  Please don't hesitate to make contact with any other queries about this project or Stampin' Up!. 

There is more Starry Sky creativity. To continue with the blog hop, click on the "next" graphic below to be taken to the blog of the lovely Diane Furniss. I always look forward to checking out Diane's creation (I wonder whether she has a fancy fold in store this week - she is amazing with fancy folds). I do love seeing everyones' projects - there are always so many ideas.

Hope to see you next week when we will be featuring another new colour, Sweet Sorbet, as we continue the weekly 2022-2023 Colour Creations blog hops featuring the new In Colours.

Stay well, stay safe and be kind to yourself and others. 

Andrea 💕🐾


If you find a broken link you can view the full list of participants on Catherine Proctor’s blog, What Cathy Made, Cathy is our wonderful Art With Heart Team Colour Creations Coordinator.  I so appreciate all Cathy does in coordinating this blog hop each week. She is such a special lady. Check out her wonderful creation while you are there.

#colourcreationsbloghop  #stampinup #stampinupaustralia #stampinupsouthpacific #stampinupdemo  #handmadecards #makeacardsendacard #stampinupdemonstrator #papercrafting #artwithheartteam  #papercrafter #naturesprints 


CASEing the Catty #537 CASE Traditions of Christmas

CASE Traditions of Christmas meets Most Wonderful Hello, welcome to Valley Inspirations with Andrea &  #537 Challenge with CASEing the C...