Art with Heart Wow Tutorials

Monday 30 August 2021

AWH Heart of Christmas #9

Christmas with Merriest Moments

Hi. Welcome to Valley Inspirations with Andrea and the Art with Heart Team 2021 Heart of Christmas Blog Hop


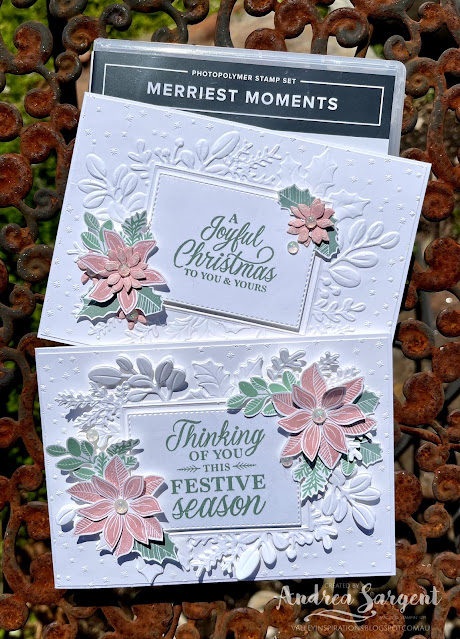
I have 2 cards to share for this week's projects, both featuring the Merriest Moments bundle. I am fascinated with the hybrid embossing folder and love the coordination of the more intricate die cut and the embossing folder which covers most of a standard card front. Given the embossed detail, a sentiment on the centre label and some stamped/die cut poinsettias & leaves are all that are needed. The colour scheme I used is inspired by the gorgeous Whimsy and Wonder Speciality Designer Series Paper (just using a few of the colours). 

Embossed leaves frame a Christmas sentiment and is decorated with softly coloured poinsettias to bring Christmas wishes.

As time is short this week my cards will be simpler than my norm. I created two cards with similar layouts and colour schemes to be able to asses the different effect of plain embossing against the addition of a die cut and embossed layer. Both cards are mainly Basic White with touches of colour from the leaves, flowers and sentiment. I love the clean look of white expanse.

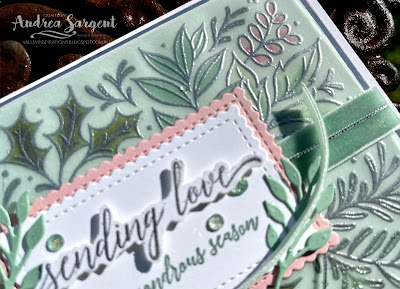
Card 1: This first card just uses the embossing folder for the card front's base layer, ie the  Basic White card-stock card was embossed with the Merriest Moments Hybrid Embossing Folder and then adhered to the Thick Basic White card base

Embossed leaves frame a Christmas sentiment and is decorated with softly coloured poinsettias to bring Christmas wishes.

The sentiment was stamped on Basic White card-stock in Soft Succulent Classic Stampin' ink and die cut with the stitched rectangle from the Merriest Frames dies. It fits the centre embossed panel beautifully and was added with some Dimensionals.

Embossed leaves frame a Christmas sentiment and is decorated with softly coloured poinsettias to bring Christmas wishes.

The poinsettias were stamped in Blushing Bride ink or die cut from Blushing Bride card-stock. The tiny die cut poinsettias had some White Craft ink added to the petal tips. The larger poinsettias were formed with 2 or 3 layers. Some leaves were stamped with Mint Macaron ink and the Holly leaves were stamped with Soft Succulent ink. The flowers and leaves were arranged and the design finished off with Opal Rounds embellishments at the flower centres plus another one so there was an uneven number of embellishments.

Embossed leaves frame a Christmas sentiment and is decorated with softly coloured poinsettias to bring Christmas wishes.

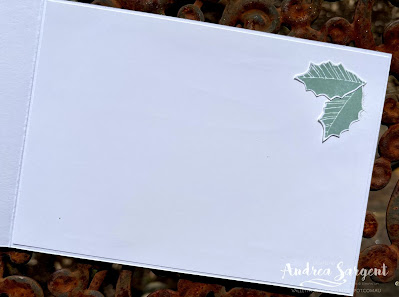
I had some Soft Succulent holly leaves left over so they were added to a Basic White card inner.  I also plan to add some Blushing Bride berries but forgot to add them prior to photographing the card. Please imagine they are added. 😉 A C6 Basic White Envelope was stamped with some of the pine fronds to coordinate with the overall design.

Embossed leaves frame a Christmas sentiment and is decorated with softly coloured poinsettias to bring Christmas wishes.

Card 2: The second card's Basic White card-front was also embossed but a second piece of Basic White card-stock was used to die cut the leafy frame and this was passed through the embossing folder. It created such a beautiful effect. The centre panel was adhered to the underneath embossed panel leaving the frame of leaves free to add more dimension.

Embossed leaves frame a Christmas sentiment and is decorated with softly coloured poinsettias to bring Christmas wishes.

As with card 1, leaves were stamped in either Mint Macaron or Soft Succulent ink and the larger poinsettias were stamped in Blushing Bride ink. A different sentiment from the Merriest Moments Stamp set was stamped in Soft Succulent ink and die cut with the stitched rectangle from the coordinating die set. 

Embossed leaves frame a Christmas sentiment and is decorated with softly coloured poinsettias to bring Christmas wishes.

The leaves and flowers were arranged and adhered in place with either Multipurpose Liquid Glue or Dimensionals. Opal Rounds embellishments were added at the flower centres and elsewhere. I love their subtle sparkle with that touch of pink. While not showing in the photographs, some Wink of Stella was added to give subtle all over shimmer.

Embossed leaves frame a Christmas sentiment and is decorated with softly coloured poinsettias to bring Christmas wishes.

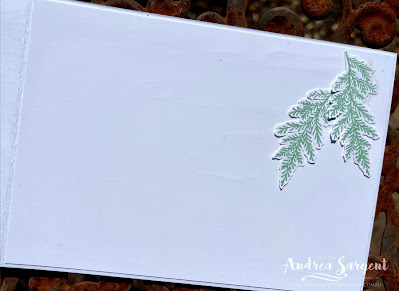
I also had a couple of Mint Macaron pine fronds left over so they were added to the Basic White card inner. Sometimes a little decoration is all that is needed. A C6 Basic White Envelope was stamped in Mint Macaron ink with some of the same fronds to coordinate.

Embossed leaves frame a Christmas sentiment and is decorated with softly coloured poinsettias to bring Christmas wishes.

I always enjoy creating to share with you and I certainly had fun playing/experimenting with the 
Merriest Moments bundle from the July-December 2021 Mini Catalogue. I am pleased with both cards and while I love the addition of the extra die cut and embossed frame layer, the card with the single embossed layer is also effective and would be great for creating in batches or for a simple card class. After creating with the soft and subtle colours, which I love, next time I must also play with more traditional Christmas colours. I have a number of ideas. The Merriest Moments bundle is delightful.


If you are in Australia, don't already have a Stampin' Up! demonstrator and would like your own copy of Stampin' Up's 2021-2022 Annual Catalogue and or the July - December Mini Catalogue then let me know and I will be delighted to send them to you. Also, please don't hesitate to make contact with any other queries about this project or Stampin' Up!. 

There is so much more Christmas creativity. To continue with the blog hop, click on the "onto the next" graphic below to be taken to the blog of an amazing and talented person, Tina Gillespie. I always look forward to checking out Theresa's creations as well as everyone else's. 

Hope to see you next week for another AWHT Heart of Christmas Blog Hop. There is so much Christmas inspiration to share using Stampin' Up!'s products and preparing early for  Christmas will minimize some of the stresses of the silly season.

Stay well, stay safe and be kind to yourself and others.

Andrea XXX


As mentioned, it is always a delight to see everyone's creations and the way they each use the amazing Stampin' Up! products. I am sure there will be gorgeous Christmas projects on show. Don't miss checking out each blog. 

If at any time you find a broken link and the next blog doesn’t come up or you started part way through, please head to the blog of this week’s host for the Heart of Christmas Blog HopSharon Davern, and she will have the list of all Art With Heart Team members who are participating in this blog hop.


#heartofchristmas #heartofchristmas2021 #awhtheartofchristmas


Wednesday 25 August 2021

AWHT Colour Creations #13 Crumb Cake

Crumb Cake with Angels of Peace & For Unto Us

Hello. Welcome to Valley Inspirations with Andrea and the Art with Heart 2021-2022 Colour Creations Blog Hop.


This week’s Blog Hop is focussing on a neutral light brown called Crumb Cake.  It is similar but still a different brown from Kraft card-stock - slightly lighter and Kraft has a little more of an orange tinge. Crumb Cake is part of the Neutrals Colour Family and coordinates so well with many colours (as neutrals tend to do). One of my favourite colour combinations is Petal Pink with Crumb Cake, so in the end I decided to go with this combo. My initial thought was to use White on Crumb Cake which is always delightful, but my designing process took me in another direction. 


Crumb Cake is produced in Stampin' Up!'s card-stock, both A4 & 12"x12"Classic Stampin' inks (ink pads & re-inkers); Stampin' Write Markers; Stampin' Blends, the Neutrals Designer Series Paper and some Bakers Twine (as part of the Essentials Pack of twine). The Slim-line Christmas cards below have used Crumb Cake card-stock, Classic ink, Stampin' Blends Combo, and Bakers Twine, plus other bits and pieces.

The Angels sing to herald in Christmas and so many blessings.

I was planning to make a fancy fold that I had recently seen and started with water-colouring some panels to use as background pieces. However, when layering them as they would look in the fancy fold I wasn't convinced that it worked well so ended up in a completely different direction, creating 2 more simple cards. 

The Angels sing to herald in Christmas and so many blessings.

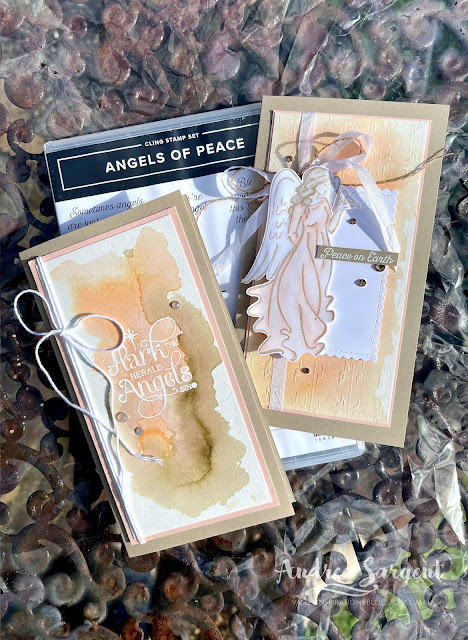
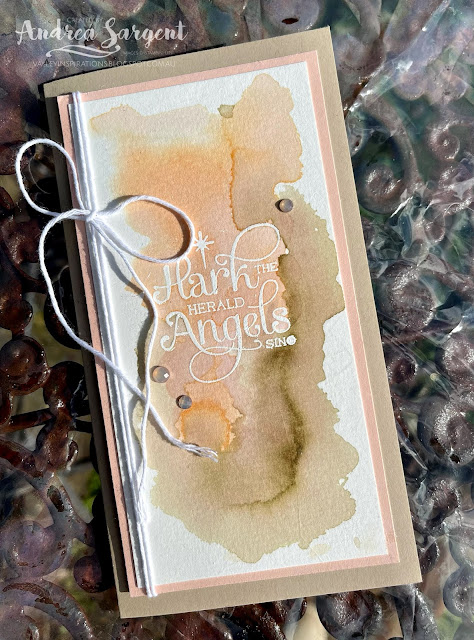
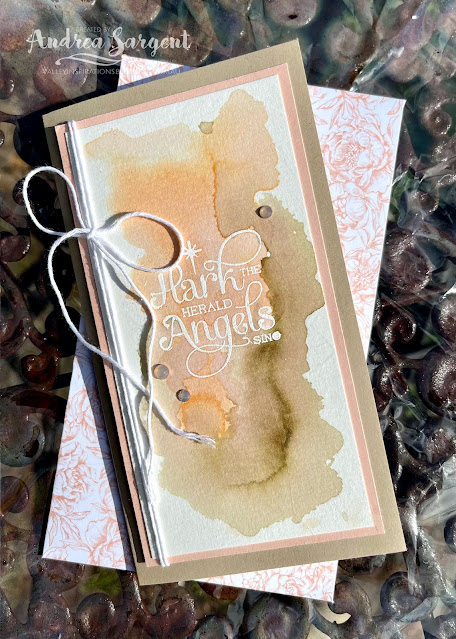
I was delighted with the water-colour effect achieved with the panel used on this first card. In my water-colour experimentation I have been trying to gain more variation of colour but usually my watercolour backgrounds tend to end up as a subtle blending of colours. This panel also uses the emboss resist technique, with a sentiment from the For Unto Us stamp set stamped in Versamark ink onto Fluid 100 Watercolor paper and heat embossed with White Stampin' Emboss powder and a Heat Gun. I used Crumb Cake and Petal Pink Classic Re-inkers with the mid-sized Water Painter and some extra water.

The Angels sing to herald in Christmas and so many blessings.

When dry, the water-coloured panel was mounted on a larger piece of Petal Pink card-stock. Some Basic White Bakers Twine from the Bakers Twine Essentials Pack was wrapped around twice and tied in a bow; and then the panel was mounted onto the Crumb Cake card-stock base. The base had been cut to create a small slimline card. The card was then finished with a few delightful Elegant Faceted Gems. I am sooo glad these carried over into the current Annual Catalogue for 2021-2022. This is a fairly simple card for me as I usually have layer upon layer and lots of texture, but I am still pleased with it, especially the water-colour effect. 

The Angels sing to herald in Christmas and so many blessings.

The card inner is simple too, with the angel from the Angels of Peace stamps partially stamped on a piece of Basic White card-stock in Petal Pink ink and the words that continue from the front sentiment, (ie a Christmas carol "Hark the Herald Angels sing, Glory to the new born King") were stamped in Crumb Cake ink. I made a custom sized envelope to suit the small slimline card using some retired Designer Series Paper. Creating your own envelopes with retired DSP is a great way to use your stash of DSP and the envelopes always look great.

The Angels sing to herald in Christmas and so many blessings.


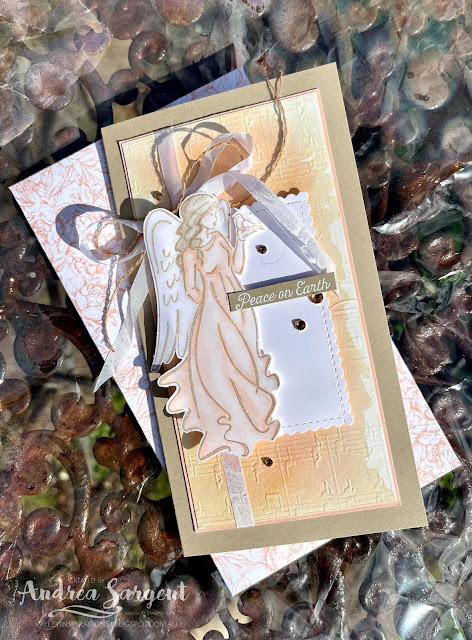
Card 2:  The second card used another water-coloured panel, that was created with the same products as previously mentioned. It too was mounted onto a panel of Petal Pink card-stock and White Crinkled Seam Binding was wrapped around and tied into a bow. Some Crumb Cake Bakers Twine from the Bakers Twine Essentials Pack was tied around the ribbon bow's knot and then tied into a bow. The whole panel was mounted onto the small slimline card Crumb Cake base.

The Angels sing to herald in Christmas and so many blessings.

The larger angel from the Angels of Peace stamp set was stamped on a seperate piece of Basic White card-stock in stamped off Crumb Cake ink. The angel was coloured with Stampin' Blends, ie Crumb Cake & Petal Pink combos and Ivory & the Colour Lifter. She was fussy cut. A label was die cut from Basic White card-stock using one of the Stitched So Sweetly dies.

The Angels sing to herald in Christmas and so many blessings.

The white label was positioned with Dimensionals and the Angel was added with another layer of Dimensionals. I do so love the effect of the added depth provided by Dimensionals and given my restraint in not added them to the background layers, I felt I could go a little wild with the focal elements. A sentiment from the same stamp set was white heat embossed on Crumb Cake card-stock and trimmed to only use the first line of the sentiment. The sentiment was layered on the label with Dimensionals as well. Some beautiful Champagne Rhinestone Basic Jewels were added as the finishing touch. They added that little shimmer and the colour seemed to match perfectly.


The card inner and envelope was similar to the first card apart from the sentiment. The same sentiment as was used on the front was stamped in Crumb Cake and the piece of the sentiment that wasn't used on the front of the card was layered over the stamped words.

The Angels sing to herald in Christmas and so many blessings.

I had fun playing with water-colour and creating these cards to share. I will need to make the fancy fold with something different so I can try it out. If it works, it may even turn up in a week or two featuring another of Stampin' Up!'s beautiful colours.

The Angels sing to herald in Christmas and so many blessings.


If you are in Australia, don't already have a Stampin' Up! demonstrator and would like your own copy of Stampin' Up's 2021-2022 Annual Catalogue and or the new July - December 2021 Mini Catalogue, then let me know and I will be delighted to send them to you. Please don't hesitate to make contact with any other queries about this project or Stampin' Up!. 

There is more Crumb Cake creativity. To continue with the blog hop, click on the "next" graphic below to be taken to the blog of a very special person and friend, Sharon Davern. I am looking forward to checking out Sharon's creation and everyone else's. I. do love seeing everyones projects - so many ideas and great creations

Hope to see you next week when we will be featuring Crushed Curryand don't forget the AWH Heart of Christmas Blog Hop is launched every Monday evening at 8pm AEST until mid-December.

Stay well, stay safe and be kind to yourself and others.

Andrea 💕🐾


If you find a broken link or have come to this blog hop from a different entry point, you can view the full list of participants on Catherine Proctor’s blog.  Check out her amazing creation while you are there.

#colourcreationsbloghop  #colourcreationsbloghop2021

Monday 23 August 2021

AWH Heart of Christmas 2021 #8

Christmas with Festive Foliage 

Hello. Welcome to Valley Inspirations with Andrea and the Art with Heart Team 2021 Heart of Christmas Blog Hop


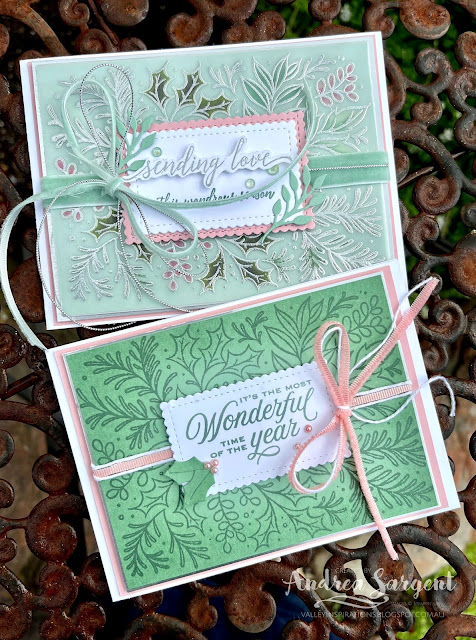
I have 2 cards to share for this week's projects, both featuring the Festive Foliage stamp. I love it with its all over design of leaves that will cover most of a standard card front. The stamp can be found in Stampin' Up!s 2021-2022 Annual Catalogue. I had an idea that I thought the stamp would be great for; then more recently saw Emma Goddard create with one of the large card front stamps from the new Mini Catalogue, which inspired me too. A couple of other ideas also came to mind. 

I had hoped to create 3 cards for this week's blog hop which all used the same stamp set but each project would use a different technique. Time ran out and the first concept I had wasn't made - perhaps I'll make it in a coming week. Here are this week's Christmas cards:

Festive Foliage cards can bring joy across the miles from Andrea Sargent, Adelaide, Australia

Both cards used a colour scheme inspired from the Whimsy & Wonder Speciality Designer Series Paper, that is Mint Macaron, Blushing Bride, Polished Pink, Basic White, some Mossy Meadow and iridescent shine (which I interpreted as silver). I added some Soft Succulent as It goes well with Mint Macaron and didn't include Misty Moonlight. Both cards started with a card front of Mint Macaron but as you can see one looks so much darker.

Festive Foliage cards can bring joy across the miles from Andrea Sargent, Adelaide, Australia

The Festive Foliage stamp was stamped onto Vellum card-stock with Versamark ink and then heat embossed with Silver Stampin' Emboss Powder and a Heat Gun. I still get a buzz seeing embossing powder melt and turn to silver or gold. The design was coloured on the back of the Vellum with Stampin' Blends, ie Flirty Flamingo (as Blushing Bride is one of the few Blends Combos that are not produced), a little Polished Pink, Mint Macaron, Soft Succulent, Mossy Meadows, Old Olive & Soft Sea Foam.

Festive Foliage cards can bring joy across the miles from Andrea Sargent, Adelaide, Australia

The coloured vellum was mounted onto Mint Macaron card-stock with opposite edges of Vellum being wrapped around and adhered to the Mint Macaron card-stock. The was mounted onto a slightly larger piece of Silver Foil from the Silver Foil pack in the Mini Catalogue. A piece of the luscious Mint Macaron Soft Velvet Ribbon was wrapped around to the back of the card front and adhered in place with Tear n' Tape. A piece of the Silver Simply Elegant Trim was added too. This card front was mounted onto a piece of Blushing Bride card-stock and then onto a Thick Basic White card-stock base.

Festive Foliage cards can bring joy across the miles from Andrea Sargent, Adelaide, Australia

A label was die cut in Basic White using a rectangular Stitched So Sweetly die. A slightly larger label was die cut from Blushing Bride card-stock. I needed to further trim 2 edges to make it a little smaller.  A small sentiment from the Heartfelt Wishes was stamped in Soft Succulent Classic Stampin' ink and a larger sentiment was stamped on an extra piece of Basic White card-stock and then fussy cut out. The fussy cut sentiment was added to the label with Dimensionals. The Basic White label was adhered to the Blushing Bride label and they were added over the ribbon with Dimensionals.  

Festive Foliage cards can bring joy across the miles from Andrea Sargent, Adelaide, Australia

A bow of thinly sliced Mint Macaron Soft Velvet Ribbon was tied with a piece of the Silver Simply Elegant Trim and added at the side of the label with Glue Dots. Two little die cut sprigs of leaves were cut out of Mint Macaron card-stock and added around the sentiment. The addition of Soft Succulent Genial Gems were added as the finishing touch. Just love a little glimmer.

The Festive Foliage Stamp was also stamped on the envelope flap using Soft Succulent ink. I do like to coordinate the envelope with the card design in some way as I do the card inner. I missed taking a photo as I was trying to duck in and out around the rain.

Festive Foliage cards can bring joy across the miles from Andrea Sargent, Adelaide, Australia


CARD 2: This second card was inspired by Emma Goddard. I attend by Zoom, Emma's Card & Cuppa each week on a Friday evening. Emma and the group of delightful ladies have helped my survive COVID and lockdowns, etc and it is always a delightful hour sharing a laugh and creativity. My card is not a direct CASE of Emma's but my mind went to the Festive Foliage Stamp when I watched Emma create.Then many aspects changed as this card developed, but I so appreciate Emma's inspiration.

Festive Foliage cards can bring joy across the miles from Andrea Sargent, Adelaide, Australia

Starting with a piece of Mint Macaron card-stock the Festive Foliage stamp was inked with Soft Succulent ink and stamped using the Stamparatus. This tool is great for large stamps as you can always restamp if aspects of the design don't stamp clearly. Using the amazing Stampin' Blending Brushes, Mint Macaron and Soft Succulent was blended over the edges of the card front. The blending doesn't show as strongly as in person, but I think you get the idea. 

Festive Foliage cards can bring joy across the miles from Andrea Sargent, Adelaide, Australia

The card front was mounted onto a piece of Silver Foil from the Silver Foil Pack. A trimmed down piece of Blushing Bride Frayed Grosgrain Ribbon was laid across the card front and adhered to the back with Tear n' Tape. White Bakers Twine from the Bakers Twine Essentials Pack was also wrapped around twice. The card front was mounted onto a piece of Blushing Bride card-stock, and then to the Thick Basic White card-stock base.

Festive Foliage cards can bring joy across the miles from Andrea Sargent, Adelaide, Australia

A Basic White card-stock label cut using a rectangular Stitched So Sweetly die was stamped in Soft Succulent ink with a sentiment from the Tidings and Trimmings stamp set. This label was added with Dimensionals. A bow tied with a sliced piece of Blushing Bride Frayed Grosgrain Ribbon and some Bakers Twine was added at the side of the label over the centre piece of ribbon. Holly leaves were cut from MInt Macaron card-stock with a die from the Christmas Trimmings dies. Some small Pearl  Basic Jewels that had been coloured with the Dark Flirty Flamingo Blend were added.


A strip of Mint Macaron card-stock that had some blending on one edge and was stamped with the Festive Foliage stamp was added to to the outer edge and with a thin strip of Silver Foil alongside. A small spray of leaves and a twig with buds were added as a little decoration. A C6 Basic White Envelope was also stamped on the flap with the Festive Foliage stamp in Soft Succulent ink and this time the envelope was positioned so the design would show on the top front of the envelope.

Festive Foliage cards can bring joy across the miles from Andrea Sargent, Adelaide, Australia

I had fun playing with the Festive Foliage Stamp. As you can see I used the same layout, yet each card can stand on its own. Well, that's two more cards for my Christmas card stash. How are you going? I need to have cards ready early as I am hoping to post around the world, interstate and across SA. The stamping community draws so many lovely friends together.

Festive Foliage cards can bring joy across the miles from Andrea Sargent, Adelaide, Australia

If you are in Australia, don't already have a Stampin' Up! demonstrator and would like your own copy of Stampin' Up's 2021-2022 Annual Catalogue and or the July - December Mini Catalogue then let me know and I will be delighted to send them to you. Also, please don't hesitate to make contact with any other queries about this project or Stampin' Up!. 

There is so much more Christmas creativity. To continue with the blog hop, click on the "onto the next" graphic below to be taken to the blog of the lovely Theresa Gerrard. I always look forward to checking out Theresa's creations as well as everyone else's. 

Hope to see you next week for another AWHT Heart of Christmas Blog Hop. There is so much Christmas inspiration to share using Stampin' Up!'s products and now is a great time to prepare early for Christmas.

Stay well, stay safe and be kind to yourself and others.

Andrea XXX


As mentioned, it is always a delight to see everyone's creations and the way they each use the amazing Stampin' Up! products. I am sure there will be gorgeous Christmas projects on show. Don't miss checking out each blog. 

If at any time you find a broken link and the next blog doesn’t come up or you started part way through, please head to the blog of this week’s host for the Heart of Christmas Blog HopTina Gillespie, and she will have the list of all Art With Heart Team members who are participating in this blog hop.


#heartofchristmas #heartofchristmas2021 #awhtheartofchristmas


Wednesday 18 August 2021

AWHT Colour Creations #12 Coastal Cabana

Coastal Cabana with Delicate Dahlias and Snowflake Wishes

Hello. Welcome to Valley Inspirations with Andrea and the Art with Heart 2021-2022 Colour Creations Blog Hop.


This week’s Blog Hop is focussing on a bright teal called Coastal Cabana.  It is part of the Brights Colour Family and coordinates harmoniously with Pool Party and Bermuda BayCoastal Cabana is produced in Stampin' Up!'s card-stock, both A4 & 12"x12"Classic Stampin' inks (ink pads & re-inkers); Stampin' Write Markers; the Brights Designer Series Paper and some embellishments including the Artistry Blooms Adhesive Backed Sequins, Holiday Rhinestone Basic Jewels and Playing with Patterns Resin Dots.


Coastal Cabana is a lovely bright colour and great for watery themes, as its name suggests, and that's where my mind first went. Wanting to branch away the "usual" and also to use the gorgeous Delicate Dahlias Sale-a-bration stamp set, I started with creating a watercolour panel. Then my ideas changed and I ended up creating 2 cards. Here they are:


While I first water-coloured a panel of Fluid 100 Watercolor paper, I decided the end result was a stronger coloured background than the one envisaged for use with the Delicate Dahlias Sale-a-bration Stamp Set. So I colour blended a background using Stampin' Ups! amazing Blending Brushes with Coastal Cabana and Pool Party Classic Stampin' inks on Basic White card-stock. To give a little texture to the blended background some water was flicked over as well as some diluted White Craft ink.


Spying a detailed floral die cut on my desk that had been cut using a die from the Artistic Dies set and Basic White card-stock, I tried it layered over the blended background. It looked good - the start of layering the design. The large dahlias, smaller flowers and the leaves were stamped in Versamark Ink on Basic White card-stock and heat embossed with White Stampin' Emboss Powder and a Heat Gun.


The flowers and leaves were coloured with Stampin' Blends, that is Highland Heather, Fresh Freesia, Pool Party Combos and a little Dark So Saffron with touches of the Colour Lifter to add highlights. While the Colour Lifter is great for diluting mistakes, it is brilliant at adding highlights or blending the lighter colours out so lines aren't apparent. The flowers and leaves were all fussy cut, with the second dahlia just being cut around the centre petals.


In arranging all the pieces, the blended background was mounted on a seperate basic White card front with a strip of the lighter mauve foil from the Silver Foil Speciality Pack, which had been embossed with the TimeWorn Type 3D Embossing Folder and added to the LHS of the card front. A piece of White Glittered Organdy Ribbon was added and the card front mounted to the Coastal Cabana card-stock base. 


As mentioned, the detailed die cut floral piece was layered over the background and the flowers and leaves arranged. Another piece of the Glittered Organdy Ribbon was cut into 3 lengthwise, folded into a bow and adhered in place under the flower with some Tear n' Tape. A sentiment from the Delicate Dahlias Stamp Set was white heat embossed onto a strip of Coastal Cabana card-stock and a few of the Artistry Blooms Adhesive-backed Sequins were added for that gentle touch of bling to finish off.


A Basic White card inner was stamped (and 2nd generation stamping) with leaves in Coastal Cabana ink. An off-cut strip from the blended background was added with a very thin strip of Coastal Cabana card-stock. A Stampin' Up! C6 Basic White Envelope was similarly stamped with leaves on the LHS edge.


CARD 2: Having missed the AWHT Heart of Christmas Blog Hop a couple of days ago I have created a Christmas themed card with the water-coloured background using Coastal Cabana and a little Pool Party Classic Stampin' inks on Fluid 100 Watercolor Paper. As I may have mentioned previously, I love snowflakes and even in the hot Aussie summer, I am happy to create snowflake cards for Christmas. I know some Aussies may have a different view.


Having already water-coloured the background, small snowflakes were heat embossed on top of the water-colour background. It brings a clear result. If starting out to create this snowflake card, another option may be to emboss the paper prior to water-colouring for an emboss resist technique. The embossed snowflakes came from the Snowflake Wishes Stamp Set.


A Basic White card front panel was dry embossed using an embossing folder from the Wintry 3D Embossing Folders set. The snowflakes folder is particularly gorgeous. It is hard to see the detail in the photos given the size of the frame and centre panel, but it is gorgeous. The embossed panel was adhered straight onto the Thick Basic White card-stock base.


A frame was die cut using the 3rd & 5th largest rectangular dies from the Stitched Rectangles dies (the centre section has been put aside for a label on another card). The 3rd largest die was also used to cut the water-coloured panel. Dimensionals were added behind the frame to lift it from the water-coloured panel. 


A sentiment from the Snowflake Wishes Stamp Set was stamped on Vellum with Versamark ink and the applied White Stampin' Emboss Powder was heat embossed. I so love Stampin' Up!'s Vellum as it is great quality and copes so well with heat embossing. The Vellum allows the background to still be seen. The Vellum was wrapped around to the back of the water-colour panel and the whole panel was adhered directly to the dry embossed panel. Three snowflakes were cut from Basic White card-stock using the So Many Snowflakes Dies and strategically added to the card. Coastal Cabana Holiday Rhinestone Basic Jewels were added to snowflake centres to add sparkle.


A Basic White card inner was stamped with snowflakes from the same stamp set in Pool Party & Coastal Cabana inks and a couple of thin strips were added on two edges. An extra Basic White die cut snowflake was also added. A Basic White C6 Envelope was similarly stamped with some snowflakes to coordinate.


It was fun creating these Coastal Cabana cards to share.  I love playing with various colouring techniques. Even though my preference is to work with more muted colours, I think Coastal Cabana is a great colour and can be used in various ways.


If you are in Australia, don't already have a Stampin' Up! demonstrator and would like your own copy of Stampin' Up's 2021-2022 Annual Catalogue and or the new July - December 2021 Mini Catalogue, then let me know and I will be delighted to send them to you. Please don't hesitate to make contact with any other queries about this project or Stampin' Up!. 

There is more Coastal Cabana creativity. To continue with the blog hop, click on the "next" graphic below to be taken to the delightful Kate Morgan's blog. I am looking forward to checking out Kate's creation and everyone else's.

Hope to see you next week when we will be featuring Crumb Cakeand don't forget the AWH Heart of Christmas Blog Hop is launched every Monday evening until mid-December.
Stay well, stay safe and be kind to yourself and others.

Andrea 💕🐾


If you find a broken link or have come to this blog hop from a different entry point, you can view the full list of participants on Catherine Proctor’s blog.  Check out her amazing creation while you are there.

#colourcreationsbloghop

AWH Colour Creations Blog Hop #50 Tahitian Tide

Tahitian Tide with Sweet Songbirds and Seaside Bay Hello. Welcome to  Valley Inspirations with Andrea  and the  Art with Heart Colour Creati...