Real Red with Two-Tone Flora & Something Fancy
Hello. Welcome to Valley Inspirations with Andrea and the Art with Heart Colour Creations Blog Hop. We are working though the Stampin' Up! colours in alphabetical order, focussing on one colour each week.
This week’s Blog Hop is focussing on a a strong red called Real Red. Real Red is part of the Regals Colour Family and is a strong primary colour. This colour is lovely when used for flowers or berries, fruit (eg strawberries), hearts, shoes or bright balloons and it is wonderful as a Christmas colour ... plus so much more.

Real Red is produced in Stampin' Up!'s card-stock, both A4 & 12"x12"; Classic Stampin' inks (ink pads & re-inkers); Stampin' Write Markers; Stampin' Blends Combo; Watercolor Pencils; Regals Designer Series Paper as well as the Christmas Gifting Kit, Christmas Whimsy Card Kit, plus Real Red and Burlap Ribbon Combo, Real Red & Garden Green Ribbon Combo, Real Red Mini Ruffled Ribbon and Pearlized Enamel Effects. There is also a range of products using Real Red in the Clearance Rack - why not check them out.

There is actually a third card as well. Here 'tis:

CARDS 1 & 2:
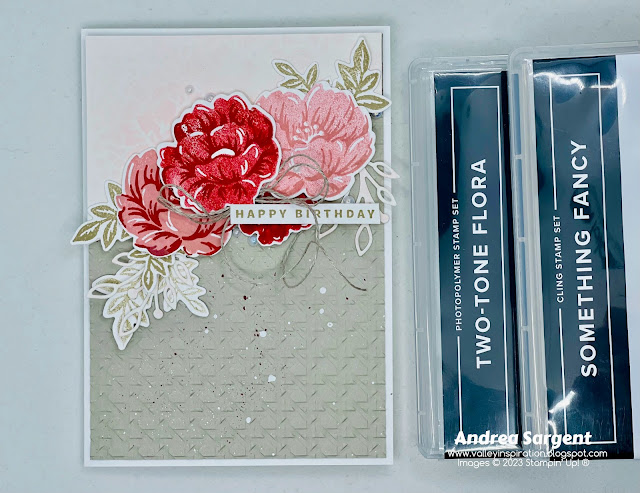
The creation process started with cutting the large detailed die out from Basic White card-stock. This acted as a mask and was layered over Shimmery White card-stock. One drop of Real Red Classic Re-inker was added to a Stampin' Mister which was filled with water. A few pumps of mist was sprayed at a height over the die cut mask while it was lying on top of the Shimmery White panel. The trick was to spray enough to provide subtle coverage but not so much that it drenched the mask. I needed a second go to feel happy with the outcome - the first was too light.

The Two-Tone Flora stamps create beautiful 2 step flowers using a base stamp with a detailed layer. The stamp set includes a number of different flowers - all lovely. I prefer stamping the detailed stamp first in the darker colour and then align the lighter full flower stamp over the top, however, some stampers prefer stamping the layers in the opposite order. Which way do you prefer? The colour combos used for these flowers were a) Real Red stamped in full strength for the detailed layer and stamped off for the base layer, b) Real Red stamped in full strength for the detailed layer and Blushing Bride for the base layer, c) Blushing Bride stamped in full strength for the detailed layer and stamped off Blushing Bride for the base layer. The leaves were stamped in Sahara Sand Classic ink; some full strength and some stamped off. Each of the flowers and leaves have coordinating dies.

A strip of Real Red card-stock was added to a Basic White card inner, with some remaining flowers and leaves adhered directly in place.

C6 Basic White envelopes were stamped with leaves in Sahara Sand ink on both the envelope front and back flap.

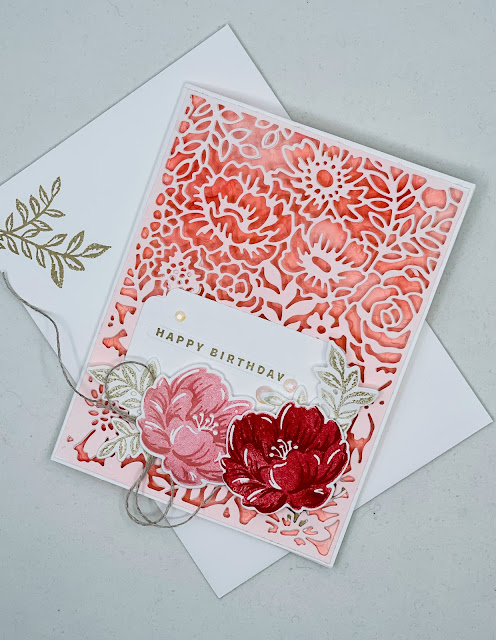
The large detailed die from the Two-Tone Flora dies was used to cut the front of a Thick Basic White card base. The coloured die cut was adhered directly over the die cut front. I used tiny dabs of Multi Purpose Liquid Glue on the thicker bits and the edges.

Stamped and die cut flowers and leaves were arranged over a Basic White card-stock label that had been cut with one of the Something Fancy dies. A sentiment from the Something Fancy stamp set was stamped in Sahara Sand ink. A Linen Twine bow and a few Iridescent Basic Rhinestone Jewels finished the card front design.


As mentioned above, a C6 Basic White envelope was stamped with leaves in Sahara Sand ink on both the envelope front and back flap.
I hope you like this set of cards featuring Real Red (combined with Blushing Bride and Sahara Sand) together with the Two-Tone Floral and Something Fancy bundles. I love the lacy look of the die cut card front of Card 3 - it is something different. Having said that, I think Card 1 is my fav. Do you have a favourite???

Real Red card-stock, ink and Stampin' Write Marker have been used in these projects plus a range of non-Real Red bits and pieces. Here are my cards:

There is actually a third card as well. Here 'tis:

CARDS 1 & 2:
I started with a plan to create one card, but as I was crafting I decided to make a second as there would be quite a few bits and pieces left over. The cards are similar but with a number of differences. The process for creating cards 1 and 2 was the same it will be discussed once.

The creation process started with cutting the large detailed die out from Basic White card-stock. This acted as a mask and was layered over Shimmery White card-stock. One drop of Real Red Classic Re-inker was added to a Stampin' Mister which was filled with water. A few pumps of mist was sprayed at a height over the die cut mask while it was lying on top of the Shimmery White panel. The trick was to spray enough to provide subtle coverage but not so much that it drenched the mask. I needed a second go to feel happy with the outcome - the first was too light.

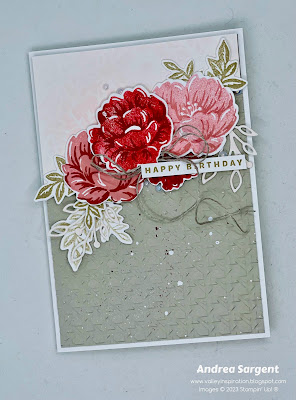
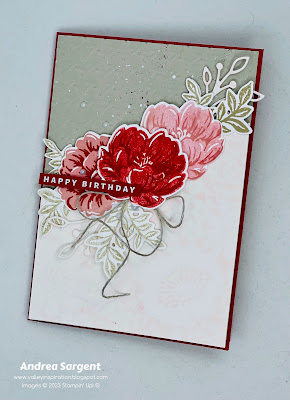
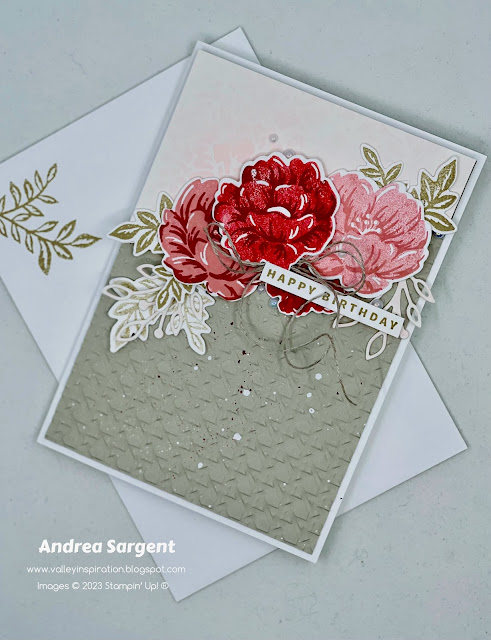
A background piece of Sahara Sand card-stock was embossed with the Cane Weave 3D embossing folder. [NB The second card, pictured directly above, used the embossed side, while the first card used the de-bossed design. I love the way we can choose between the embossed and de-bossed sides.] The embossed Sahara Sand panel was lightly splattered using a Real Red Stampin' Write Marker and some White Craft ink (ie using the medium Water Painter) before being adhered directly to the card base; ie Thick Basic White card-stock for card 1 and Real Red card-stock for card 2. Once dry, the delicately misted panel was cut diagonally with Stampin' Up!s Paper Trimmer. The top piece was added to card 1 with Dimensionals and similarly, the bottom section to card 2.

The Two-Tone Flora stamps create beautiful 2 step flowers using a base stamp with a detailed layer. The stamp set includes a number of different flowers - all lovely. I prefer stamping the detailed stamp first in the darker colour and then align the lighter full flower stamp over the top, however, some stampers prefer stamping the layers in the opposite order. Which way do you prefer? The colour combos used for these flowers were a) Real Red stamped in full strength for the detailed layer and stamped off for the base layer, b) Real Red stamped in full strength for the detailed layer and Blushing Bride for the base layer, c) Blushing Bride stamped in full strength for the detailed layer and stamped off Blushing Bride for the base layer. The leaves were stamped in Sahara Sand Classic ink; some full strength and some stamped off. Each of the flowers and leaves have coordinating dies.

The flowers and leaves were arranged and adhered with either Dimensionals or Glue Dots. I felt it needed an extra bit of "lightness" so die cut some detailed leaves from the Fitted Florets dies. They were die cut from the discarded misted panel. A Linen Twine bow was tucked under the edge of a flower using a Glue Dot. A sentiment from the Something Fancy stamp set was stamped in Sahara Sand ink on Basic White card-stock (card 1) and white heat embossed on Real Red card-stock (card 2). Iridescent Pearl Basic Jewels were added as the finishing touch.

A strip of Real Red card-stock was added to a Basic White card inner, with some remaining flowers and leaves adhered directly in place.

C6 Basic White envelopes were stamped with leaves in Sahara Sand ink on both the envelope front and back flap.

CARD 3:
After creating the two cards above, the misted pale pink die cut mask was "staring at me". My first thought was "I must do something with that later." I don't know about you, but I have said that with so many bits and pieces - and they are still around ... somewhere. So I determined to create a third card for this blog hop.


Stamped and die cut flowers and leaves were arranged over a Basic White card-stock label that had been cut with one of the Something Fancy dies. A sentiment from the Something Fancy stamp set was stamped in Sahara Sand ink. A Linen Twine bow and a few Iridescent Basic Rhinestone Jewels finished the card front design.

A panel of Shimmery White card-stock was water-coloured (wet on wet technique) with Real Red and Blushing Bride inks. As the panel was drying, it was embossed with the Pretty Flowers embossing folder. When dry, it was directly adhered inside the card on the back panel. Another die cut label was positioned inside the card directly beneath the label on the card front. A brief personal message could be written here. A smaller left over flower and some leaves were adhered to the side of the inner label. While not really seen in the photograph, an extra label was adhered directly behind the top label to give a better finish inside the card.


I hope you like this set of cards featuring Real Red (combined with Blushing Bride and Sahara Sand) together with the Two-Tone Floral and Something Fancy bundles. I love the lacy look of the die cut card front of Card 3 - it is something different. Having said that, I think Card 1 is my fav. Do you have a favourite???

There is more Real Red creativity. To continue with the blog hop, click the "onto the next" graphic below and be taken to the blog of the very special Kate Morgan. I always look forward to checking out Kate’s creations. I do love seeing everyones' projects - there is always inspiration.

I hope to see you next week when we will be featuring Rich Razzleberry, another of the Regals Colour family as we continue the weekly 2022-2023 Colour Creations Blog Hops.
Stay well, stay safe and be kind to yourself and others.
Andrea 💕🐾
If you find a broken link or have come to this blog hop from a different entry point, you can view the full list of participants on Catherine Proctor’s blog @ What Cathy Made. Cathy is our Art With Heart Team Colour Creations Coordinator. She is an amazing lady. Check out her delightful creation while you are there.
If you live in Australia, don't already have a Stampin' Up! demonstrator and would like your own copy of Stampin' Up's 2022-2023 Annual Catalogue and or the January - April 2023 Mini Catalogue then let me know and I will be delighted to send them to you. Please don't hesitate to make contact with any other queries about this project or Stampin' Up!.
#colourcreationsbloghop #stampinup #stampinupaustralia #stampinupsouthpacific #stampinupdemo #handmadecards #makeacardsendacard #stampinupdemonstrator #papercrafting #artwithheartteam #papercrafter #stamper #valleyinspirations #twotoneflora #somethingfancy