Art with Heart Wow Tutorials

Wednesday 29 September 2021

AWHT Colour Creations #18 Garden Green

Garden Green with Poinsettias and Hand Penned Petals

Hello. Welcome to Valley Inspirations with Andrea and the Art with Heart 2021-2022 Colour Creations Blog Hop.


This week’s Blog Hop is focussing on a strong and rich green called Garden Green. Garden Green is part of the Regals Colour Family and is a wonderful colour for a range of leaves, grasses & the like.  This week's project was inspired by a wreath I created for the recent Heart of Christmas Blog Hop that went live a couple of days ago. Also, an amazing crafter, Emma Goddard inspired the use of the fancy fold. Emma demonstrated this particular fold at last Friday's Card and a Cuppa session.


Garden Green is produced in Stampin' Up!'s card-stock, both A4 & 12"x12"Classic Stampin' inks (ink pads re-inkers); Stampin' Write Markers; Watercolor Pencils; the Regals & Painted Christmas, Hand-penned and Bloom Where You Are Planted Designer Series Papers; and the Hand-penned Memories & More Card pack. The cards below have used a mix of Garden Green card-stock and Classic Stampin' ink, Painted Christmas and Hand-penned DSPs together with a range of other bits and pieces.


These Double Diamond Fancy Folds are fun to create and actually quite addictive - hence my 2 cards for this Blog Hop. 

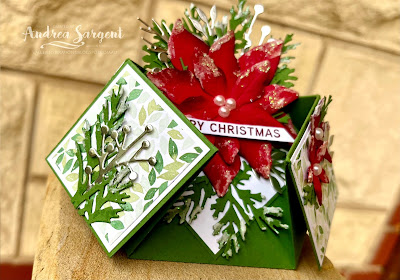
As I was creating the Poinsettia Wreath for my last Heart of Christmas blog post I was also thinking of the fold that I saw a couple of days prior. As the wreath used Garden Green card-stock to die cut pine fronds, I pondered how I could create a card using the same Garden Green pine fronds. With a large poinsettia and 2 minis left over from the wreath, the Double Diamond Poinsettia card became a reality.


As I already had the Real Red and Cherry Cobbler card-stock poinsettias left over from my previous project, I started by cutting pine fronds from Garden Green card-stock using one of the pine dies from the Pinecone dies set. Some leaves and bud stems were die cut out of Silver foil from the Silver Foil Speciality Pack.


The card base was made from half an A4 sheet of Garden Green card-stock. One of the designs from the Painted Christmas DSP was cut into small squares and mounted onto Basic White card-stock for each of the outer squares. The larger inner square was cut from Basic White card-stock and mounted on a slightly larger piece of Garden Green card-stock. This was adhered to the card base on the lower triangular half of this piece.


Shimmery White Embossing paste was added to the tips of the pine fronds and tips of the poinsettia flowers. All the die cut pieces were arranged and adhered with a mix of Dimensionals and Multipurpose Liquid Glue on to the central focal panel and the 2 front smaller DSP diamonds. Here is a closer look from both sides. 

The "Happy Christmas" sentiment was stamped in Merry Merlot ink on Basic White card-stock. This sentiment was trimmed from a larger sentiment from the Words of Cheer stamp set. (I need to tidy up my work station as products are still out from previous projects, however it was useful to have stamps, etc that could be easily grabbed for this project.)


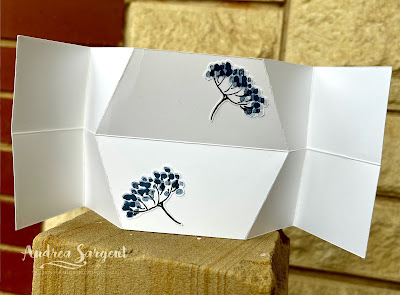
Some Basic White card-stock was added underneath the card for a place to write a personal message. The full sentiment from the Words of Cheer stamp set was stamped in Merry Merlot. As you can see from the photo below the card is simply folded from the half sheet of card-stock and no glue holds the fold together - it holds itself once folded and standing up.


Project 2: The second card features the same fancy fold and a different DSP, which includes Garden Green as one of the colours, that is the Hand-penned DSP. I really love this DSP design - well, actually I adore the whole suite. I love the colour combinations and the sketchy water-colour effect.


The Basic White card-base was scored and folded and 4 x DSP squares were cut from one of the Hand-penned DSP designs. The DSP pieces were mounted on larger Garden Green pieces and then adhered to the outer diamonds of the folded card.


The larger focal square was cut from Basic White card-stock and mounted onto Garden Green. Before the white piece was mounted, it was dry embossed using the Hello embossing folder from the Thanks & Hello Embossing Folder set. A Blending Brush and some Soft Sea Foam ink was lightly blended over the embossed panel.


Floral stamps and a sentiment from the Hand-penned Petals stamp set were stamped in Momento ink onto Basic White card-stock. The flowers were stamped with the coordinating stamps from the stamp set using colours to match the DSP, ie Pale Papaya and Misty Moonlight. The leaves were coloured with Garden Green ink and a Blender Pen. Some extra Pale Papaya also was added with the Blender Pen. As I wanted to include some of the colouring that intentionally went outside of the line, the flowers, leaves and sentiment were fussy cut.


The flowers and sentiment were arranged and adhered with Dimensionals. A bow was tied using White Bakers Twine and the Gold Elegant Trim and some of the delightful 2021-2023 In Colour Jewels were added to give some gorgeous sparkle.


Two remaining flowers were adhered to the reverse side to add some coordinating "pretty" to decorate the personal message space.

I did have a lot of fun creating these Double Diamond cards and am really enamoured with this fold. Garden Green is a great green to work with when illustrating natures foliage. (My apologies for the photo backgrounds as it was raining and I couldn't use my usual spot; as such I set up on my front porch to use the natural light. I hope to re-photograph tomorrow - weather permitting.)


If you live in Australia, don't already have a Stampin' Up! demonstrator and would like your own copy of Stampin' Up's 2021-2022 Annual Catalogue and or the July - December 2021 Mini Catalogue, then let me know and I will be delighted to send them to you. Please don't hesitate to make contact with any other queries about this project or Stampin' Up!. 

There is more Garden Green creativity. To continue with the blog hop, click on the "next" graphic below to be taken to the blog of a very special and talented friend, Rachel Palmieri. As always, I am looking forward to checking out Rachel's creation along with everyone else's. I do love seeing everyones' projects - so many ideas and such inspiring creations

Hope to see you next week when we will be featuring Gorgeous GrapeAlso, don't forget that the AWH Heart of Christmas Blog Hop goes live with another blog hop every Monday evening at 8pm AEST until mid-December.

Stay well, stay safe and be kind to yourself and others.

Andrea 💕🐾


If you find a broken link or have come to this blog hop from a different entry point, you can view the full list of participants on Catherine Proctor’s blog, our amazing AWHT Colour Creations Coordinator.  Check out her amazing creation while you are there.

#colourcreationsbloghop  #colourcreationsbloghop2021

Monday 27 September 2021

AWH Heart of Christmas #13

Christmas with a Poinsettia & Pine Wreath

Hello. Welcome to Valley Inspirations with Andrea and the Art with Heart Team 2021 Heart of Christmas Blog Hop


I'm so glad you are joining us for this Heart of Christmas Blog Hop. I do enjoy creating for Christmas and really loved working on this week's project. I hope you like it:

Create a Christmas Poinsettia Wreath yourself to welcome guests coming into your home like Andrea Sargent in Australia

In the past, one of the ladies who attends a craft group that I teach at twice a term indicated an interest in creating a wreath. Last Friday we created the wreath at the craft group and the ladies went home very happy with their projects.  I had planned to share the wreath with you today. However, not only was it a full class using all the prepared kits but I heard that one of the ladies was not well and would be unable to attend for quite a while, so I asked if the group coordinator could pass on my wreath as a gift to show she was in our thoughts. Hmm, but what was I to do for this Blog Hop? Just as well I had one wreath base left...

Create a Christmas Poinsettia Wreath yourself to welcome guests coming into your home like Andrea Sargent in Australia.

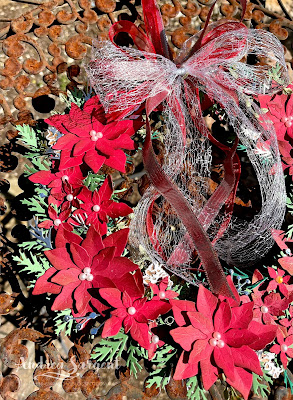
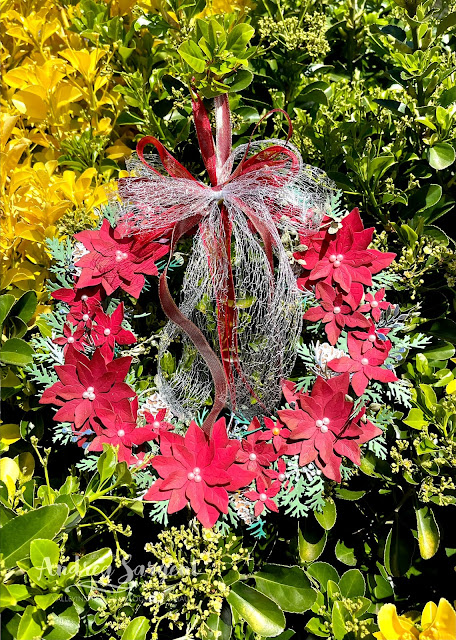
The wreath created in class only decorated part of the wreath, whereas this project has decorated all around the whole circle. I started by die cutting poinsettia pieces from both Cherry Cobbler and Real Red craft-stocks using the Poinsettia dies. These dies are gorgeous as they have the ability to emboss leaf veins while die cutting. You may be able to see the veins in this close-up below (although you may need to squint and use your imagination as it is fainter in the photographs).

Create a Christmas Poinsettia Wreath yourself to welcome guests coming into your home like Andrea Sargent in Australia.

All of the petals were partially daubered with Merry Merlot Classic Stampin' ink. As you can see, the large poinsettias were created with 3 layers of petals, where-as the smaller flowers used the small and tiny petals. The tiny flowers were a single layer only. All of the poinsettia flowers used Pearl Basic Jewels as the flower centres. I noticed that the above photo does show the one pearl that had been coloured yellow for a previous project.  I needed to use it as I only just had enough of the larger pearls in my stash for my wreath. I didn't mind incorporating the yellow pearl, as nature comes up with unusual variations at times - it just adds interest.

Create a Christmas Poinsettia Wreath yourself to welcome guests coming into your home like Andrea Sargent in Australia.

I used one of the large dies from the Christmas Pinecones dies to cut the pine fronds from Garden Green card-stock while the finer fronds were die cut in Shaded Spruce card-stock to add a little variation of colour. Pine fronds were trimmed from the full die cut pieces and then the sections of pinecones were used to adhere directly to the trig wreath. While I would have preferred to have used a glue gun - mine was missing, so I used quite a bit of Multipurpose Liquid Glue. It seemed to worked well. Some pine fronds were also cut from Champagne Foil.

Create a Christmas Poinsettia Wreath yourself to welcome guests coming into your home like Andrea Sargent in Australia.

Also, some small pinecones were stamped in Cinnamon Cider and Soft Suede and die cut using the Christmas Season Bundle. With all the pieces prepared, everything was arranged and adhered in place. 
 
Create a Christmas Poinsettia Wreath yourself to welcome guests coming into your home like Andrea Sargent in Australia.

I finished the Poinsettia Christmas wreath with many ribbon bows layered on top of each other. Firstly, two ribbons (ie Cherry Cobbler & Gold Ribbon and the Real Red Sheer Ribbon) were tied around the wreath and a knot was tied at the end of the loop to create the loop for hanging the wreath.  Bows were tied with the Metallic Mesh ribbon as well as the Cherry Cobbler & Gold and the Real Red Sheer Ribbons. Many bows were tied as I wanted a voluminous feel.

Create a Christmas Poinsettia Wreath yourself to welcome guests coming into your home like Andrea Sargent in Australia.

Thank you so much for spending time with me on my blog. 

If you are in Australia, don't already have a Stampin' Up! demonstrator and would like your own copy of Stampin' Up's 2021-2022 Annual Catalogue and or the July - December Mini Catalogue & Saleabration Leaflet then let me know and I will be delighted to send them to you. Don't forget, Sale-a-bration finishes at the end of September - only a few days left. Please don't hesitate to make contact with any other queries about this project or Stampin' Up! 

To continue with the blog hop, click on the "onto the next" graphic below to be taken to the blog of the lovely Rosa Leyden. I always look forward to checking out Rosa's creations together with everyone else's. 

Hope to see you next week for another AWHT Heart of Christmas Blog Hop. There is so much Christmas inspiration to share using Stampin' Up!'s products and preparing early will minimize some of the stresses of the silly season. Also, don't forget the weekly Colour Creations Blog Hop by the Art with Heart Team that launches every Wednesday at 8.00pm AEST.

Stay well, stay safe and be kind to yourself and others.

Andrea XXX


As mentioned, it is always a delight to see everyone's creations and the way they each use the amazing Stampin' Up! products. I am sure there will be gorgeous Christmas projects on show. Don't miss checking out each blog. 

If at any time you find a broken link and the next blog doesn’t come up or you started part way through, please head to the blog of this week’s host of the Heart of Christmas Blog HopSharon Davern, and she will have the list of all Art With Heart Team members who are participating in this blog hop. Check out her beautiful creation while you are there.


#heartofchristmas #heartofchristmas2021 #awhtheartofchristmas

Wednesday 22 September 2021

AWHT Colour Creations #17 Flirty Flamingo

Flirty Flamingo with Delicate Dahlias

Hello. Welcome to Valley Inspirations with Andrea and the Art with Heart 2021-2022 Colour Creations Blog Hop.


This week’s Blog Hop is focussing on a bright pink called Flirty Flamingo.
 Flirty Flamingo is part of the Brights Colour Family and is a wonderful colour for flowers and all sorts of pink things. It is a pretty colour.  Flirty Flamingo is produced in Stampin' Up!'s card-stock, both A4 & 12"x12"Classic Stampin' inks (ink pads, re-inkers & Classic Stampin' Spots); Stampin' Write Markers; Watercolor Pencils; the Brights, Sweet Symmetry and Pattern Party Designer Series Papers; as well as the Flirty Flamingo Metallic Ribbon, From the Heart Faceted Gems & Sequins for Everything.


For me there was not difficulty in coming up with ideas for this week's project, but rather in choosing which concept I would work on. I was inspired by a beautiful bunch of flowers that were different shades of Flirty Flamingo pink with some deep cherry red roses. However, I thought I would work in reverse with a Flirty Flamingo/Cherry Cobbler water-colour background and the flowers outlined in gold heat embossing with some shading in grey, ie Gray Granite. I love a pink and grey colour scheme. The card below has used Flirty Flamingo card-stock, Classic ink and the Flirty Flamingo Metallic Ribbon, plus a range of other bits and pieces.

You inspire me with water-colouring, embossing and Stampin' Up!s Delicate Dahlias by Andrea Sargent in Australia

I started by creating a 
water colour background using Flirty Flamingo, Cherry Cobbler and a little Gray Granite Classic Stampin' ink on Fluid 100 Watercolor Paper. I used a wet on wet water colour technique and rather than leaving the edges in white I very lightly took Flirty Flamingo to the edges. When it was almost dry I ran the coloured panel through the Cut & Emboss Machine with the Timeworn Type 3D Embossing Folder.


The dahlia flowers from the gorgeous Delicate Dahlias stamp set were stamped in Versamark Ink on to Basic White Card-stock and heat embossed with Gold Metallic Emboss Powder and a Heat Gun. I specifically chose these gorgeous Dahlias for this project as you are able to acquire this stamp set for free with the purchase of $180 worth of Stampin' Up! products during Sale-a-bration. This offer finishes in a little over a week so if you are wanting this stamp set - time is running out. 

I coloured the flowers with Stampin' Blends, using the Gray Granite Blends Combo. I usually try to use a third & different colour as well but I only wanted light shading. As such, the Colour Lifter was key to blend out edges of grey and to soften the colouring.


The flowers were fussy cut with my trusty Stampin' Snips. They were added to the background panel with Dimensionals leaving room for the sentiment. Strips of Gold Foil from the Brushed Metallic Card-stock pack were added to the longer edges of the water-coloured background panel together with strips of Flirty Flamingo card-stock
. This background panel was adhered directly to a card base of Thick Basic White card-stock


Some of the Flirty Flamingo Metallic Ribbon was folded in half and added across the centre of the card. A sentiment from the same stamp set was gold heat embossed on Basic White card-stock. Trimmed and then mounted on a slightly larger off-cut of Flirty Flamingo card-stock. This label was positioned with Dimensionals. A piece of the Gold Trim from the Simply Elegant Trim pack was tied in a bow around the folded end of the ribbon and some clear Wonderful Gems added for that finishing touch.


The card inner was decorated with an off-cut of the water-coloured & embossed panel and fine strips of Gold Brushed Metallic paper and Flirty Flamingo card-stock. I had 2 little flowers remaining that weren't needed for the front design so they were perfect to add inside the card. I ran out of time to decorate a C6 Basic White envelope so that will be a task for another day.


I love playing with water-colour and embossing in its various forms. While I loved creating this to share, I'm not 100% sold on the final effect. Do you have some ideas of what I could do to give it a little more oomph?


If you live in Australia, don't already have a Stampin' Up! demonstrator and would like your own copy of Stampin' Up's 2021-2022 Annual Catalogue and or the July - December 2021 Mini Catalogue & Sale-a-bration Leaflet (don't forget Sale-a-bration finishes really soon), then let me know and I will be delighted to send them to you. Please don't hesitate to make contact with any other queries about this project or Stampin' Up!. 

There is more Flirty Flamingo creativity. To continue with the blog hop, click on the "next" graphic below to be taken to the blog of the lovely, Christine Blain. As always, I am looking forward to checking out Christine's creation and everyone else's. I do love seeing everyones' projects - so many ideas and such great creations

Hope to see you next week when we will be featuring Garden Greenand don't forget the AWH Heart of Christmas Blog Hop goes live every Monday evening at 8pm AEST until mid-December.

Stay well, stay safe and be kind to yourself and others.

Andrea 💕🐾


If you find a broken link or have come to this blog hop from a different entry point, you can view the full list of participants on Catherine Proctor’s blog, our amazing and long suffering AWHT Colour Creations Coordinator.  Check out her amazing creation while you are there.

#colourcreationsbloghop  #colourcreationsbloghop2021

Monday 20 September 2021

AWH Heart of Christmas #12

Christmas with Sparkle of the Season Easel Card

Hello. Welcome to Valley Inspirations with Andrea and the Art with Heart Team 2021 Heart of Christmas Blog Hop


So glad you are joining us for this Heart of Christmas Blog Hop. I love creating for Christmas and even with a changing week and limited time, I had fun with this week's card. I hope you like this swirly wreath easel card:

Share a starry wreath this Christmas time to brighten someone's day, by Andrea Sargent, in Australia

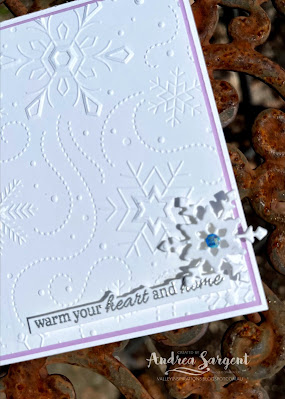
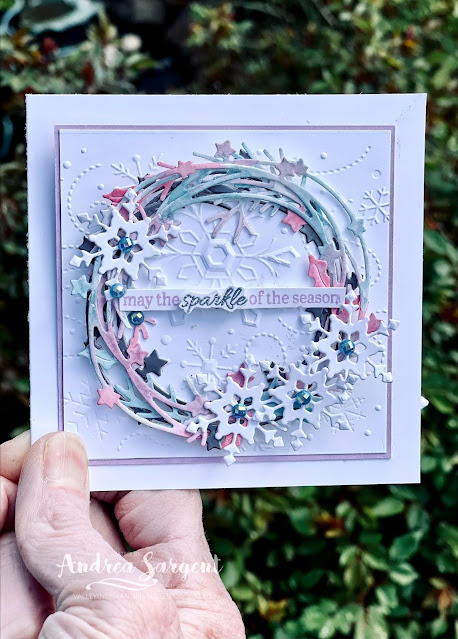
I love the Sparkle of the Season bundle for many reasons, no less because i can't resist some form of a wreath at Christmastime. I used a couple of the circular die cuts from the coordinating Seasonal Swirls dies. While I used the one with pine fronds and holly leaves I mainly used the swirls with stars. As this latter one was smaller, I cut it at one point and stretched it out and added a second opened swirl to form a larger circle.

Share a starry wreath this Christmas time to brighten someone's day, by Andrea Sargent, in Australia

The circular swirls with stars die was used to cut 2 swirls from the lighter mauve Silver Foil pack. As mentioned above, the swirls was clipped and spread to form a larger circle using the 2 dies cuts. The same die was used to cut another 2 swirls from Shimmery White card-stock and the pine and holly swirl die was used to cut another swirl from the same card-stock.

Share a starry wreath this Christmas time to brighten someone's day, by Andrea Sargent, in Australia

The Shimmery White swirls were then water-coloured with Balmy Blue, Fresh Freesia and Polished Pink Classic Stampin' ink using the mid-sized Water Painter. While they were left to dry, Basic White card-stock was dry embossed with the Snowflake embossing folder from the Wintry Embossing Folder set. This is such a beautiful embossing folder.

Share a starry wreath this Christmas time to brighten someone's day, by Andrea Sargent, in Australia

The foil and water-coloured swirls were layered on top of each other over an embossed Basic White panel. This panel was mounted onto a piece of Fresh Freesia card-stock. A sentiment from the Sparkle of the Season stamp set was stamped in Fresh Freesia ink and again in Versamark ink and heat embossed with Silver Emboss powder and a Heat Gun. The lines of the sentiment were separated and the word "sparkle" fussy cut from the embossed first line. The other first line was adhered with Mini Dimensionals across the swirly wreath and the embossed "sparkle" added on top to highlight that word.

Share a starry wreath this Christmas time to brighten someone's day, by Andrea Sargent, in Australia

The Thick Basic White card-stock base was scored in half and the top half section was scored in half diagonally from corner to opposite corner. The card was folded and burnished along the score lines with a Bone Folder. The first couple of photos show the card standing up for display. The photo directly above looks at the diagonal fold (from above) and the last photo shows the card flat as it would be for placing in an envelope. As the card is square when closed, a specially made envelope could be created or if posting, a normal Basic White C6 Envelope could be used. I'll probably create a custom sized envelope from retired DSP. It's a great way to use left over DSP and make room for all the luscious new Designer Series Papers.

Share a starry wreath this Christmas time to brighten someone's day, by Andrea Sargent, in Australia

The inner layer of the card also had a Basic White snowflake embossed panel mounted on a piece of Fresh Freesia card-stock. The second line of the sentiment was also added with Dimensionals. The smallest snowflake from the So Many Snowflakes dies was used to cut 6 snowflakes from Basic White card-stock. Two snowflakes were adhered together to strengthen the snowflake, which was added to the inner layer to help hold the folded card front to stand.

The back/bottom of the card is also layered with Basic White and Fresh Freesia card-stocks for a place to add your hand written personal message.

Share a starry wreath this Christmas time to brighten someone's day, by Andrea Sargent, in Australia

The other four snowflakes were adhered to the swirly wreath and some of the gorgeous Blue Sparkly embellishments were added to the centre of each snowflake to add that bit of sparkle. A little Wink of Stella also subtly added more sparkle, but this hasn't been captured in the photos.  I've just realised that I didn't add my usual obligatory bow or ribbon/twine trim. I don't think it needs it - what do you think?

Share a starry wreath this Christmas time to brighten someone's day, by Andrea Sargent, in Australia

Thank you so much for spending time with me on my blog. I'm so glad you made the time.


If you are in Australia, don't already have a Stampin' Up! demonstrator and would like your own copy of Stampin' Up's 2021-2022 Annual Catalogue and or the July - December Mini Catalogue & Saleabration Leaflet then let me know and I will be delighted to send them to you. Don't forget, Sale-a-bration finishes very soon - the end of September is nigh. Please don't hesitate to make contact with any other queries about this project or Stampin' Up!. 

To continue with the blog hop, click on the "onto the next" graphic below and you will be taken to the blog of the very special Sharon Davern. I always look forward to checking out Sharon's creations as well as everyone else's. Sharon is also this week's Blog Hop Host.

Hope to see you next week for another AWHT Heart of Christmas Blog Hop. There is so much Christmas inspiration to share using Stampin' Up!'s products. Don't delay with your  preparations for  Christmas so you can minimize some of the stresses of the silly season. Also, don't forget the weekly Colour Creations Blog Hop by the Art with Heart Team that launches every Wednesday at 8.00pm AEST.

Stay well, stay safe and be kind to yourself and others.

Andrea XXX


As mentioned, it is always a delight to see everyone's creations and the way they each use the amazing Stampin' Up! products. I am sure there will be gorgeous Christmas projects on show. Don't miss checking out each blog. 

If at any time you find a broken link and the next blog doesn’t come up or you started part way through, please head to the blog of this week’s host for the Heart of Christmas Blog HopSharon Davern, and she will have the list of all Art With Heart Team members who are participating in this blog hop. Do check out her beautiful creation while you are there.


#heartofchristmas #heartofchristmas2021 #awhtheartofchristmas


Wednesday 15 September 2021

AWHT Colour Creations #16 Early Expresso

Early Expresso with Nature's Harvest & Quiet Meadow

Hello. Welcome to Valley Inspirations with Andrea and the Art with Heart 2021-2022 Colour Creations Blog Hop.


This week’s Blog Hop is focussing on a dark brown called Early Expresso.
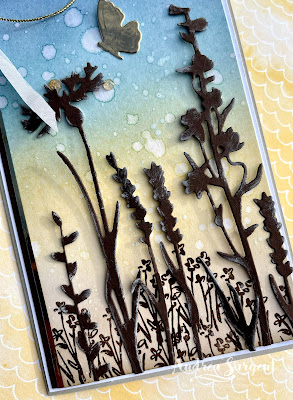
 Early Expresso is part of the Neutrals Colour Family and is a wonderful colour for trees, twigs & the like and great when creating for fellas. It is an essential colour, however, not one I usually choose to hero on a project. This week's project was inspired by silhouettes seen while walking my dog at dusk.


Early Expresso 
is produced in Stampin' Up!'s card-stock, both A4 & 12"x12"Classic Stampin' inks (ink pads 
& re-inkers); Stampin' Write Markers; Watercolor Pencils; the Neutrals & Gingerbread & Peppermint, Blackberry Beauty, You're A Peach, Painted Christmas, Beauty of the Earth, In Good Taste Designer Series Papers; Gingerbread & Peppermint Memories & More Card pack; Gingerbread & Peppermint Memories & More Cards & Envelopes, Blackberry Beauty Ephemera pack and Faux Suede Trim. The card below has used Early Expresso card-stock and Classic ink, plus a range of other bits and pieces.

Sending healing thoughts through a handcrafted card, sharing nature and peace by Andrea Sargent in Australia.

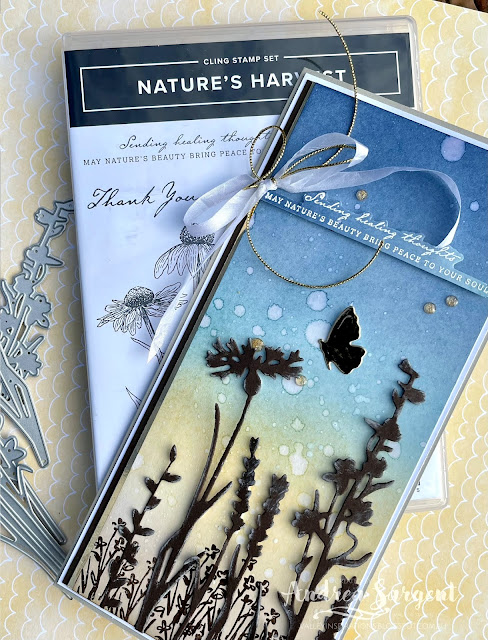
In accordance with its name, Early Expresso is reminiscent of strong black coffee, so I was going to use the Love You More Than bundle for tonight's project. I also was thinking of using Painted Christmas Suite as the pine cones would stamp brilliantly in Early Expresso. I still want to try out my ideas, however the Early Expresso project ended up by using Early Expresso to represent nature's silhouettes as the sun is setting. 

Sending healing thoughts through a handcrafted card, sharing nature and peace by Andrea Sargent in Australia.

The blended background was created on a piece of Shimmery White card-stock using Crumb Cake, So Saffron, Balmy Blue, Misty Moonlight and Night of Navy Classic Stampin' inks with Stampin' Up!'s delightful Blending Brushes. Water droplets were flicked over the blended background and once dry some White Craft ink was also flicked over the background.

Sending healing thoughts through a handcrafted card, sharing nature and peace by Andrea Sargent in Australia.

The little sketchy grassy flowers from the Garden Birdhouses stamp set were stamped over the base of the background in Early Expresso ink. A range of plants were die cut from Early Expresso card-stock using a mix of dies from both the Harvest and Meadows die sets. Each piece had White Craft ink added on the edges with a Sponge Dauber to add sense of dimension. They were adhered in place with a mix of Multipurpose Liquid Glue and Mini Dimensionals.

Sending healing thoughts through a handcrafted card, sharing nature and peace by Andrea Sargent in Australia.

Strips of both Early Expresso card-stock and Copper Foil paper were added to the left edge of the card-front panel and then it was mounted onto a piece of Basic White card-stock. In turn this card front was mounted on a Sahara Sand card-stock base. A sentiment from the Nature's Harvest stamp set was stamped in Versamark onto an off-cut from the blended background and heat embossed with White Stampin' Emboss powder and a Heat Gun. The sentiment was fussy cut and added to the card with thin strips of Dimensionals, A bow was tied with Gold Elegant Trim and White Crinkled Seam Binding and added with Glue Dots to the left of the sentiment. The final touch was the addition of some Genial Gems and a little butterfly die cut from Copper Foil

Sending healing thoughts through a handcrafted card, sharing nature and peace by Andrea Sargent in Australia.

The card inner was created with a piece of Basic White card-stock and a few left over die cut Early Expresso plants; as well as an off cut of the blended background and a thin strip of Early Expresso card-stock. I ran out of time to create a custom made envelope. My plan is to use the DSP shown in the photos as a backdrop to create a specially sized envelope

Sending healing thoughts through a handcrafted card, sharing nature and peace by Andrea Sargent in Australia..

I hope you find some inspiration through my card and or the whole Blog Hop. We all enjoy creating to share with you each week.

Sending healing thoughts through a handcrafted card, sharing nature and peace by Andrea Sargent in Australia.


If you live in Australia, don't already have a Stampin' Up! demonstrator and would like your own copy of Stampin' Up's 2021-2022 Annual Catalogue and or the July - December 2021 Mini Catalogue & Sale-a-bration Leaflet (don't forget Sale-a-bration finishes soon), then let me know and I will be delighted to send them to you. Please don't hesitate to make contact with any other queries about this project or Stampin' Up!. 

There is more Early Expresso creativity. To continue with the blog hop, click on the "next" graphic below to be taken to the blog of a very special and talented friend, Rachel Palmieri. As always, I am looking forward to checking out Rachel's creation and everyone else's. I do love seeing everyones' projects - so many ideas and such great creations

Hope to see you next week when we will be featuring Flirty Flamingoand don't forget that the AWH Heart of Christmas Blog Hop is launched every Monday evening at 8pm AEST until mid-December.

Stay well, stay safe and be kind to yourself and others.

Andrea 💕🐾

If you find a broken link or have come to this blog hop from a different entry point, you can view the full list of participants on Catherine Proctor’s blog, our amazing AWHT Colour Creations Coordinator.  Check out her amazing creation while you are there.

#colourcreationsbloghop  #colourcreationsbloghop2021


AWH Colour Creations Blog Hop #50 Tahitian Tide

Tahitian Tide with Sweet Songbirds and Seaside Bay Hello. Welcome to  Valley Inspirations with Andrea  and the  Art with Heart Colour Creati...