Garden Green with Poinsettias and Hand Penned Petals
Hello. Welcome to Valley Inspirations with Andrea and the Art with Heart 2021-2022 Colour Creations Blog Hop.
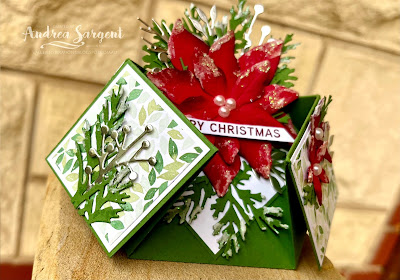
As I already had the Real Red and Cherry Cobbler card-stock poinsettias left over from my previous project, I started by cutting pine fronds from Garden Green card-stock using one of the pine dies from the Pinecone dies set. Some leaves and bud stems were die cut out of Silver foil from the Silver Foil Speciality Pack.
The card base was made from half an A4 sheet of Garden Green card-stock. One of the designs from the Painted Christmas DSP was cut into small squares and mounted onto Basic White card-stock for each of the outer squares. The larger inner square was cut from Basic White card-stock and mounted on a slightly larger piece of Garden Green card-stock. This was adhered to the card base on the lower triangular half of this piece.
Shimmery White Embossing paste was added to the tips of the pine fronds and tips of the poinsettia flowers. All the die cut pieces were arranged and adhered with a mix of Dimensionals and Multipurpose Liquid Glue on to the central focal panel and the 2 front smaller DSP diamonds. Here is a closer look from both sides.
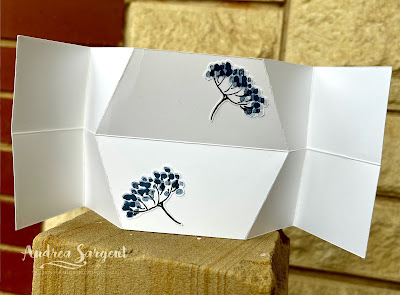
Some Basic White card-stock was added underneath the card for a place to write a personal message. The full sentiment from the Words of Cheer stamp set was stamped in Merry Merlot. As you can see from the photo below the card is simply folded from the half sheet of card-stock and no glue holds the fold together - it holds itself once folded and standing up.
Project 2: The second card features the same fancy fold and a different DSP, which includes Garden Green as one of the colours, that is the Hand-penned DSP. I really love this DSP design - well, actually I adore the whole suite. I love the colour combinations and the sketchy water-colour effect.
The Basic White card-base was scored and folded and 4 x DSP squares were cut from one of the Hand-penned DSP designs. The DSP pieces were mounted on larger Garden Green pieces and then adhered to the outer diamonds of the folded card.
The larger focal square was cut from Basic White card-stock and mounted onto Garden Green. Before the white piece was mounted, it was dry embossed using the Hello embossing folder from the Thanks & Hello Embossing Folder set. A Blending Brush and some Soft Sea Foam ink was lightly blended over the embossed panel.
Floral stamps and a sentiment from the Hand-penned Petals stamp set were stamped in Momento ink onto Basic White card-stock. The flowers were stamped with the coordinating stamps from the stamp set using colours to match the DSP, ie Pale Papaya and Misty Moonlight. The leaves were coloured with Garden Green ink and a Blender Pen. Some extra Pale Papaya also was added with the Blender Pen. As I wanted to include some of the colouring that intentionally went outside of the line, the flowers, leaves and sentiment were fussy cut.
The flowers and sentiment were arranged and adhered with Dimensionals. A bow was tied using White Bakers Twine and the Gold Elegant Trim and some of the delightful 2021-2023 In Colour Jewels were added to give some gorgeous sparkle.
Two remaining flowers were adhered to the reverse side to add some coordinating "pretty" to decorate the personal message space.
There is more Garden Green creativity. To continue with the blog hop, click on the "next" graphic below to be taken to the blog of a very special and talented friend, Rachel Palmieri. As always, I am looking forward to checking out Rachel's creation along with everyone else's. I do love seeing everyones' projects - so many ideas and such inspiring creations
Hope to see you next week when we will be featuring Gorgeous Grape. Also, don't forget that the AWH Heart of Christmas Blog Hop goes live with another blog hop every Monday evening at 8pm AEST until mid-December.
#colourcreationsbloghop #colourcreationsbloghop2021


Gosh, these look very elaborate, Andrea! I especially love the poinsettia card; the colours and details are so rich and beautiful. I like the addition of the Shimmery White embossing paste to the flowers and foliage - a lovely detail.
ReplyDeleteNot one but two amazing fancy fold cards, andrea! These both look amazing, even though you had to photograph in low light (it was raining here too and the quality of my photos suffered as well so I feel your pain). Its great to see both a Christmas and an non-Christmas example.
ReplyDeleteThese are gorgeous, Andrea. I have often seen these and they look very interesting and quite involved to make, but you have made two! They are both lovely for different occasions.
ReplyDeleteWow Andrea these look very spiffy, I have never done this fold before but I think I will have to give this one a go. I love love love these.
ReplyDeleteAmazing cards, and I love them both! Shimmery paste on the poinsettia is very swish, but my mind boggles at the fold.
ReplyDeleteOh Andrea, your cards are stunning! Such a fun fold and you have decorated them both so beautifully. I think I need to try this now!
ReplyDeleteOh my golly gosh. Both cards are beautiful but especially the Christmas one. Do they fold flat? for postage? I love the Shimmery edges of the poinsettias.
ReplyDeleteYour cards are amazing and look fabulous with all the different panels.
ReplyDeleteWow, these are both such amazing cards! I will have to use my google skills to track down a tutorial. They are stunners!
ReplyDelete