Christmas with a Poinsettia & Pine Wreath
Hello. Welcome to Valley Inspirations with Andrea and the Art with Heart Team 2021 Heart of Christmas Blog Hop.
I'm so glad you are joining us for this Heart of Christmas Blog Hop. I do enjoy creating for Christmas and really loved working on this week's project. I hope you like it:
In the past, one of the ladies who attends a craft group that I teach at twice a term indicated an interest in creating a wreath. Last Friday we created the wreath at the craft group and the ladies went home very happy with their projects. I had planned to share the wreath with you today. However, not only was it a full class using all the prepared kits but I heard that one of the ladies was not well and would be unable to attend for quite a while, so I asked if the group coordinator could pass on my wreath as a gift to show she was in our thoughts. Hmm, but what was I to do for this Blog Hop? Just as well I had one wreath base left...
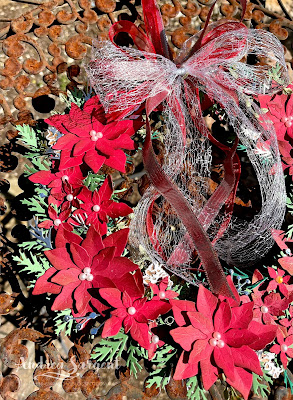
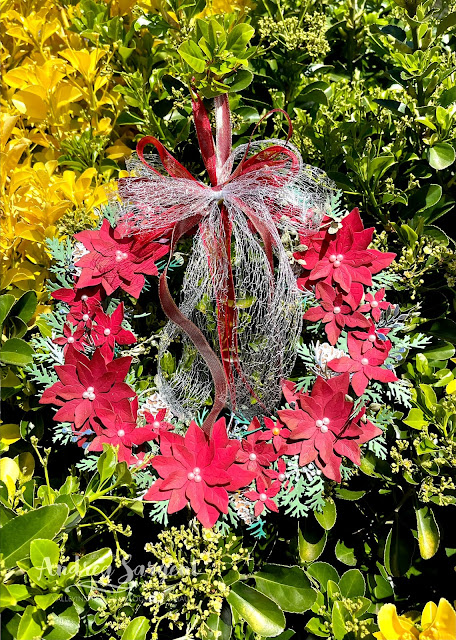
The wreath created in class only decorated part of the wreath, whereas this project has decorated all around the whole circle. I started by die cutting poinsettia pieces from both Cherry Cobbler and Real Red craft-stocks using the Poinsettia dies. These dies are gorgeous as they have the ability to emboss leaf veins while die cutting. You may be able to see the veins in this close-up below (although you may need to squint and use your imagination as it is fainter in the photographs).
All of the petals were partially daubered with Merry Merlot Classic Stampin' ink. As you can see, the large poinsettias were created with 3 layers of petals, where-as the smaller flowers used the small and tiny petals. The tiny flowers were a single layer only. All of the poinsettia flowers used Pearl Basic Jewels as the flower centres. I noticed that the above photo does show the one pearl that had been coloured yellow for a previous project. I needed to use it as I only just had enough of the larger pearls in my stash for my wreath. I didn't mind incorporating the yellow pearl, as nature comes up with unusual variations at times - it just adds interest.
I used one of the large dies from the Christmas Pinecones dies to cut the pine fronds from Garden Green card-stock while the finer fronds were die cut in Shaded Spruce card-stock to add a little variation of colour. Pine fronds were trimmed from the full die cut pieces and then the sections of pinecones were used to adhere directly to the trig wreath. While I would have preferred to have used a glue gun - mine was missing, so I used quite a bit of Multipurpose Liquid Glue. It seemed to worked well. Some pine fronds were also cut from Champagne Foil.
Also, some small pinecones were stamped in Cinnamon Cider and Soft Suede and die cut using the Christmas Season Bundle. With all the pieces prepared, everything was arranged and adhered in place.
I finished the Poinsettia Christmas wreath with many ribbon bows layered on top of each other. Firstly, two ribbons (ie Cherry Cobbler & Gold Ribbon and the Real Red Sheer Ribbon) were tied around the wreath and a knot was tied at the end of the loop to create the loop for hanging the wreath. Bows were tied with the Metallic Mesh ribbon as well as the Cherry Cobbler & Gold and the Real Red Sheer Ribbons. Many bows were tied as I wanted a voluminous feel.
Thank you so much for spending time with me on my blog.
If you are in Australia, don't already have a Stampin' Up! demonstrator and would like your own copy of Stampin' Up's 2021-2022 Annual Catalogue and or the July - December Mini Catalogue & Saleabration Leaflet then let me know and I will be delighted to send them to you. Don't forget, Sale-a-bration finishes at the end of September - only a few days left. Please don't hesitate to make contact with any other queries about this project or Stampin' Up!
To continue with the blog hop, click on the "onto the next" graphic below to be taken to the blog of the lovely Rosa Leyden. I always look forward to checking out Rosa's creations together with everyone else's.
Hope to see you next week for another AWHT Heart of Christmas Blog Hop. There is so much Christmas inspiration to share using Stampin' Up!'s products and preparing early will minimize some of the stresses of the silly season. Also, don't forget the weekly Colour Creations Blog Hop by the Art with Heart Team that launches every Wednesday at 8.00pm AEST.
Stay well, stay safe and be kind to yourself and others.
Andrea XXX
As mentioned, it is always a delight to see everyone's creations and the way they each use the amazing Stampin' Up! products. I am sure there will be gorgeous Christmas projects on show. Don't miss checking out each blog.
If at any time you find a broken link and the next blog doesn’t come up or you started part way through, please head to the blog of this week’s host of the Heart of Christmas Blog Hop, Sharon Davern, and she will have the list of all Art With Heart Team members who are participating in this blog hop. Check out her beautiful creation while you are there.
#heartofchristmas #heartofchristmas2021 #awhtheartofchristmas


Wow, Andrea, this is BEAUTIFUL!! What a labour of love ... and not at all surprising that your class ladies would have been thrilled with what they got to create. I love the glorious ribbon treatment you added, after assembling the many components of your wreath. I would love to see this photographed against a white background, to really show off all the lovely details.
ReplyDeleteOh my goodness, Andrea, this is an amazing work of art! There are so many details to take in and I can't even imagine how long this took to create. I'm sure your class ladies were thrilled!
ReplyDeleteWow Andrea how long did this wreath take to make? It is simply amazing and would look incredible on any front door!
ReplyDeleteOh Andrea, how beautiful! Such an amazing project for your craft group ladies. There are so many gorgeous details all set off with the lovely ribbon treatment.
ReplyDeleteYour wreath is beautiful Andrea and I can see it’s fullness by the abundance of Poinsettia flowers, pine fronds and ribbons. Nicely put together.
ReplyDeleteMy goodness, your arm must be tired after all those cranks of the handle of your die-cutting machine! Totally worth it, though - the wreath is stunning!
ReplyDeleteWow Andrea your wreath is amazing. As Christine said I'd love to see it against a solid background to be able to truly appreciate its beauty
ReplyDeleteWOW!!! Your wreath is beyond beautiful. I really appreciate the amount of work that has gone into it's creation. Your craft group would have enjoyed making such a beautiful project.
ReplyDeleteNo wonder everyone was thrilled with their wreath! It is amazing!
ReplyDelete