Art with Heart Wow Tutorials

Wednesday, 27 July 2022

AWHT Colour Creations #13 Cherry Cobbler

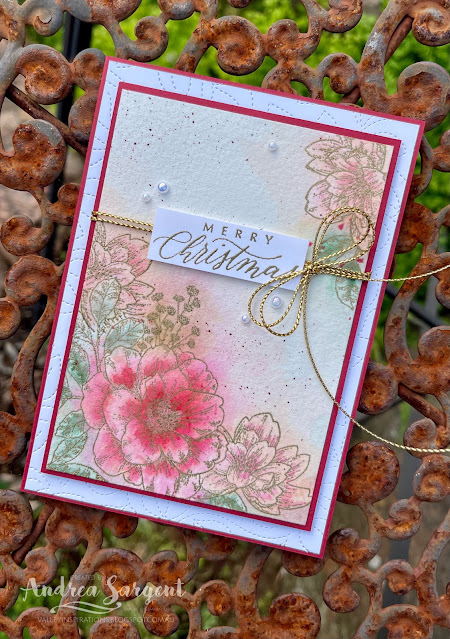
Cherry Cobbler with Cottage Rose and some Loose Water-colouring

Hello. Welcome to Valley Inspirations with Andrea and the Art with Heart Colour Creations Blog Hop. We are working though the Stampin' Up! colours in alphabetical order. 


This week’s Blog Hop is focussing on a deep cherry red called Cherry Cobbler. Cherry Cobbler is part of the Regals Colour Family and is a deep muted colour. This colour is lovely when used for Christmas, flowers and so much more. It goes with different greens, with Crumb Cake, Pool Party, etc. It is also great with Gold. 


Cherry Cobbler is produced in Stampin' Up!'s card-stock, both A4 & 12"x12"Classic Stampin' inks (ink pads re-inkers); Stampin' Write Markers; Water-colour Pencils; Stampin' Blends; Regals Designer Series Paper as well as Painted Christmas and Boughs of Holly DSPs; plus Lights Aglow and Festive Foils Speciality DSPs; Festive Pearls; and Santa Express Memories & More Cards & Envelopes. 

We are coming to the end of July, which is Worldwide Watercolor month.  I have been attempting to include watercolour in some form in each blogged project this month and have intended to use the Loose Watercolour technique during the month - so tonight is the night. 

Wish a friend "Merry Christmas" with this gorgeous loose water-coloured Cherry Cobbler Christmas rose.

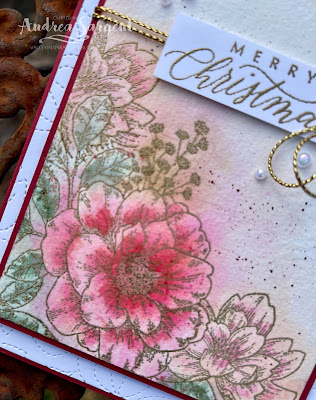
I find it fun to use a stamp set out of its usual context and so while thinking of a Christmas rose, I decided to use the gorgeous Cottage Rose stamp set. I gold embossed the larger image using Versamark ink, Gold Emboss Powder and a Heat Gun. This image was masked using the newly available Masking Paper and then the mid-sized flower and leaves were stamped and heat embossed. I love the effect of masking but seldom use it. Now that Stampin' Up! is supplying Masking Paper I will probably be using this technique more often. 

Wish a friend "Merry Christmas" with this gorgeous loose water-coloured Cherry Cobbler Christmas rose.

The images were stamped on a half sheet of Fluid 100 Watercolor paper. This enables you to get 2 projects from one sheet of paper - so much more economical. Loose water-colouring means you don't stay within the lines but allow the ink to blur over the edges and colours to mix slightly - although the latter needs to be done carefully so you don't end up with a muddy brown picture. I like to work with colours for one image and then leave it to slightly dry before using the next colour combo. If using complementary colours, I leave the image to dry much more so the colours don't bleed into each other. 

Wish a friend "Merry Christmas" with this gorgeous loose water-coloured Cherry Cobbler Christmas rose.

The base lighter layer was laid down first using a fair bit of water and the mid-sized Water Painter (they come in a set of 3, ie fine, medium and wide brush). You can relax with this layer and paint over the edges of the images - just have fun. The Classic Stampin' Inks used to paint the image are: Cherry Cobbler for the large flower, Petal Pink with touches of Cherry Cobbler for the smaller flowers, Crumb Cake around the fine gold flowers and Soft Succulent with touches of Evening Evergreen for the leaves. I couldn't resist using the fine Water Painter to add extra detail, colour and depth.

Wish a friend "Merry Christmas" with this gorgeous loose water-coloured Cherry Cobbler Christmas rose.

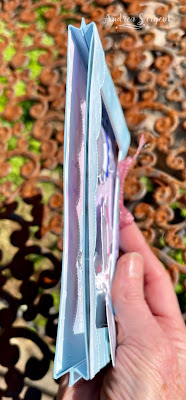
Once the panel had dried, I added a splattering of Cherry Cobbler ink using a Stampin' Write Marker. It wasn't fully dry (I was running out of time) so some of the splatters blurred. The water-coloured panel was mounted onto a slightly larger piece of Cherry Cobbler card-stock. A piece of Basic White card-stock was embossed with the Stitched Greenery die as the leaves were a similar shape to the leaves in the stamp set. I do love the effect of this stitched die.

Wish a friend "Merry Christmas" with this gorgeous loose water-coloured Cherry Cobbler Christmas rose.

A sentiment from the Hope and Peace stamp set was gold heat embossed onto a scrap of Thick Basic White card-stock. I like extra thickness for sentiment strips to ensure the label sits straighter, especially over trim or ribbon. Some gold Simply Elegant Trim was wrapped around the painted panel and the sentiment label was positioned over using Dimensionals. A seperate double bow was adhered with Glue Dots. Some Iridescent Pearls Basic Jewels added the finishing touch of shimmer.

Wish a friend "Merry Christmas" with this gorgeous loose water-coloured Cherry Cobbler Christmas rose.

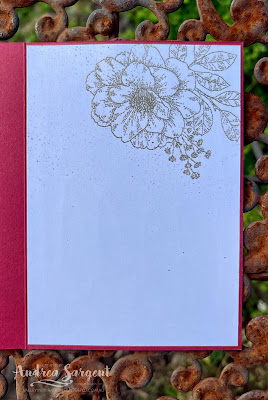
A Basic White piece of card-stock was gold heat embossed using the larger cottage rose stamp for the card inner. A C6 Basic White envelope was similarly embossed.

Wish a friend "Merry Christmas" with this gorgeous loose water-coloured Cherry Cobbler Christmas rose.

I so loved creating this card and do love the effect of loose water-colouring.  I had hoped to create a second card with and alternative Cherry Cobbler colour scheme but time ran out - perhaps on the weekend. Thank you so much for dropping by. I do value the time you spent with me.

Wish a friend "Merry Christmas" with this gorgeous loose water-coloured Cherry Cobbler Christmas rose.

There is more Cherry Cobbler creativity. To continue with the blog hop, click on the "next" graphic below to be taken to the blog of the lovely Christine Blain. I always look forward to checking out Christine's creation. I do love seeing everyones' projects - always so much inspiration.

Hope to see you next week when we will be featuring Coastal Cabana as we continue the weekly 2022-2023 Colour Creations blog hops. Also, don't forget many of us are joining the Heart of Christmas Blog Hop on Monday evenings which will continue until the end of November. 

Stay well, stay safe and be kind to yourself and others. 

Andrea 💕🐾


If you find a broken link or have come to this blog hop from a different entry point, you can view the full list of participants on Catherine Proctor’s blog @ What Cathy Made. Cathy is our wonderful Art With Heart Team Colour Creations Coordinator.  She is such an amazing lady and we appreciate all she does. Check out her wonderful creation while you are there.

If you live in Australia, don't already have a Stampin' Up! demonstrator and would like your own copy of Stampin' Up's 2022-2023 Annual Catalogue and or the July - December 2022 Mini Catalogue then let me know and I will be delighted to send them to you.  Sale-a-bration continues through August but don't delay if you want free product as it is only while supplies last. Please don't hesitate to make contact regarding any queries about these projects or Stampin' Up!. 

#colourcreationsbloghop  #stampinup #stampinupaustralia #stampinupsouthpacific #stampinupdemo  #handmadecards #makeacardsendacard #stampinupdemonstrator #papercrafting #artwithheartteam  #papercrafter  #stamper  #valleyinspirations #cottagerose #hopeandpeace #CreativeChallengeSU 

Monday, 25 July 2022

AWH Heart of Christmas #4

Heart of Christmas Blog Hop: Hippest Hippos

Hello. Welcome to Valley Inspirations with Andrea and the fourth Art with Heart Team Heart of Christmas Blog Hop for 2022. 


Here we are - nearly at the end of July. I am so glad I have made a start with my Christmas creations as I am sure the coming months will speed by. I had a bit of fun creating my project for this blog hop using non traditional stamp and dies for a 3D Christmas card.


I had the water-colour panel left over from last week's creativity, so decided to use it as the background. As previously mentioned, July is Watercolor Month internationally. The paper was water-coloured with Orchard Oasis and Highland Heather Classic Stampin' inks and a wide brush Water Painter on Fluid 100 Watercolor Paper. Before it had fully dried the paper was passed through a Cut 'n Emboss machine with the Merry Melody 3D embossing folder.


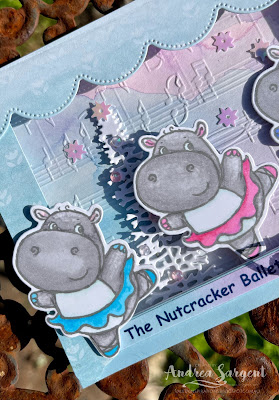
The dancing hippo from the Hippest Hippos stamp set was stamped in Basic Gray Classic ink on Basic White card-stock. This stamp set is so cute and can be earned for free with a qualifying order of $90 in Australia during the Sale-a-bration promotion. The coordinating dies are another Sale-a-bration product and can cut out the Hippos plus many other cute accessories. It is brilliant! The hippos were coloured with Stampin' Blends, including Smoky Slate, Blushing Bride, Pool Party, Polished Pink, Tahitian Tide, Orchard Oasis combos and the Colour Lifter to add highlights.


The tree from the Majestic Mountain dies was used to cut 3 trees from Basic White card-stock. The die cuts were adhered together down the centre, which allowed the boughs to be separated to give the white "Christmas" tree some dimension. 


The card base used Balmy Blue card-stock that was cut into 2 pieces which were scored on each end. I scored twice at 6mm and 12mm in from each end. However, the space between the scores should have been larger - upto 1cm to enable more dimension for the scene and also more stability for the card to stand on display. I wasn't using pre-tried measurements so am keen to try again to be surer of my measurements. A stitched rectangle from the Stitched Rectangles dies cut a hole in the centre of the front panel. The frame die from the Fabulous Frames Die Set cut a couple of frames that were layered to strengthen the front panel. Here is the top view.

Give a friend a smile at Christmas with the Hippo Nutcracker Ballet card.

As the dancing hippo started me thinking about the Nutcracker Ballet which is based on a story set at Christmas Eve I had decided on a Theatre scene. The top scalloped pelmet and the curtains used some of the delightful Awash In Beauty Designer Series Paper. The scalloped pelmet was cut with a die from the Scalloped Contours dies.

Give a friend a smile at Christmas with the Hippo Nutcracker Ballet card.

To ensure the card recipient and other viewers easily understood the Christmas card's theme, I needed to make reference to the Nutcracker Ballet, however, there was only room for small lettering so decided to print from my computer to card-stock. My printer was temperamental and wouldn't accept the thickness of card-stock. In the end, the words were printed on printer paper and some Balmy Blue and Fresh Freesia inks were blended over the words using a Blending Brush. It was cut down with Stampin' Up!s Trimmer

Give a friend a smile at Christmas with the Hippo Nutcracker Ballet card.

2021-2023 In Color Opal Rounds were added to the tree and Adhesive-Backed Stars were added to the background. As I was writing this blog and adding the photos, I was becoming more and more concerned with the bow, so I have now removed it and added 3 more Opal Rounds. I love adding embellishments to my projects but the photos reinforced to me the bow wasn't right. It is dark outside so can't re-take photos now. Will do so tomorrow.

Give a friend a smile at Christmas with the Hippo Nutcracker Ballet card.

A left over strip of the water-coloured embossed background was added to a piece of Basic White card-stock and an extra ballerina hippo and a star embellishment also were adhered. A 5th hippo was adhered to a C6 Basic White Envelope. When colouring the hippos, I hadn't decided how the hippos would be arranged so stamped and coloured 5 hippos. It was the perfect number for this project.


Thank you so much for calling in and spending some time with me. I do appreciate you. I hope the Hippo Ballet gave you a smile.

It is always a delight to see everyone's creations and I am sure there will be gorgeous Christmas projects on show so don't miss checking out each blog. To continue with the blog hop, click on the "onto the next" graphic below to be taken to the blog of the talented Rachel Woolard. I always look forward to checking out Rachel's creations together with everyone else's. 

Don't forget the weekly Colour Creations Blog Hop by the Art with Heart Team that also launches every Wednesday at 8.00pm AEST. 

Stay well, stay safe and be kind to yourself and others.

Andrea XXX


If at any time you find a broken link and the next blog doesn’t come up or you started part way through, please head to the blog of our Heart of Christmas Blog Hop Host, the very special Sharon Davern, and she will have the list of all Art With Heart Team members who are participating in this blog hop. Check out her beautiful creation while you are there.

If you are in Australia, don't already have a Stampin' Up! demonstrator and would like your own copy of Stampin' Up's 2022-2023 Annual Catalogue and or the July - December Mini Catalogue then let me know and I will be delighted to send them to you. Pease don't hesitate to contact me with any other queries about these projects or Stampin' Up!. 

#heartofchristmas #heartofchristmas2022  #awhtheartofchristmas #Stampin'Up! #stampinupaustralia #stampinupsouthpacific #stampinupdemo  #handmadecards #makeacardsendacard #stampinupdemonstrator #papercrafting #artwithheartteam  #papercrafter  #stamper  #valleyinspirations #hippesthippos #merriestmelody  


Wednesday, 20 July 2022

AWHT Colour Creations #12 Calypso Coral

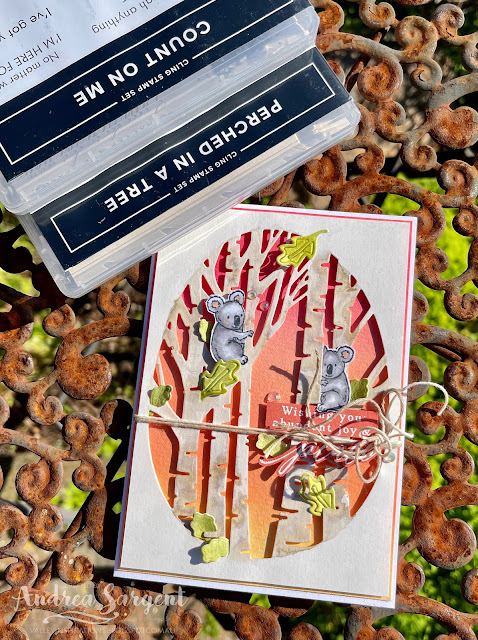
Calypso Coral with Count on Me, Perched in a Tree & Country Wreaths

Hello. Welcome to Valley Inspirations with Andrea and the Art with Heart Colour Creations Blog Hop. We are working though the Stampin' Up! colours in alphabetical order. 


This week’s Blog Hop is focussing on a pinky orange called Calypso Coral. Calypso Coral is part of the Subtles Colour Family and is a beautiful soft orange with a bit of oomph. This colour is lovely when used with Petal Pink or yellows, oranges or pinks. 


Calypso Coral is produced in Stampin' Up!'s card-stock, both A4 & 12"x12"Classic Stampin' inks (ink pads re-inkers); Stampin' Write Markers; Water-colour Pencils; Stampin' Blends; Subtles Designer Series Paper as well as Gingham Cottage, Storybook Gnomes, Butterfly Kisses, Awash in Beauty, Happy Forest Friends, Pretty Prints and Painted Christmas DSPs; plus Splendid Day SDSP and Fine Sparkle Adhesive Backed Gems & Fun Floral Resin Shapes; and Today is the Day Memories & More Card Pack. 

My card uses Calypso Coral Classic Stampin' ink and card-stock as well as other non CC bits and pieces. To create this project I have used 2 different bundles and a 3rd stamp set.


I want to acknowledge Cindy Schuster from The Crafty Carrot Collective for the inspiration for my card. Cindy created a card in a Crafty Carrot's tutorial this past week featuring the Aspen Trees dies. I have CASEd her design but used water-colouring rather than Stampin' Blends for most of the colouring, as well as different stamps and other dies. As I watched Cindy create, the seeds were sewn for this card to come into being. Thank you Cindy.


A piece of Shimmery White card-stock was cut using the oval tree die from the Aspen Tree dies. It is amazing - I love it. The trees were water-coloured with Gray Granite Classic ink and a medium Water Painter. As I walked this morning I was checking out nearby gum trees and noticed they were a really light browny grey with some darker patches.  This has influenced my water-colouring of the trees. Fluid 100 Watercolor paper was used for the water-coloured background with Daffodil Delight, Calypso Coral, Pumpkin Pie and Melon Mambo Classic inks and a wide-brush Water Painter. I had a summer sunset in mind. Once dry, the die cut panel was added to the background panel with Dimensionals. I love the depth this creates.


The koalas stamp from the Count on Me stamp set was stamped in Black Momento ink and coloured with Blends, ie Smoky Slate combo, SU700 and my trusty Colour Lifter. The koalas were fussy cut. An off-cut of Fluid 100 Watercolor paper was coloured with Old Olive and Pear Pizzazz Classic inks. Once dry, tiny leaf dies from the Country Wreaths die set cut a series of leaves.


Crumb Cake and Very Vanilla twine from the Basic Twine Pack were wrapped around the front panel and then tied in a bow. A sentiment from Perched in a Tree stamp set was white heat embossed on Calypso Coral card-stock using Versamark ink, White Emboss Powder and a Heat Gun. The sentiment was cut out and added with Mini Dimensionals and Tombow Multi-Purpose Liquid Glue. Some gorgeous Iridescent Basic Rhinestone Jewels added that touch of glimmer and I couldn't resist adding more shimmer with a splatter of Wink of Stella.


The little koalas were stamped off and stamped in the centre of a Basic White card-stock inner and left over die cut leaves were scattered around. A C6 Basic White envelope was stamped with a branch from the Perched in a Tree set and a koala. A little leaf was added as well. 


Thank you so much for dropping by. I do value the time you spent here.

There is more Calypso Coral creativity. To continue with the blog hop, click on the "next" graphic below to be taken to the blog of a special lady, Kate Morgan. I always look forward to checking out Kate's creation (I wonder what she has in store this week). I do love seeing everyones' projects - always so much inspiration.

Hope to see you next week when we will be featuring Cherry Cobbler as we continue the weekly 2022-2023 Colour Creations blog hops.

Also, many of us are joining a Heart of Christmas Blog Hop on Monday evenings which will continuing until the end of November. Don't forget to check out these blog hops featuring a range of Christmas projects. I'm hoping starting Christmas creativity early will lessen pressure in December. 

Stay well, stay safe and be kind to yourself and others. 

Andrea 💕🐾


If you find a broken link or have come to this blog hop from a different entry point, you can view the full list of participants on Catherine Proctor’s blog @ What Cathy Made. Cathy is our wonderful Art With Heart Team Colour Creations Coordinator.  She is such an amazing lady. Check out her wonderful creation while you are there.

If you live in Australia, don't already have a Stampin' Up! demonstrator and would like your own copy of Stampin' Up's 2022-2023 Annual Catalogue and or the July - December 2022 Mini Catalogue then let me know and I will be delighted to send them to you.  Please don't hesitate to make contact with any other queries about this project or Stampin' Up!. 


#colourcreationsbloghop  #stampinup #stampinupaustralia #stampinupsouthpacific #stampinupdemo  #handmadecards #makeacardsendacard #stampinupdemonstrator #papercrafting #artwithheartteam  #papercrafter  #stamper  #valleyinspirations #countonme #perchedinatree #countrywreaths #thecraftycarrotco #CreativeChallengeSU
Monday, 18 July 2022

AWH Heart of Christmas #3

Heart of Christmas Blog Hop: Peace to You with Watercolour

Hello. Welcome to Valley Inspirations with Andrea and the third Art with Heart Team Heart of Christmas Blog Hop for 2022.

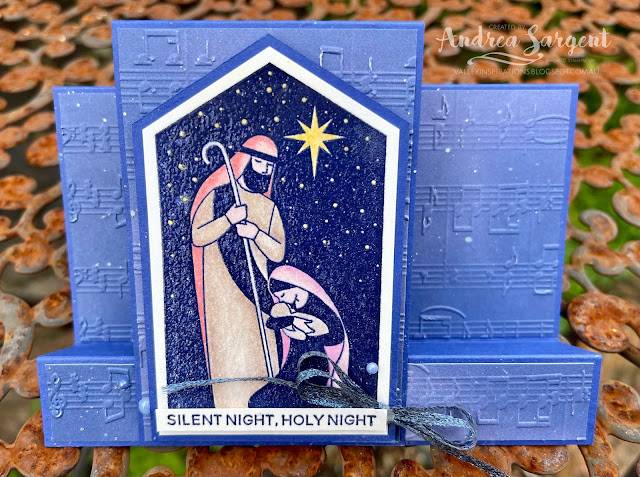
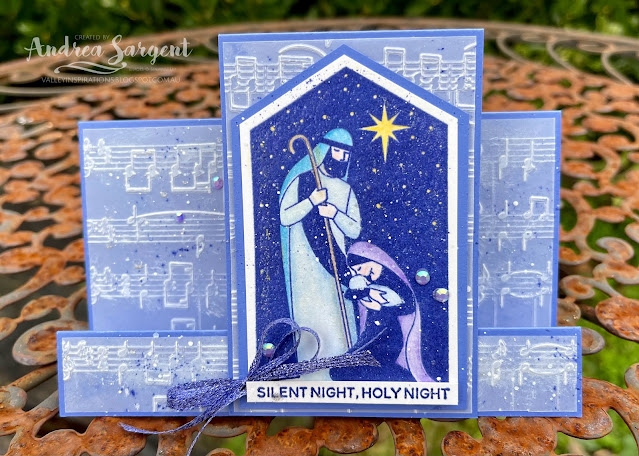
I love the simplicity of the Peace to You images and the heartfelt sentiments. The images remind me of the old style woodcuts or vinyl cuts. To show off the nativity scene I chose a simple fancy fold called a Faux Step Fold. I had recently seen a colleague, Diane Furniss, use this fold and at the time I decided to use it with the Peace to You nativity image.

Christmas is a wonderful time to make contact with friends near and far sending a personally created card.

I thought I may create 2 cards for this blog hop using the same design but different colours. My initial idea was a water-coloured background with a water-colour penciled scene that was “watered” with a Blender Pen. However, the water-coloured background seemed to detract from the coloured nativity scene. One of the water-coloured backgrounds had already been embossed, trimmed and adhered to the folded card-stock and so 3 cards were created with one water-coloured background left over.

Christmas is a wonderful time to make contact with friends near and far sending a personally created card.

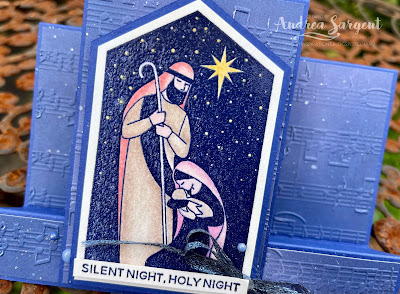
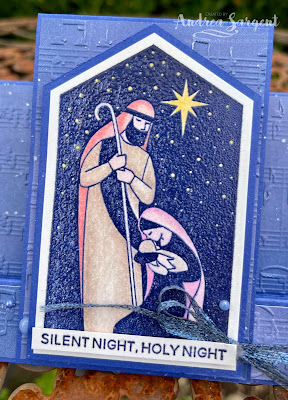
As you can see the overall design is the same, but different colours and accents were used. The basic process was the same for each card, starting with stamping the nativity scene from the Peace to You stamp set on Shimmery White card-stock using my trusty Stamparatus. As the image has areas of solid colour and I wanted good coverage the Stamparatus enabled me to stamp the image a number of times without any blurring. Once the ink was dry I dabbed it with my Embossing Buddy and then clear heat embossed it with Versamark, Clear Emboss Powder and a Heat Gun.

Christmas is a wonderful time to make contact with friends near and far sending a personally created card.

The image was coloured with Stampin' Up!s Watercolor Pencils, that is Daffodil Delight, Early Expresso, Real Red, Flirty Flamingo and Calypso Coral; then "water-coloured" with a Blender Pen. This can soften the colours and remove pencil lines and is another way to water-colour. The image was trimmed leaving a boarder of white and then mounted onto a piece Starry Sky card-stock.

Christmas is a wonderful time to make contact with friends near and far sending a personally created card.

A half an A4 sheet of Starry Sky card-stock was scored, measuring along the long side, at 7.5cm, 15cm, 17.5cm and then cut at 20cm. It was folded in an 'M' shape and the folds burnished with a bone folder. An extra piece of Starry Sky card-stock was cut to 21cm x 7cm; and scored at 10.5cm. A piece of Sun Prints DSP was used to cut 3 pieces, ie 14.5cm x 7.2cm, 14.5cm x 2.2cm and 10.2cm x 6.7cm. They were embossed with the Merry Melody 3D embossing folder and adhered directly to the front facing sections of card-stock. The backgrounds were splattered with White Craft ink reinker with a tad of water and a Water Painter. One needs to remember craft ink takes longer to dry. 

Christmas is a wonderful time to make contact with friends near and far sending a personally created card.

The coloured nativity scene was added to the long thin panel using Dimensionals. A sentiment from the same stamp set was stamped in Starry Sky ink and immediately some Clear Emboss Powder was sprinkled over then melted with a Heat Gun. The sentiment was also added with Dimensionals. A double bow was tied with the delightful Starry Sky Metallic Woven ribbon and tucked behind the sentiment with a couple of Glue Dots. A few Starry Sky 2022-2024 In Colour Matte Decorative Dots were added to finish off.

Christmas is a wonderful time to make contact with friends near and far sending a personally created card.

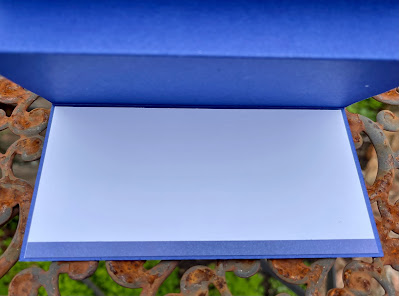
A piece of Basic White card-stock was added to the inside back panel with a thin strip of the DSP adhered at the base. I had planned to include another sentiment but simply forgot. Will need to add it later using the Stamparatus to ensure it is straight and clear. The Basic White C6 envelope was partially embossed with a little of the Merry Melody EF.

Christmas is a wonderful time to make contact with friends near and far sending a personally created card.

The second card was built on Orchid Oasis card-stock and inked with Orchid Oasis Classic ink. The process was the same a detailed above. The Nativity scene was coloured with Watercolor Pencils, that is Daffodil Delight, Balmy Blue, Pacific Point, Gorgeous Grape and Calypso Coral. Vellum cardstock was used for the background and was embossed with the Merry Melody 3D embossing folder. I usually love the effect of embossed vellum, but I don't think it works as well as the background for this card. What do you think?

Christmas is a wonderful time to make contact with friends near and far sending a personally created card.

The background was splattered with White Craft ink and Orchid Oasis ink using a Stampin' Write Marker.  Some of the delightful Orchid Oasis Metallic Woven ribbon was used to tie a double bow and Basic Rhinestone Jewels were coloured with a Light Fresh Freesia Blend to finish off this card.

Christmas is a wonderful time to make contact with friends near and far sending a personally created card.

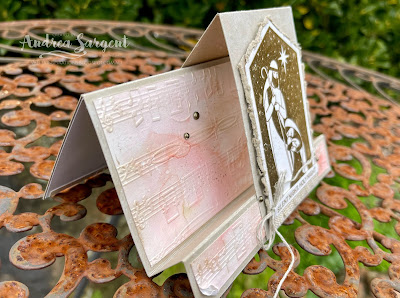
The third version ended up as more rustic. The Crumb Cake card-stock base was lightly daubered with some White Craft ink. The Nativity scene was stamped in Crumb Cake Classic ink and clear embossed (as described above). The scene wasn't further coloured as the water-coloured and embossed background panels added enough colour and texture. Some Crumb Cake ink was very lightly daubered over the music embossing and 2 opposite corners were softened and paper edge divided and bent. 

Christmas is a wonderful time to make contact with friends near and far sending a personally created card.

The mounted image edges were carefully roughened with Snips. A piece of Natural Finish ribbon was frayed and adhered behind the sentiment. A double Linen Twine bow and some Rustic Metallic Adhesive Backed Dots finished off this card. A side view is shown below.

Christmas is a wonderful time to make contact with friends near and far sending a personally created card.

Thank you for dropping by. I really appreciate it.

It is always a delight to see everyone's creations and I am sure there are gorgeous Christmas projects on show so don't miss checking out each blog. To continue with the blog hop, click  the "onto the next" graphic below to be taken to the blog of the lovely Theresa Gerrard. I always look forward to checking out Theresa’s creations and everyone else's. 

Don't forget the weekly Colour Creations Blog Hop by the Art with Heart Team that launches every Wednesday at 8.00pm AEST. 

Stay well, stay safe and be kind to yourself and others.

Andrea XXX


If at any time you find a broken link and the next blog doesn’t come up or you started part way through, please head to the blog of our Heart of Christmas Blog Hop Host, the very special Sharon Davern, and she will have the list of all Art With Heart Team members who are participating in this blog hop. Check out her beautiful creation while you are there.

If you are in Australia, don't already have a Stampin' Up! demonstrator and would like your own copy of Stampin' Up's 2022-2023 Annual Catalogue and or the July - December Mini Catalogue then let me know and I will be delighted to send them to you. Pease don't hesitate to contact me with any other queries about these projects or Stampin' Up!. 

#heartofchristmas #heartofchristmas2022  #awhtheartofchristmas #Stampin'Up! #stampinupaustralia #stampinupsouthpacific #stampinupdemo  #handmadecards #makeacardsendacard #stampinupdemonstrator #papercrafting #artwithheartteam  #papercrafter  #stamper  #valleyinspirations #peacetoyou 


Wednesday, 13 July 2022

AWHT Colour Creations #11 Cajun Craze

Cajun Craze with Ranunculus Romance and some Water-Colouring

Hello. Welcome to Valley Inspirations with Andrea and the Art with Heart Colour Creations Blog Hop. We are working though the Stampin' Up! colours in alphabetical order. 


This week’s Blog Hop is focussing on a deep rusty orange called Cajun Craze. Cajun Craze is part of the Regals Colour Family and is a deep muted colour. This colour is lovely when used with other natural earthy colours. It is delightful with Autumnal colours such as Old Olive and Daffodil Delight or also works really well with harmonious colours like Calypso Coral and Petal Pink. 


Cajun Craze is produced in Stampin' Up!'s card-stock, both A4 & 12"x12"Classic Stampin' inks (ink pads re-inkers); Stampin' Write Markers; Water-colour Pencils; Stampin' Blends; Regal Designer Series Paper, He's the Man and Metallic & Shimmer SDSP & Santa Express & Rustic Harvest DSPs as well as Santa Express Memories & More Card Packs and Santa Express Memories & More Cards & More. 

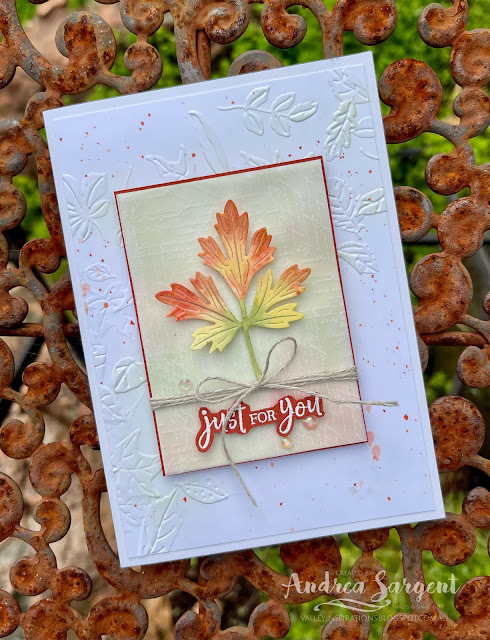
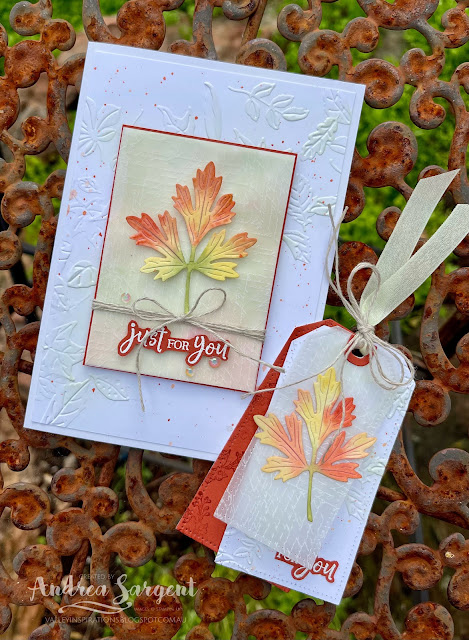
The card and tag below have used Cajun Craze Classic Stampin' ink and Card-stock plus a range of other non-BB bits and pieces.

Nothing can compare with a personally created card & tag to show how much you appreciate someone.

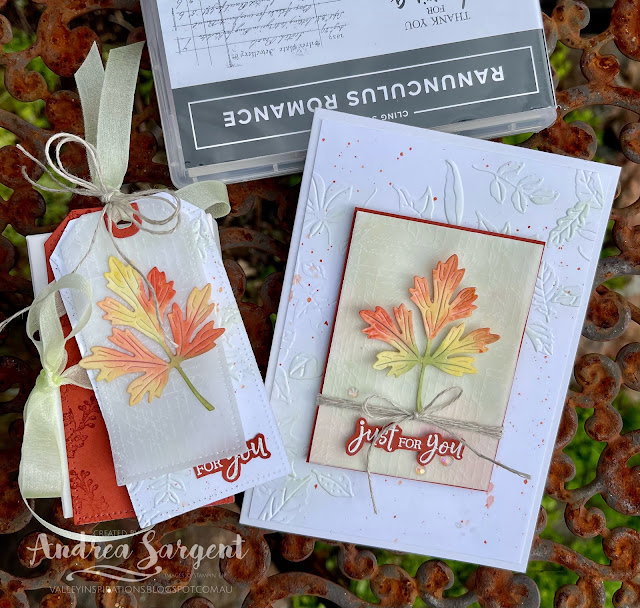
When I think of Cajun Craze I first think of Autumn leaves and as I am trying to use a water-colouring technique in my projects this month (as its World Water-colour Month) I have water-coloured a gorgeous die cut leaf from the Ranunculus Romance bundle. A number of die cut leaves were cut from Shimmery White card-stock and then wet on wet water-coloured with Cajun Craze, Old Olive and Daffodil Delight Classic Stampin' ink using the mid-sized Water Painter. I so love playing with this technique and adore the effect gained.

Nothing can compare with a personally created card to show how much you appreciate someone.

A piece of Basic White card-stock was dry embossed with the Leaf Fall 3D Embossing Folder. This is a delightful embossing folder in the new July - December Mini Catalogue and am sure I will often use it. Water-colour Cajun Craze splattering was added using the medium Water Painter. Once the splattering had dried, some Soft Sea Foam ink was very lightly blended over the embossed leaves with a Blending Brush before the panel was adhered to a Thick Basic White card base.

Nothing can compare with a personally created card to show how much you appreciate someone.

A small piece of Fluid 100 Watercolor Paper was wet on wet watercolored using Soft Sea Foam ink and touches of Cajun Craze ink. When dry, it was mounted to a slightly larger piece of Cajun Craze card-stock. One of the water-coloured leaves was adhered to a piece of Layering Designs Vellum with MIni Dimensionals and then the vellum was adhered to the water-coloured panel placing the adhesive underneath the leaf.

Nothing can compare with a personally created card to show how much you appreciate someone.

A sentiment from the Ranunculus Romance stamp set was white heat embossed on Cajun Craze card-stock with White Emboss Powder, Versamark and a Heat Gun. Some Linen Twine was wrapped around this centre panel 3 times and tied in a bow. This panel was centred on the background with Dimensionals and then some Iridescent Basic Rhinestones added a touch of shimmer.

Nothing can compare with a personally created card to show how much you appreciate someone.

Some Soft Sea Foam ink blending was applied to a Basic White card inner and one of the water-coloured leaves was adhered over the blending. A C6 Basic White envelope had a little blending added to a front corner with stamping in Cajun Craze ink using one of the flower stems from the same stamp set. 

Nothing can compare with a personally created card to show how much you appreciate someone.


GIFT TAG:
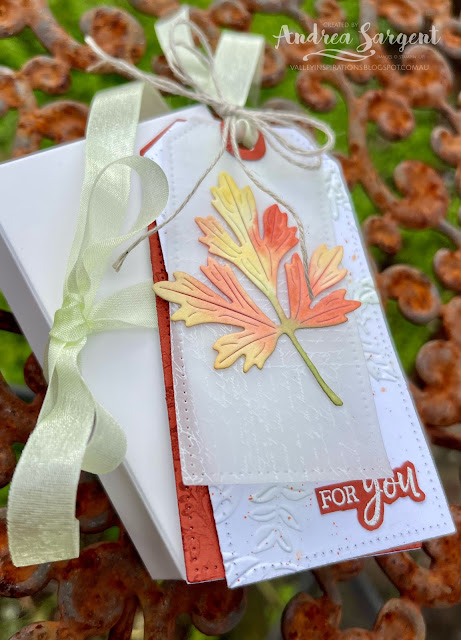
As I still had a couple of water-coloured leaves left over I decided to create a coordinating tag. One of the largest Taylor Made Tags dies was used to cut Cajun Craze and Basic White card-stocks. A sprig from the Ranunculus Romance stamp set was randomly stamped in Cajun Craze ink for a tone on tone effect. The Basic White tag was embossed with the Leaf Fall 3D embossing folder then splattered with some Cajun Craze ink. The White tag also had some Soft Sea Foam ink blended over the embossed leaves. A second white tag was adhered to the back of the Cajun Craze tag to enable a message to be written.

Nothing can compare with a personally created tag to show how much you appreciate someone.

A sentiment from the same stamp set was white heat embossed on a piece of Cajun Craze card-stock and then fussy cut, including removing one of the words from the sentiment. Some Layering Designs Vellum was cut with the next smaller tag die and a water-coloured leaf was adhered directly with Multipurpose Liquid Glue. The tag dies cut holes for twine or ribbon in each tag and the Taylor Made Tags dies can also cut hole reinforcers. It's a brilliant set of dies. The three tags were layered together and a piece of Soft Sea Foam Seam Binding Ribbon was threaded through the holes with a double Linen Twine bow tied around the ribbon at the top of the tags.

Nothing can compare with a personally created tag to show how much you appreciate someone.

This tag would go beautifully with an Envelope Treat Box that can be found in the July-December Mini Catalogue. This little stamp able & food safe box is so simple to fold and put together.

Thank you so much for dropping by. I do value the time you spent with me.

Nothing can compare with a personally created card & tag to show how much you appreciate someone.

There is more Cajun Craze creativity. To continue with the blog hop, click on the "next" graphic below to be taken to the blog of the lovely Theresa Gerrard. I always look forward to checking out Theresa's creation (I wonder what she has in store this week). I also love seeing everyones' projects - there is always so much inspiration.

Hope to see you next week when we will be featuring Calypso Coral as we continue the weekly 2022-2023 Colour Creations blog hops.

Also, many of us are joining a Heart of Christmas Blog Hop on Monday evenings and continuing until the end of November. Don't forget to check out these blog hops featuring a range of Christmas projects. Starting Christmas creativity early should lessen pressure in December. 

Stay well, stay safe and be kind to yourself and others. 

Andrea 💕🐾


If you find a broken link or have come to this blog hop from a different entry point, you can view the full list of participants on Catherine Proctor’s blog What Cathy Made. Cathy is our wonderful Art With Heart Team Colour Creations Coordinator.  She is such an amazing lady. Check out her delightful creation while you are there.

If you live in Australia, don't already have a Stampin' Up! demonstrator and would like your own copy of Stampin' Up's 2022-2023 Annual Catalogue and or the January - June 2022 Mini Catalogue then let me know and I will be delighted to send them to you.  Please don't hesitate to make contact with any other queries about these projects or Stampin' Up!. 


#colourcreationsbloghop  #stampinup #stampinupaustralia #stampinupsouthpacific #stampinupdemo  #handmadecards #makeacardsendacard #stampinupdemonstrator #papercrafting #artwithheartteam  #papercrafter  #stamper  #valleyinspirations #ranunculusromance #leaffall  #taylormadetags  #CreativeChallengeSU

AWH Colour Creations Blog Hop #36 Moody Mauve

Moody Mauve with Beautiful Butterflies Hello. Welcome to  Valley Inspirations with Andrea  and the  Art with Heart Colour Creations Blog Hop...