Art with Heart Wow Tutorials

Thursday, 19 March 2020

Art With Heart Monthly Creative Showcase - March 2020

MONOCHROMATIC CARD USING MORNING STAR WITH STAMP LAYERING & MARKER SHADING

Thanks for dropping in. I hope you and your loved ones are feeling well and coping in this difficult time. May you enjoy the Art with Heart Creative Showcase for creative endeavours can minister to our heart, whether in the creative process or viewing and thinking about the end product.
This month the Art With Heart Team are featuring Monochromatic cards, that is cards that only show different shades of the same colour. This is a great opportunity to demonstrate the wonderful range of Stampin’ Up! colours across our inks, papers and embellishments that can be combined to produce the amazing monochromatic projects that we have to share with you. It is wonderful to be able to trust Stampin' Up! ability to ensure that cardstock, inks and embellishments identified as the same colour actually are the same colour and work together so well.

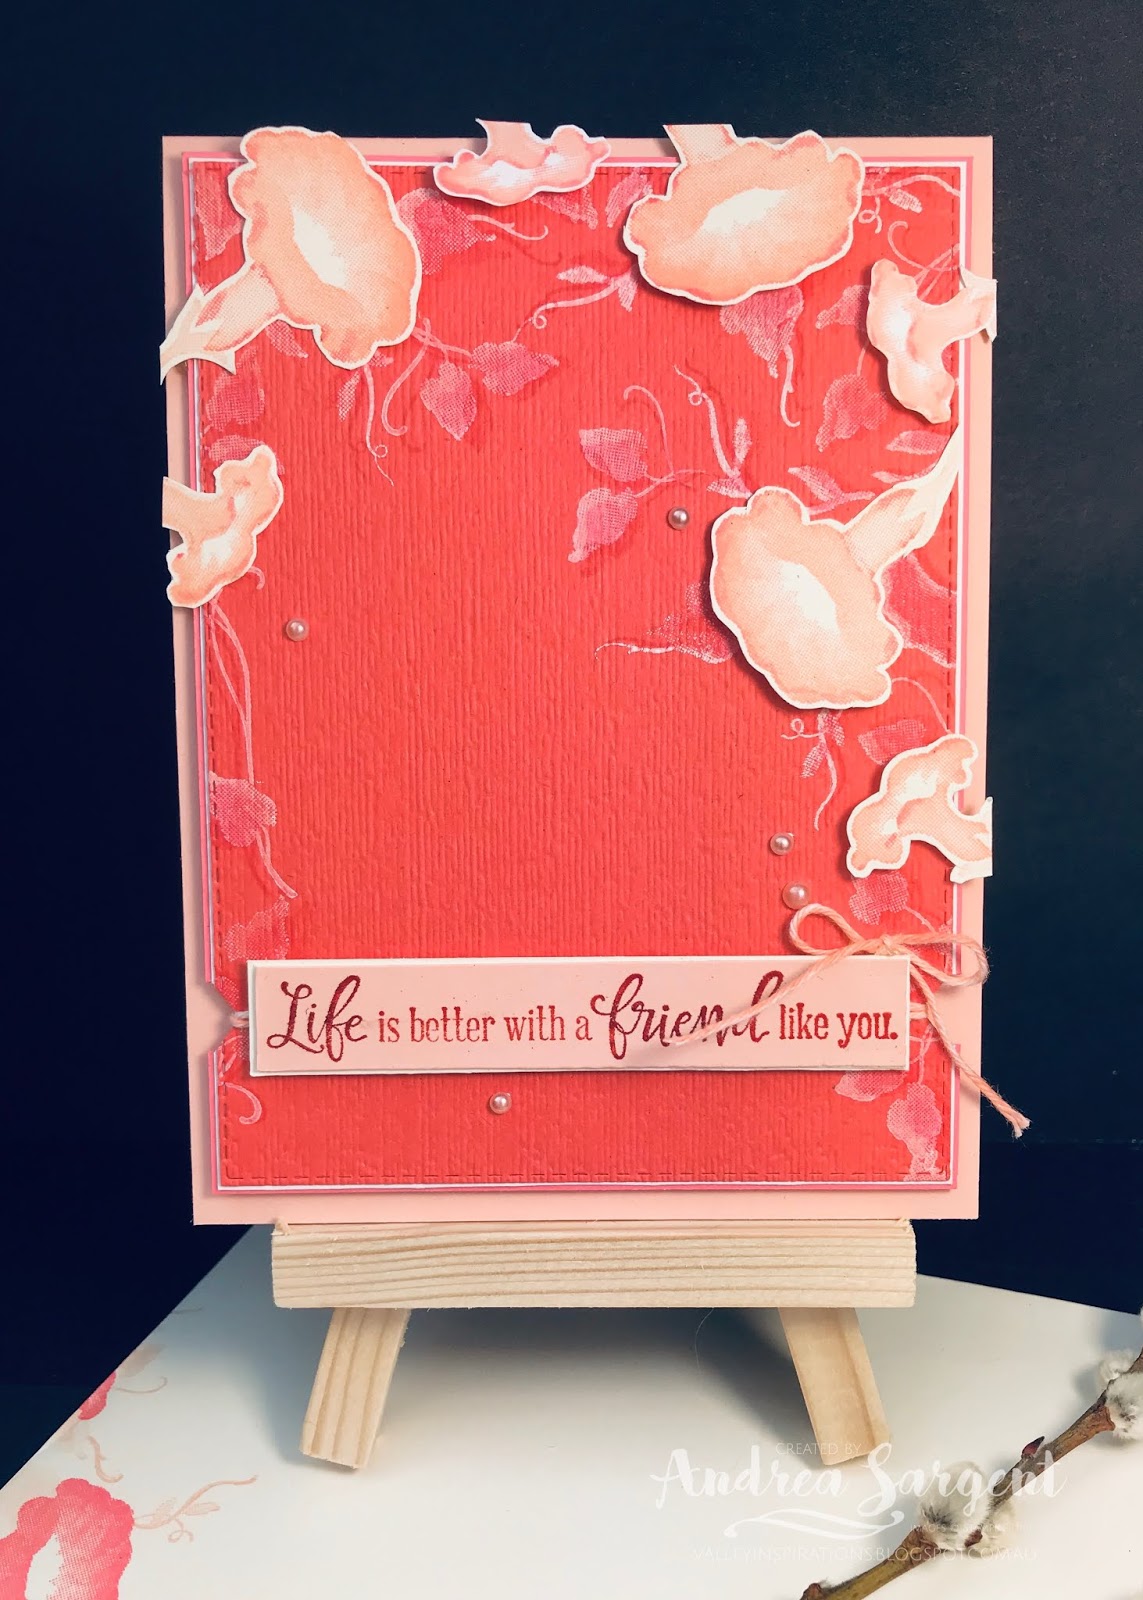
Here is my monochromatic card:

Morning Star, Stampin Up, Art with Heart, AWHT, Andrea Sargent, Valley Inspirations, Layered stamping, Peaceful Moments, Rectangle Stitched dies

This card has been inspired by two amazingly creative women.  As I was watching Paula Dobson's Facebook Live last Saturday I was inspired to create a monochromatic design with the stamps and layout Paula used. Later I started playing with the Morning Star stamp set, trying a couple of colour combinations and techniques, however I wasn't satisfied with the outcomes. I wondered about using our Whisper White Craft ink on the background card front for the flowers, but before I had a chance to play, life went somewhat topsy turvy. Well, at least a couple of days seemed to disappear as I responded to internal flooding due to blocked drains. Yukkkk 😧. Then, I watched a U-Tube video by Jennifer McQuire on Stamp Layering on Dark Cardstock. The cogs started turning again - and this is what I was created.
Morning Star, Stampin Up, Art with Heart, AWHT, Andrea Sargent, Valley Inspirations, Layered stamping, Peaceful Moments, Rectangle Stitched dies

The Stampin' Up! colours used in this card were Calypso Coral, Flirty Flamingo, Petal Pink, a tiny bit of Merry Merlot, with Whisper White and Very Vanilla. These colours blend together really well to create this monochromatic card, especially with layered stamping using the Whisper White Craft ink as a base. Craft ink on dark cardstock (in this case Calypso Coral) doesn't fully block out the background colour but shows it as a really light shade. Stamping over the craft ink with Flirty Flamingo ink, shows the colour as a different tint and where Flirty Flamingo stamps directly onto Calypso CoraI cardstock a darker tint is created - thereby creating a range of variations of the colour. Stamp layering on dark cardstock is a great technique for a monochromatic card.

The card front was die cut out of Calypso Coral cardstock using the largest Stitched Rectangles dies. Leaves from the Morning Star stamp set were stamped firstly in Whisper White Craft ink and then the leaves were stamped again in Flirty Flamingo ink in the same position but a little to one side. (Must admit stamping a little "off " came quite naturally to me. 😀) The stamped card front was dry embossed using the Subtle Embossing folder. (This is such a versatile embossing folder - I love it.)

The flowers were stamped on Very Vanilla cardstock using the Stamparatus. (I so love my Stamparatus.) I used Stampin' Up!s positioning tool for two reasons, that is I was able to stamp a couple of layers to strengthen the Petal Pink and I was also able to add touches of extra shading using a Flirty Flamingo Stamping Write Marker. The flowers were all fussy cut and then positioned with a Mini Dimensional under the flower heads and a Glue Dot at the stem end; giving the flower a tad of height off the card front.

The card front was then mounted first onto Very Vanilla and then Flirty Flamingo cardstock using Tombow Liquid Glue.  A little notch was punched on either side of the mounted card front with the Classic Label punch. Whisper White Bakers Twine which had been coloured with a Dark Petal Pink Blend Alcohol Marker was tied around the mounted card front at the notches. The card front then was adhered to the Petal Pink card base with Dimensionals. A sentiment from the Peaceful Moments stamp set was stamped on Petal Pink cardstock with Calypso Coral ink. The words "Life" and "friend" were highlighted by colouring them on the stamp using a Merry Merlot Write Marker and then stamped. The Stamperatus was used to enable this technique. The sentiment was mounted with a fine Very Vanilla boarder and adhered in place over the twine with Mini Dimensionals. The card was finished with a tiny Bakers Twine bow and Basic Pearls coloured with a Light Calypso Coral Blend. Here are a couple of close ups of the card:

Morning Star, Stampin Up, Art with Heart, AWHT, Andrea Sargent, Valley Inspirations, Layered stamping, Peaceful Moments, Rectangle Stitched dies

Morning Star, Stampin Up, Art with Heart, AWHT, Andrea Sargent, Valley Inspirations, Layered stamping, Peaceful Moments, Rectangle Stitched dies

As you may know, I love to add design elements to the card inner to ensure it ties in with the card  design. The Whisper White cardstock inner was stamped with Petal Pink leaves and mounted on Flirty Flamingo cardstock with a fine boarder showing. Flirty Flamingo flowers, which had some Calypso Coral shading, were fussy cut and adhered flat with liquid glue.

Morning Star, Stampin Up, Art with Heart, AWHT, Andrea Sargent, Valley Inspirations, Layered stamping, Peaceful Moments, Rectangle Stitched dies

I also like to tie in the envelope as well. The leaves and flowers were stamped directly onto the envelope.

Morning Star, Stampin Up, Art with Heart, AWHT, Andrea Sargent, Valley Inspirations, Layered stamping, Peaceful Moments, Rectangle Stitched dies

I had hoped to have a couple more monochromatic cards for you, but life and blocked drains demanded time that had been set aside to create. Check in with me on my blog next week for some more monochromatic cards. Hopefully the ideas in my head will translate easily onto paper.

Thank you so much for joining me as you hop around this Art with Heart Creative Showcase. I am so looking forward to seeing everyone's creations.

Do continue to look after yourself and those you love and ensure you do something nice to lighten your load. 😘

The next demonstrator to share her monochromatic project is the amazingly talented Caroline Manwaring. Click on the graphic below to see her card on Carussell Crafts.

If you have a broken link or have come to this blog hop midway, you can view all the participants by clicking on the links below:

Andrea Sargent < You are here

Don't forget that Sale-a-bration is finishing on 31st of March. There are so many amazing products that you can earn with a purchase of $90 or $180 worth of Stampin' Up products. Contact any of the team members for more information. We would be delighted to help you.


Thursday, 27 February 2020

Art With Heart Monthly Blog Hop - February 2020

Masculine Cards for Fellas

How can the year be passing so quickly? February is almost at an end and I've been creating masculine cards. I am so glad you have dropped by to see some cards to give to fellas.

Welcome to the second Creative Showcase for 2020 with the Art With Heart Team. Yes, we have changed the name from a 'Blog Hop' to a 'Creative Showcase'. This month we are featuring Masculine themed projects. We have many masculine themed products in the Stampin’ Up! range including Stamp Sets and coordinating Dies, Designer Series Papers, Embellishments and Embossing Folders. The Art With Heart Team have a wonderful selection of projects to inspire you to create Masculine Masterpieces.


Tonight I am sharing three cards. I don't find creating masculine cards particularly easy, so  I took this Creative Showcase Theme as a challenge that I was determined to meet (I do like a creative challenge that stretches me). My February Paper Crafting class on the first Monday of the month occurred before Valentines Day so my mind went to creating a Valentines Day card to give to a fella. Something simple with neutral colours, dry embossing (I love this technique to add texture and interest without clutter) and a simple heart or two. Then the Sunday morning prior to class I was talking to a delightful lady who would be coming to class the following day, who said she really needed two birthday cards - one for a special female friend and one for a male friend that she had known for many, many years. One of the cards that had been planned for class would be just right for her female friend, but the masculine Valentine's Day card I'd designed wouldn't be right. So ... arriving home mid Sunday afternoon, I set about designing a masculine card - its the second card in this blog. The third card is hot off the press and has been made with my brother in mind.

I will detail the cards in the reverse order to the way they were referenced above. This initial card has been created with my brother in mind. He is a dedicated golfer, so I was really excited when I first saw Stampin' Up!'s Mini Catalogue and that there was a golfing suite of amazing products. I have featured the gorgeous Country Club Designer Series Paper (DSP), the Absolutely Argyle 3D Embossing Folder and a piece of the Night of Navy Bakers Twine (from the Country Club Twine Combo Pack), with 2 of the sentiments from the Clubhouse Stamp set. The whole stamp set is fantastic and there are also delightful wooden Country Club elements that are also part of the Country Club Suite.

Country Club, Absolutely Argyle, masculine card, Stampin Up, Art with Heart, blog hop, Andrea Sargent, AWHT

The DSP includes 2 sheets with black lined images that can be coloured. I chose one of these images and coloured it with Stampin Blends. The image was then cut out using a die from the Stitched Rectangle Die set and mounted on a die cut piece of Sahara Sand Cardstock. Some Night of Navy Bakers Twine was wrapped around a couple of times and tied with a simple knot. The card base and card front were both cut from Night of Navy  cardstock with the card front dry embossed using the Absolutely Argyle 3D Embossing Folder. This picture doesn't really show the embossed paper well. It is really gorgeous. The other side of the DSP lined images has a colourful stitched diamonds design. A small rectangle of this DSP was adhered near the left side of the embossed card front and then the coloured and mounted picture of a golfer was adhered using Dimensionals. A sentiment from the Clubhouse Stamp set was stamped in Night of Navy on Smokey Slate cardstock. The sentiment was also embossed with Clear Emboss powder to give it some extra impact. and then was cut with a circle die from the Layering Circles Die set, to be reminiscent of a round golf ball.


Absolutely Argyle embossing, Country Club, masculine card, Stampin Up, Art with Heart, blog hop, Andrea Sargent, AWHT

I always like to decorate the card inner. My sincere apologies for the quality of this picture and others in this blog. I have been house & dog sitting elsewhere and only arrived back early afternoon, so the lighting for my photos was not as good as photos usually taken in the morning.

Absolutely Argyle embossing, Country Club, masculine card, Stampin Up, Art with Heart, blog hop, Andrea Sargent, AWHT

The second card shown in this blog is the card that was designed, created and prepared for a card class the following morning. At that time I was extremely thankful for a layout by one of Stampin' Up!'s amazing Artisan team, Narelle Farrugia. I altered numerous components to personalise the card. Here it is:

Geared Up Garage, masculine card, Stampin Up, Art with Heart, blog hop, Andrea Sargent, AWHT, embossing

The card base is Thick Whisper White cardstock and the Whisper White card front was cut a little smaller than the card base and dry embossed with an amazing embossing folder that is only available during the Sale-a-bration promotion - this Stone 3D Embossing folder comes together with the lovely Power of Hope stamp set and they are free with a purchase of Stampin' Up! products to the value of $180. 

Some "cogs" were die cut from Night of Navy cardstock with the Garage Gears dies. Parts of this cog image were pressed into a Versamark ink pad and then sprinkled with Gold Emboss Powder and heat set to give a "shabby" look. It was then adhered directly to the card front. Two small pieces of Come Sail Away DSP were adhered with Dimensionals and a very thin strip of Gold Foil was added on top. A circle of Vellum that was die cut with one of the Stitched Shapes dies was layered over. The car was stamped using the Geared Up Garage stamp set and heat embossed in Versamark and Gold Emboss powder. It was raised on Dimensionals. The sentiment was stamped in Night of Navy and then fussy cut into 2 pieces. This was adhered with Mini Dimensionals. As a final touch, a little key embellishment (with a little gold heat embossing) from the Classic Metal elements, was tied with a piece of Night of Navy/Sahara Sand Bakers Twine and adhered with a couple of Glue Dots.

Geared Up Garage, masculine card, Stampin Up, Art with Heart, blog hop, Andrea Sargent, AWHT, embossing

The card inner used another sentiment and the toolbox from the Geared Up Garage stamp set and a very thin strip of navy cardstock was added at the base.


Geared Up Garage, masculine card, Stampin Up, Art with Heart, blog hop, Andrea Sargent, AWHT, embossing

My last card for this blog was designed as a masculine card for Valentines Day. As mentioned, I wanted something simple with neutral colours, dry embossing to add texture and interest plus a simple heart or two. Here is what I came up with:

embossing, masculine card, Stampin Up, Art with Heart, blog hop, Andrea Sargent, AWHT

The card base and the card front is Crumb Cake cardstock, with the card front (cut a little smaller than the card base), die cut with a stitched curve and dry embossed with the Stone 3D Embossing Folder. The Whisper White Craft Stampin ink pad was lightly dragged across the embossed card front so the raised sections picked up some white ink. One of the wooden elements from the Country Club Elements was tied around the card front with Night of Navy/Sahara Sand Bakers Twine and the ends were frayed a little. The sentiment from Heart to Heart stamp set was gold heat embossed on the lower un-embossed piece of the card front. Both these pieces were mounted on a piece of Night of Navy that was also gold heat embossed around the edges. The embossed card front was adhered in place with Dimensionals. Finally, hearts were die cut using the Stitched Be Mine stamp set from Night of Navy cardstock. A number of hearts were glued together to create 2 thick hearts. One heart was gold heat embossed across the front and the other heart was gold embossed around the edges. Then they were adhered together leaving some of the lower heart showing. The two hearts were adhered with Dimensionals to further highlight them.


Thank you so much for calling in to check out the Valley Inspirations Blog, as part of February's Art with Heart Creative Showcase. I would love to hear your thoughts - please comment below. Let me know if you would like further details on the projects shown here. Also, I would love to earn you business, so please contact me if you have any queries about Stampin' Up! or if I can help with a purchase of any Stampin' Up! products.

The next demonstrator to share their Masculine project with you is the very talented Sharon Davern. Click on the arrow below to be taken to Rhapsody in Craft to discover Sharon's creations. I am looking forward to see her projects.


If you have a broken link or have come to this Creative Showcase midway, you can view all the participants by clicking on their names below:

Andrea Sargent  - you are here

Thursday, 23 January 2020

Art With Heart Monthly Blog Hop - January 2020

Golden Honey Speciality DSP and the coordinating Honey Bee Bundle 

Welcome to 2020 and my first blog for the year. I have had a great break over the Christmas - New Year period. I hope you have too.


Honey Bee, Art with Heart, blog hop, Stampin Up, Andrea Sargent, Saleabration, 2020, watercolour wash, die cutting, 3D project, Golden Honey Speciality, DSP, Mini Catalogue, Detailed Bees

This is a wonderful time to grab some great Stampin' Up! deals. It's Sale-a-bration time.


Tonight's blog hop is the first Art With Heart Blog Hop for 2020. This month we are featuring cards using the amazing products that you can earn for free during our Sale-a-bration promotion. This is a fantastic opportunity to obtain limited edition products. Until the 31st of March, with every $90 you spend on Stampin’ Up! products you will earn free products from our Sale-a-bration brochure.


Hostess’ earn bonuses too! When you host a party with sales above $500 you receive an oh so cute Little Ladybug set in addition to the usual Hostess benefits.


Sale-a-bration also has an amasing bonus for recruits who join during this promotion. For the joining fee of $169 you can choose your starter kit of products to the value of $235 plus  Mini Paper Cutter, 6" x 6" Designer Series Paper sampler and their choice of stamp set.


Tonight I'm using the delightful and delicious Golden Honey Speciality Designer Series
Paper (it is free when you spend $90 on Stampin' Up! products). This speciality DSP has more body than most DSPs and the designs have touches of gold on one side of each sheet of 12x12 paper. It is special and was designed to coordinate with the Honey Bee Bundle of stamps and dies from the January - June Mini Catalogue.  


Honey Bee, Art with Heart, blog hop, Stampin Up, Andrea Sargent, Saleabration, 2020, watercolour wash, die cutting, 3D project, Golden Honey Speciality, DSP, Mini Catalogue, Detailed Bees

Inspired by this gorgeous paper I decided to create a custom-made box for delicious nougat that I found when holidaying in Margaret River, WA back in November last year. I have one left to give as a gift. I also made a coordinating card. 

Honey Bee, Art with Heart, blog hop, Stampin Up, Andrea Sargent, Saleabration, 2020, watercolour wash, die cutting, 3D project, Golden Honey Speciality, DSP, Mini Catalogue, Detailed Bees

This box was made from a 7"x12" piece of the gold & black stripe paper. It was scored, burnished & trimmed then adhered using Tombow Multipurpose Liquid Glue. Tombow is my "go to" glue at present. The trick is controlling the amount of glue that comes out on your paper so it doesn't squish out and go everywhere. I used Tombow liquid glue for both projects, so unless I mention a different product, know that I used this liquid glue to adhere pieces together. 


Honey Bee, Art with Heart, blog hop, Stampin Up, Andrea Sargent, Saleabration, 2020, watercolour wash, die cutting, 3D project, Golden Honey Speciality, DSP, Mini Catalogue, Detailed Bees

The box was decorated with Whisper White 1/4" Crinkled Seam Binding Ribbon (which can be found in the Mini Catalogue), some golden honey comb (die cut out of Gold Foil using a die from the Detailed Bee dies); and a gold bee that was die cut out of a different design from the Golden Honey SDSP. I am so impressed with the way Stampin' Up! coordinates its products; and this includes the way the Detailed Bee dies not only match the stamped images but also images in the DSP. The sheets of golden bees is so lovely.The die cut golden bee and honey comb was popped up on Mini Dimensionals. A small piece of So Saffron Metallic Bakers twine from the Sale-a-bration Metallic Bakers Twine & Sequins Combo Pack was added to the ribbon bow.


Honey Bee, Art with Heart, blog hop, Stampin Up, Andrea Sargent, Saleabration, 2020, watercolour wash, die cutting, 3D project, Golden Honey Speciality, DSP, Mini Catalogue, Detailed Bees

The coordinating card features a piece of the same gold & black striped Speciality DSP as well as the coordinating Honey Bee Bundle. The Detailed Bees dies not only cut out the stamped images but there is also a detailed die to cut a beautiful bee. I used this die to cut bees out of both Gold Foil and Basic Black cardstock. With the latter, I ensured none of the detailed bits fell out (a small piece of sticky tape is hidden underneath).

Now back to how the card was made. The card base used half an A4 piece of Thick Whisper White cardstock and was scored in half. A piece of Shimmery White cardstock was trimmed a little smaller than the card base. A light watercolour wash was painted over part of the shimmery white piece using a Pineapple Crush ink pad and Aqua painter. Once the wash dried, a Black Stampin Write Marker was used to flick some black speckles over the card front. This card front was adhered directly to the card base.


Honey Bee, Art with Heart, blog hop, Stampin Up, Andrea Sargent, Saleabration, 2020, watercolour wash, die cutting, 3D project, Golden Honey Speciality, DSP, Mini Catalogue, Detailed Bees

A couple of pieces of Honey comb was die cut from Whisper White cardstock and adhered over the Pineapple Crush wash. The piece of black and gold SDSP was popped up on Dimensionals across the card near the bottom. The detailed die cut bee was added to one side of the strip of SDSP with Mini Dimensionals. A sentiment from the Honey Bee stamp set was stamped onto a piece of Basic Black cardstock in Versamark and then heat embossed using White Stampin Emboss powder. Then, this was die cut using the smallest long/thin Stitched Rectangle die. The sentiment was then adhered to the SDSP. Two little gold foil hearts, cut using the Detailed Bee dies, were adhered to finish off the card.


Honey Bee, Art with Heart, blog hop, Stampin Up, Andrea Sargent, Saleabration, 2020, watercolour wash, die cutting, 3D project, Golden Honey Speciality, DSP, Mini Catalogue, Detailed Bees

I love adding coordinating elements to the inside of the card and also on the envelope. Inside the card, a thin strip of the same SDSP was adhered at the bottom and two bees we stamped in Black Momento Ink. The Honey Bees stamps are DisINKtive stamps which is a Stampin' Up! specialty. DisINKtive stamps enable you to stamp with an impact of varying shading with one stamp. The wings of the bees show this effect beautifully. Two bees were also stamped on the envelope in Pineapple Crush with some speckles from the Black Stampin Write Marker.

If you are interested in anything I have shared here, please do not hesitate to contact me for more information or to purchase Stampin Up!'s quality and coordinating products and obtain some free Sale-a-bration products.

Well that's it from me for this Art with Heart Blog Hop. Thank you so much for spending some time here at Valley Inspirations. I do appreciate it.

The next demonstrator to share their Sale-a-bration inspiration with you is the talented Cathrine Proctor. I always love her creations and I am sure you will too. Just click on the arrow to be taken to What Cathy Made
  
If you have a broken link or have come to this blog hop midway, you can view all the participants using the links below:

Andrea Sargent  -  You are here

Tuesday, 17 December 2019

Just Add Ink Challenge Entry - #486

Feels Like Frost Tri-fold Shaker Card

Welcome back to Valley Inspirations with Andrea. Thanks for dropping in. 

This week I have created a Christmas card for an entry in the current Just Add Ink Challenge. I also created this card with a special friend and fellow paper crafter in mind.

Photo Credit: https://pin.it/46yqdqea3drdpe
This  week's Just Add Ink Challenge is to create a project that has been inspired by this gorgeous Christmas table setting. As I studied the photo I thought of classic beauty, shimmer, light, decadence, crystal clear glasses, foliage and of course, Christmas. I thought of a generally neutral colour scheme with some colour from the table runner and the foliage. Pondering what I would create, my thought process went to Stampin' Up!'s luscious Feels Like Frost designer series paper (DSP) with a shaker card. As I collected the materials I would need, I also pondered the practicalities of trying to stand a shaker card without it falling forward, so I decided on a simple tri-fold card. 

Post Update - I was so delighted to receive an Honourable Mention for my card. Some comments from the Design Team were:

Such an effective card fold, using gorgeous papers and die cuts.

A great project with many elements.

A gorgeous work of art and the soft tulle and shaker elements are so celebratory.


Here is the card front:


Stampin Up, Andrea Sargent, Christmas, 2019, Just Add Ink Challenge, Feels Like Frost, Frosted Foliage, Trifold card, Shaker card, Frosted Frames

After preparing a Thick Whisper White cardstock base, I cut a Whisper White frame using the largest and 3rd largest Stitched Rectangle dies and also cut a piece of the Feels Like Frost DSP with the second largest rectangle die. The Frosted Frames dies were all used to cut Whisper White cardstock, with extra leaves and snowflakes also prepared (although I still needed to cut more as the card design developed). The die cut pieces, including the rectangular frame were spritzed with Frosted White Shimmer paint mixed with Isopropyl Alcohol.

Stampin Up, Andrea Sargent, Christmas, 2019, Just Add Ink Challenge, Feels Like Frost, Frosted Foliage, Trifold card, Shaker card, Frosted Frames
Showing some sequins over the card front, after a gentle shake.
The leafy frame was cut into pieces and adhered to the underside of the rectangular frame, with an extra leaf spray and snowflake - all facing inwards. This is opposite to the die cut frame where the leaf sprays and snowflakes are on the outside. A piece of Window Sheet was adhered to the underside of the re-created rectangular foliage frame. Before adhering the piece of DSP to the card base a greeting from Itty Bitty Christmas stamp set was stamped in Versamark and heat embossed using Shimmer White Emboss powder. The greeting was re-stamped in Rococo Rose ink moving the stamp a tad to the left to give a shadow effect - the Stamparatus is brilliant for this. Foam Adhesive Strips were stuck on the edge of the DSP ensuring there were no gaps so sequins can not escape when the final card is shaken. The delightful Snowflake Sequins were sprinkled within the rectangle formed by the foam strips and then the decorative frame placed on top. Voila! It's a shaker card. (Bye the way, in a number of the above steps, ensuring accurate alignment is important. It is certainly worth the effort of double checking before adhering.) A bow of 1.6cm Whisper White Polka Dot Tulle ribbon has been tied around the card to hold the card in a neatly closed position. 

Stampin Up, Andrea Sargent, Christmas, 2019, Just Add Ink Challenge, Feels Like Frost, Frosted Foliage, Trifold card, Shaker card, Frosted Frames
The card front without the tulle bow, showing the sequins.
With this simple tri-fold card, apart from the card front, there are four other card surfaces that can be seen when opening the card (that is, not including the blank card back). In line with the decadence of the inspirational table setting, I decided to add design elements to each surface, with the greater focus on the RHS flap that is seen first when the card is opened. One of these pages is for the hand written greeting to the recipient and the other two pages have simpler designs, so as not to compete with the focal pages. 


Stampin Up, Andrea Sargent, Christmas, 2019, Just Add Ink Challenge, Feels Like Frost, Frosted Foliage, Trifold card, Shaker card, Frosted Frames
The view when card is first opened, with a focus on the RHS.
Stampin Up, Andrea Sargent, Christmas, 2019, Just Add Ink Challenge, Feels Like Frost, Frosted Foliage, Trifold card, Shaker card, Frosted Frames
The card is fully opened, showing the 3 inner pages.
As you can see, the inner pages continued to use the Feels Like Frost DSP, the Frosted Frames dies and the shimmer spritzing technique, and more of Rococo Rose and Blushing Bride cardstock and ink were used to tie in with these colours in the DSP. The matching Frosted Foliage stamp set was used as well. Layers have been kept to a minimum within  the card and no dimensionals were used so that the card did not become tooooo bulky. 

Now for a look at each individual page:

Stampin Up, Andrea Sargent, Christmas, 2019, Just Add Ink Challenge, Feels Like Frost, Frosted Foliage, Trifold card, Shaker card, Frosted Frames
Inner page seen when card first opened.
The design elements on this page include some Feels Like Frost DSP, using the silver and white side. The white leaves and snowflakes were sponged with Rococo Rose ink ensuring it was darker at the bottom and lighter at the top. The Foliage Frame was cut out of Silver foil and the sentiment panel of Rococo Rose cardstock was inlaid in the Foliage Frame. The sentiment from the Light & Peace stamp set was heat embossed using the Shimmer White Emboss powder. Three snowflake sequins were scattered around the sentiment and two die cut and shimmer spritzed snowflakes were adhered on the frame's corners.

Stampin Up, Andrea Sargent, Christmas, 2019, Just Add Ink Challenge, Feels Like Frost, Frosted Foliage, Trifold card, Shaker card, Frosted Frames
LHS page when card is fully opened.
This page is very simple so as not to compete with the page shown directly above. A sentiment from Itty Bitty Christmas stamp set was stamped in Blushing Bride ink. Die cut white and shimmer spritzed snowflakes and snowflake sequins were scatted around, giving a subtle white on white effect.

Stampin Up, Andrea Sargent, Christmas, 2019, Just Add Ink Challenge, Feels Like Frost, Frosted Foliage, Trifold card, Shaker card, Frosted Frames
Central page of fully opened card for handwriting a message. 
This central page was stamped in Blushing Bride ink using the snowflakes stamp from the Frosted Foliage set. The stitched rectangle, which had been cut out to form the Whisper White frame on the card front, was adhered in the centre and two die cut Rococo Rose shimmer spritzed snowflakes were added at two corners.

Stampin Up, Andrea Sargent, Christmas, 2019, Just Add Ink Challenge, Feels Like Frost, Frosted Foliage, Trifold card, Shaker card, Frosted Frames
The RHS page when card fully opened
The final decorative page has a sentiment from the Frosted Foliage stamp set that was heat embossed using the Shimmer White Emboss powder on Rococo Rose cardstock. The die cut and shimmer spritzed leaf sprays were cut from both Whisper White and Rococo Rose cardstock. A number of star shaped sequins were scattered around. The Snowflake Sequins are simply delightful with a number of different shaped and coloured sequins.

Stampin Up, Andrea Sargent, Christmas, 2019, Just Add Ink Challenge, Feels Like Frost, Frosted Foliage, Trifold card, Shaker card, Frosted Frames
A view of the fully open card showing the inner RHS page, the card back and the card front.
I so enjoyed creating this card, with its different pages. Having been inspired by the gorgeous Christmas table setting, the card creation took on its own life as the design aspects developed. While it's a pity that the shimmer spritzing didn't show in the photos compared to the effect in real life, I hope you were able to get a sense of decadence, sparkle and beauty. I also hope my friend will like it and feel special.

Thanks for dropping by and taking time to check out my entry in the Just Add Ink Challenge. Have a blessed Christmas and wonderful New Year. I do hope you drop back to my blog in 2020. 💕🐾


AWH Heart of Christmas - #7

Christmas with Shining Stars  Hello. Welcome to  Valley Inspirations with Andrea  and the seventh  Art with Heart Team Heart of Christmas Bl...