Art with Heart Wow Tutorials

Saturday, 25 April 2020

Social Stamping - #5 War and Peace

War and Peace with Painted Poppies

Welcome to Valley Inspirations with Andrea and the Social Stamping Blog Hop for ANZAC Day. Our theme this week is "War & Peace".


This morning as I stood in my driveway for the Dawn Service to remember those who fought to keep Australia and New Zealand free, I was so thankful to be an Australian and live in a country that provides so many blessings. This is no more true than in the current times as we battle against COVID-19. Yes, we have not been immune to the impact of this deadly virus and there a many struggles and difficulties, but we are in such a better place than other countries. 


Andrea Sargent, Social Stamping, blog hop, Stampin Up, 2020, Peaceful Poppies, wreath, Peaceful Moments

My Grandfathers and Father fought in the First & Second World Wars and while they returned home, they were never the same. So ANZAC Day is an important day for me. When contemplating this week's theme, I wanted to design something around one of the symbols, Poppies and they needed to be red poppies in recognition of the blood that was shed. I had a number of ideas but decided on using another symbol, that of a wreath. 

The card base was cut from Old Olive cardstock, scored in the middle and folded in half to form a 5.5inch square card. A slightly smaller piece of Peaceful Poppies Designer Series Paper was adhered in place to form a background for the card design.

Andrea Sargent, Social Stamping, blog hop, Stampin Up, 2020, Peaceful Poppies, wreath, Peaceful Moments

The poppies were die cut out of Poppy Parade and Cherry Cobbler card-stock and then they were further coloured with sponge daubers to add depth. The flower centre and the leaves also were tinted with Whisper White and Garden Green inks. I love adding touches of ink to add some life to the die cut pieces. Before the poppies and leaves were positioned on the card front, a wreath of leaves was stamped directly onto the the card which then was dry embossed with the Subtle Embossing Folder to give it a very subtle texture.

Andrea Sargent, Social Stamping, blog hop, Stampin Up, 2020, Peaceful Poppies, wreath, Peaceful Moments

The decorated card front was popped up on dimensionals and adhered to the card base. A Wink of Stella pen was used to sprinkle a tinge of glitter over the card (you can't see this in the photo). A triple bow of Whisper White Crinkled Seam Binding was added to finish off the wreath.

Andrea Sargent, Social Stamping, blog hop, Stampin Up, 2020, Peaceful Poppies, wreath, Peaceful Moments

To link the centre of the card with the card front a couple os strips of the DSP were added along with a die cut and coloured sprig of leaves.  An envelope was custom made out of the same Designer Series Paper.

Andrea Sargent, Social Stamping, blog hop, Stampin Up, 2020, Peaceful Poppies, wreath, Peaceful Moments

Thank you for spending time with me and allowing me to muse over the theme.

There are so many talented people participating in the "War & Peace" Social Stamping Blog Hop. I do hope you are gaining ideas and inspiration as you go from blog to blog. The next person is the lovely and talented Denita Wright-Smee. Click on the "Next" graphic to see her creation.


To go to the full list of participants click here and you will find links that will take you to everyones' blogs.


Stay home, stay safe, stay healthy and I hope you are staying sane. I look forward to blog hopping with you again next week.


A list of Products used to create this card will be added soon.

Saturday, 18 April 2020

Social Stamping - #4 Friends

"Friends" With A Range Of Flowers

Hello, welcome to Valley Inspirations with Andrea and the 4th Social Stamping Blog Hop that is focussing on the theme of "Friends".


Friends are so important to us but in current times there are not the same opportunities to catch up with our special friends. As card makers, this is a perfect opportunity to share our love and creativity by sending cards.

Following the instigation of self isolation, a special lady, friend and my Stampin' Up! upline sent 1/2 card kits (ie Stampin' Up!s Calligraphy Essentials Project kit) to friends and  team members as well as establishing a private Facebook group so we could chat and share our creations. She challenged us to do our own "thing" rather than follow the kit directions. It's been a great way to keep contact, keep crafting and to encourage one another. I've only used 3 of the card bases thus far, but thought I would share them with you as the kit came with love and encouragement from a friend and the cards will be posted to friends to let them know I am thinking of them and sending paper hugs.  


Andrea Sargent, Social Stamping, Stampin Up, Timeless Tulips, See a Silhouette, Easter Promise, Calligraphy Essentials, 2020, Friends, blog hop

I found each of the card bases were a challenge to think of a card design that could build on and blend with the base. 

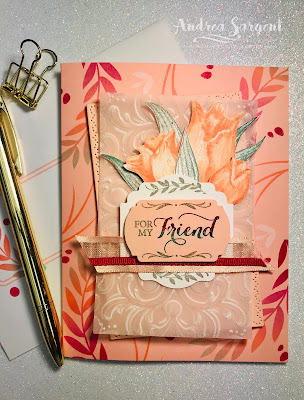
CARD 1: I love the colour combination of the central base (shown above) and used the colours in designing the card front. Both Petal Pink card-stock and Vellum were die cut with the rectangular stitched die from Thoughtful Moments dies and the vellum piece was embossed with the Parisian Flourish 3D embossing folder. Ooo - I do love the delicacy of embossed vellum. The flowers and leaves were stamped using the Timeless Tulips stamp set in Petal Pink (flowers) and Smoky Slate (leaves). While this is a distinktive stamp I added further colour and depth using the Stamparatus and Stampin' Write Markers, ie Grapefrut Grove for the tulips and Bermuda Bay on the leaves. I so love playing with colour and so really enjoy colouring the stamps with markers and gradually building up the colours with multiple stamping.


Andrea Sargent, Social Stamping, Stampin Up, Timeless Tulips, Calligraphy Essentials, Layered with Kindness, 2020, Friends, blog hop

The labels were cut using the Label Me Lovely & Label Me Fancy punches from Whisper White and Petal Pink card-stock. The sentiment came from the coordinating Layered with Kindness stamp set and was stamped in Smoky Slate ink with extra colour added using Bermuda Bay and Lovely Lipstick markers. The labels were popped up on Dimensionals and the card was finished with snippets of Petal Pink Organdy Striped Ribbon and Lovely Lipstick Grosgrain Ribbon partially tucked under the top label. Here is a close up of the card centre.


Andrea Sargent, Social Stamping, Stampin Up, Timeless Tulips, Calligraphy Essentials, Layered with Kindness, 2020, Friends, blog hop

CARD 2: The next card was particularly challenging for me as the combination of the Pool Party leaves and the Old Olive centre was not quite 'me'. However, I love a challenge 😉 and also love the crocuses from the Easter Promise stamp set. Having seen Emma Goddard create a card combining these flowers with the swirly label from the Painted Labels dies I started the design there. The crocuses were stamped in Momento ink and then coloured with Petal Pink, Lovely Lipstick and Pool Party Light & Dark Blends and then fussy cut. Also, the Daffodil Delight blends were used where the centre of the flowers are seen.


Andrea Sargent, Social Stamping, Stampin Up, Easter Promise, Peaceful moments, Calligraphy Essentials, 2020, Friends, blog hop

A rectangular piece of Vellum was die cut using the Ornate Layers dies. The label was die cut from Whisper White card stock and the sentiment from the Peaceful Moments stamp set was stamped in Lovely Lipstick ink. The flowers were tucked in around one side of the label with some of the flowers being popped up on Dimensionals. A quadruple Whisper White Bakers Twine bow was adhered with a Glue Dot and the finishing touch was a few sequins that came with the card kit.

Andrea Sargent, Social Stamping, Stampin Up, Easter Promise, Peaceful Moments, Calligraphy Essentials, 2020, Friends, blog hop 

CARD 3: For this 3rd card (which was actually created first), I was sitting at my craft space looking at the card base and wondering what I would do when I spied out of the corner of my eye some flowers and leaves that I had previously fussy cut from the See a Silhouette Designer Series Paper. I started playing with the fussy cut flowers and arranging them on the card base. After deciding on the arrangement, I die cut two flower centres using small dies from the Poppy Moments dies and Whisper White card-stock. Some flower/leaves pieces were adhered direct to the card front and a little dimension was added with a few DimensionalsTwo Gold Faceted Gems finished off the flowers.  


Andrea Sargent, Social Stamping, Stampin Up, See a Silhouette DSP, Peaceful Moments, Calligraphy Essentials, 2020, Friends, blog hop

The sentiment from the Peaceful Moments stamp set was stamped in Mossy Meadows ink and die cut with one of the smaller Stitched Rectangles dies. A double Whisper White Bakers Twine bow was adhered at the bottom of the flowers with a Glue Dot and a few Rhinestone Basic Jewels were coloured with an Ivory Blend and scattered on the card.


Andrea Sargent, Social Stamping, Stampin Up, See a Silhouette DSP, Peaceful Moments, Calligraphy Essentials, 2020, Friends, blog hop

That's it for me in this week's "Friends" Social Stamping Blog Hop. Thank you for dropping by - I really appreciate it. I'm looking forward to seeing all the wonderful "Friends" projects created by others in the Hop. The next paper crafter is the lovely Peta Stephen at Stampin' Cat with Peta 

  
Click on the NEXT graphic to head over to another Friend 
To go to the full list of participants click here and you will find links that will take you to everyones' blogs.

Stay home, stay safe, stay healthy and I hope you are staying sane. I look forward to blog hopping with you again next week.


With love and prayers 


Andrea 💖

Thursday, 16 April 2020

Art With Heart Monthly Creative Showcase - April 2020

Mothers Day with Positive Thoughts and Dressed to Impress

Thanks for dropping in to the Valley Inspirations Blog and particularly this post as part of the April's Art with Heart Team Creative Showcase. I hope you are surviving isolation at this difficult time and that this Creative Showcase not only is a distraction but that it gives you joy.

Welcome to the Art With Heart Stampin’ Up! Team Monthly Creative Showcase. The theme for this month’s showcase is Mother’s Day. Under the current conditions, Mother’s Day this year is going to be completely different to any other Mother’s Day celebrations. Our mothers give of themselves for us and it is important to recognise not only what they do but often their sacrifice for us. 

The Art With Heart Team are hoping to share a little Mother’s Day love and inspiration with you tonight.

My mother is no longer alive, but I remember her with so much love and appreciation. My father died when I was young and so my mother dedicated herself to bringing up her two young children by herself. She was such an inspiration and I do miss her. While I can't give her a Mother's Day card, I did think of her as I created this card. I think she would have liked it.

Positive Thoughts, Andrea Sargent, Stampin Up, Art with Heart, AWHT, Creative Showcase, blog hop, stencilling

The design for the card has been based on an Artistic Trading Card that I created recently. You may be saying "what is an Artistic Trading Card (ATC)?". It is a card that is the same size as Sporting Trading Cards but it is focused on artistic pursuits. A number of fellow Art with Heart Team members take up a challenge each month to create ATCs based around a technique or a theme and then we share our ATCs with each other. This recent ATC Challenge was to use a stencilling technique that included outlining. This technique was demonstrated by the amazing Jackie Aitkin, a Western Australian Demonstrator, as she was finishing her time as a member of the world-wide Stampin' Up! Artisan Team on the 1st of January 2020. It was uploaded by Stampin' Up! to Instagram.

Positive Thoughts, Andrea Sargent, Stampin Up, Art with Heart, AWHT, Creative Showcase, blog hop, stencilling

A card base and the card front were cut from Very Vanilla card-stock. Soft Sea ink was applied to the leaf-like stencil from the Basic Pattern Decorative Masks with a Sponge Brayer. The depth of applied colour varied from lighter at the top RHS to darker in the lower LHS of the card front. Once the ink dries a marker or gel pen is used to outline the inked design - I only outlined the lower edge of the darker stencilled areas of the design with a gold gel pen. Where the stencilling is lighter only a dash or dot of gold was added - this is an adaption of the technique.

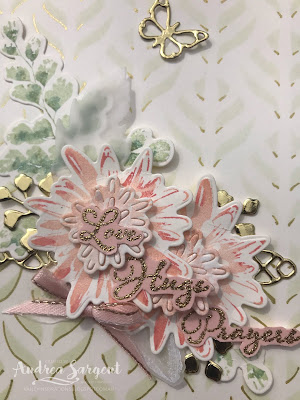
Using a Stamparatus, leaves and flowers from the Positive Thoughts stamp set were inked with markers to give a variegated colour effect. Soft Sea Foam and Pear Pizzazz was used for the leaves and Petal Pink with touches of Flirty Flamingo for the flowers. The flower centre used Petal Pink and Whisper White Craft ink. During Salebration Stampin" Up! released Natures Thoughts dies that coordinated with this stamp set. These dies were used to cut the leaves, flowers, Gold Foil accents and Vellum feathers. The die cut elements were either adhered with Tombow Liquid Glue or popped up with Dimensionals. A small bow was tied in Metallic Edge Petal Pink Ribbon and tucked under one of the flowers with a Glue Dot. The sentiment, from the same stamp set, was stamped in Versamark and heat embossed with Gold Emboss Powder. The sentiment was fussy cut and adhered with Mini Dimensionals over the flowers. A Gold Foil butterfly was added as a final touch.


Fine Gold Foil strips were adhered to either side of the card front and then the card front was adhered to the card base with Dimensionals.


Here is a close up of the focal floral arrangement and sentiment.

Positive Thoughts, Andrea Sargent, Stampin Up, Art with Heart, AWHT, Creative Showcase, blog hop, stencilling

I love to decorate the inside of the card in a way that links with the card front. I added 2 thin strips of gold foil on each side of the card centre and also added a flower, some leaves and a little gold butterfly.

Positive Thoughts, Andrea Sargent, Stampin Up, Art with Heart, AWHT, Creative Showcase, blog hop, stencilling

Card 2
I love my pets and have found that dogs I meet, whether when visiting friends or when I walk my dog, quickly pick up that I am a dog tragic. I say that by way of introduction - a friend's dog "asked" me to create a Mother's Day card from him to his Mum (my friend). I will post the card so that it arrives in time for Mother's Day on Charlie's behalf. Charlie's Mum loves, loves, loves shoes so the Dressed to Impress bundle was perfect as the inspiration for this Mother's Day card. I CASEd a card displayed on page 54 in Stampin' Up!'s Mini Catalogue, but translated it as a fancy fold and also changed various components. Oh no ... I have just realised that when taking these photographs I forgot to take one or two showing the side view. I may not have a chance to take and add sideview photos by the time this blog goes live but will add extra photos tomorrow. My apologies. It has been a strange day with a number of unplanned things occurring and I just didn't think about taking side views until now.

Best Dressed, Dressed To Impress, Andrea Sargent, Stampin Up, Art with Heart, AWHT, Creative Showcase, blog hop, fancy fold

Two pieces of Petal Pink card-stock were cut and scored for the card base. The gorgeous Best Dressed Designer Series Paper (DSP) was chosen and two different designs were mounted on the card base pieces. One of the floral designs covered sections of the background and extra flowers were fussy cut from that DSP. A more subtle design of DSP was used for the card front to show off the focal fussy cut handbags and shoes. The box used to help the card stand, was formed at the bottom by folding along the scoring on the larger piece of card-stock and then adhering the flap back onto the cardbase. The smaller piece of card-stock was also folded along the score-lines and then adhered in place. Two strips of Whisper White card-stock were die cut with a stitched die from the All Dressed Up dies. The white strips and the fussy cut shoes, handbags (from another piece of DSP) and flowers were arranged and either adhered flat or popped up on Dimensionals. The sentiment was white heat embossed using White Emboss powder and cut out with one of the stitched dies from the same die set. To finish the card, a little Wink of Stella was flicked to give a gentle sprinkle of glitter. (This was not picked up by the camera.)

Here is a close up of part of the card front.

Best Dressed, Dressed To Impress, Andrea Sargent, Stampin Up, Art with Heart, AWHT, Creative Showcase, blog hop, fancy fold

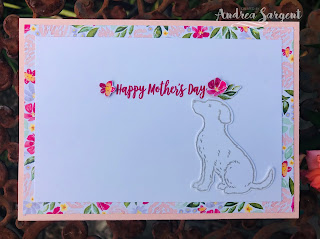
Given the design of this fancy fold card, there is not a card inner but the panel at the back of the card will be used to write Charlie's greeting to his mother.  A piece of DSP, matching one of the Best Dressed Designer Series paper designs used on the card front was cut a little smaller than the back panel of the card and adhered in place. A smaller piece of Whisper White card-stock was adhered. The "Happy Mother's Day" sentiment was stamped in coordinating Lovely Lipstick ink. In recognition that the card is from Charlie, a dog from the Happy Tails stamp set was stamped in Smoky Slate ink and punched out using the Dog Builder punch. This dog doesn't look like Charlie - I don't have a greyhound stamp. I had hoped to colour the dog on the card in Charlie-like colours, but I ran out of time in my topsy turvy day. A couple of tiny flowers were fussy cut and adhered to further tie the card back to the card front.
Best Dressed, Dressed To Impress, Andrea Sargent, Stampin Up, Art with Heart, AWHT, Creative Showcase, blog hop, fancy fold

I hope these cards have given you some ideas, and some smiles.

To all the Mothers, I hope you have a special Mother's Day, even in the midst of this strange time. Thank you for all you do for your families. You are amazing.

Best Dressed, Dressed To Impress, Andrea Sargent, Stampin Up, Art with Heart, AWHT, Creative Showcase, blog hop, fancy fold


The next demonstrator to share her Mother’s Day project is the amazingly talented Kathryn Mangelsdorf at Kathryn's Crafting World. I'm so looking forward to seeing Kathryn's card.
I'm blessed to be apart of such a talented team. Knowing each of my colleagues in this blog hop, I am sure that they will have delightful Mother's Day projects. Don't miss checking out each of their blogs. If you have a broken link or have come to this blog hop midway, you can view all the participants below. Click on their names to be taken to their respective blogs:

Andrea Sargent  << You are here

Take care everyone. Stay home, stay safe and stay well. If you are struggling then please reach out to trusted friends and talk about what is happening and how you feel. Social media is available to help you stay connected and there is always a phone call. You are important.

Thank you for calling in. I so appreciate you spending time with me.


Andrea 💕🐾

Saturday, 11 April 2020

Social Stamping - #3 Rainbows

"Rainbows" using Watercolour, Crafting Forever and It Starts with Art  

So glad you have dropped into Valley Inspirations as part of the Social Stamping Blog Host. I hope you are staying well and are coping in this interesting time and self isolating as much as you are able. As I have said previously, I am so thankful to have paper crafting as a hobby. There is always something new to experiment with and creating the card for this Blog Hop is no exception.


Welcome to the 3rd Social Stamping Blog Hop. This week the blog hop theme is "rainbows". Rainbows have become a symbol of connectedness during these times of isolation and aligns with the theme of "we're all in this together".

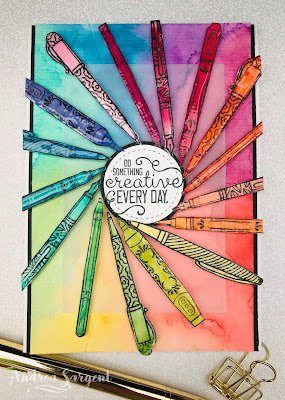
This week's topic was a lot of fun. I love rainbow colour combinations but had never paper crafted using this theme.  The fun multiplied as I decided to try out a watercolour technique that I saw recently - more of this later. Here's my card:


2020, Andrea Sargent, blog hop, Rainbows, Social Stamping, Watercolour, Crafting Forever, It Starts with Art, Stitched Shapes, Circle Punch, vellum,

The Watercolour technique I used for colouring the pens was demonstrated recently by Emma Goddard, who is a UK Stampin' Up! Demonstrator and part of the Artisan Team. I put some ink from my Stampin' Up inkpads on the edge of a large clear block and then spritzed the ink with some water. I cut one finger off a thin rubber glove and put it on my index finger and touched the tip of my covered finger into the watercolour and then dabbed each colour on one of the pens that had previously been stamped with Stazon ink. As I was colouring all the pens it occurred to me how much I was enjoying myself and realised it was taking me back to my childhood and the joy of finger painting. The difference this time was that my hands were relatively clean when I finished. The card background was created with a more traditional watercolour process using an aqua painter.


2020, Andrea Sargent, blog hop, Rainbows, Social Stamping, Watercolour, Crafting Forever, It Starts with Art, Stitched Shapes, Circle Punch, vellum,


Now to how the card was the created. I stamped the pens and other writing implements (ie pencil, highlighter or pen - henceforth referred to as "pens") using 2 different stamp sets, that is Stampin' Up!s Crafting Forever and It Starts With Art. Both sets had a stamp of 3 pens. Each image was stamped 3 times in Stazon ink on Watercolour paper. Initially the pens from Crafting Forever were coloured as described above using Real Red, Calypso Coral, Daffodil Delight, Garden Green, Bermuda Bay, Pacific Point, Gorgeous Grape, Blackberry Bliss inks. The other pens from It Starts With Art set were coloured by mixing each of the colours listed above with the colour next to it, eg Daffodil Delight with Garden Green to create a more yellow-green. Each pen was painted with one to the mixed colours. They were left to dry thoroughly before fussy cutting each one out. I had ink remaining on the large clear block so I decided to watercolour the background with an aqua painter on watercolour paper.


2020, Andrea Sargent, blog hop, Rainbows, Social Stamping, Watercolour, Crafting Forever, It Starts with Art, Stitched Shapes, Circle Punch, vellum,

A piece of vellum was die cut using the rectangular die from Natures Thoughts dies  and centred on the watercolour background. The card front was mounted on Basic Black card-stock.

The sentiment from Crafting Forever was stamped on Whisper White card-stock with Momento ink and cut out using a stitched circle die from the Stitched Shapes dies. A circle was also punched out of Basic Black card-stock with a 1 1/2" circle punch. The sentiment was mounted on the black circle and adhered in the centre of the card front using Dimensionals

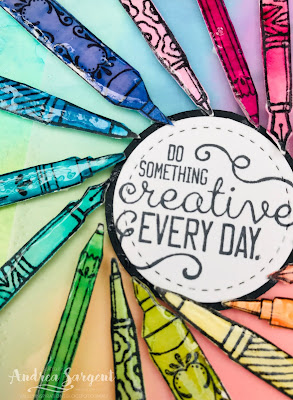
Each of the fussy cut pens were covered with Shimmery Crystal Effects and left to dry to give them a shiny surface, to be reminiscent of the implements themselves. Mini Dimensionals were added to the back of the pens and each pen was placed at an angle around the centre sentiment in colour order. The positioning was by guesstimate as I couldn't find the appropriate positioning tool. (I looked for my wreath builder template - but it was hiding! Such is life.) Where some of the pens jutted out over the card front they were trimmed to align with the mounted card front.

Here is a close-up of the pens/card centre:

2020, Andrea Sargent, blog hop, Rainbows, Social Stamping, Watercolour, Crafting Forever, It Starts with Art, Stitched Shapes, Circle Punch, vellum,

The card front was adhered to a Thick Whisper White card base using Dimensionals.

I love carrying the theme of the card front to the inside of the card and so stamped a sentiment from the It Starts With Art stamp set on Whisper White card-stock in Momento ink. A pen, that had been previously watercoloured with the 8 colours (listed above), was adhered so the tip of the pen touched the end of the sentiment. The white centre panel was mounted on 2 thin strips of Basic Black card-stock and then adhered directly to the card base.


2020, Andrea Sargent, blog hop, Rainbows, Social Stamping, Watercolour, Crafting Forever, It Starts with Art, Stitched Shapes, Circle Punch, vellum,

I had hoped to have another card or 2 to share with you but time has run out. So many ideas ... so little time! 

I find cards using rainbow colours communicate "Happiness". I learnt a number of things as I created this card and even though there are aspects that I may change next time I do something similar, I did enjoy playing with rainbow colours. I hope you are enjoying this Rainbow Social Stamping Blog Hop.

Thank you so much for visiting my blog. The next blog showcases the rainbow creation of the very lovely Sheila who is at Stand Up Stamper


To go to the full list of participants click here.

I hope you find blessings in unexpected places this Easter. It may not be our normal form of celebrations but I do hope your heart is touched in some special way.

Stay home, stay safe and stay healthy everyone. I look forward to blog hopping with you again.


Saturday, 4 April 2020

Social Stamping - Thank You

"Thank you" with Ornate Garden Suite

So glad you have dropped by to check out my blog as part of the Social Stamping Blog Host. I hope you are staying well and are coping with staying home and self isolating as much as we can. I am so thankful to have paper crafting as a hobby. There is always something to experiment with and to enjoy creating. 


This week's Social Stamping theme is "Thank You". It's a great theme and especially appropriate for me, as there are a number of folk I need to thank. As soon as I saw the theme I immediately knew what Suite of products I would be using - Stampin' Up!'s newly released Ornate Garden Suite. I hadn't had a chance to play with it since it arrived in my home and as the Ornate Thanks sentiment stamp set focusses on saying "Thank you" it was so appropriate for this blog hop. I wonder whether the others in the Blog Hop think the same thing?  I created this card with a special couple in mind who recently blessed me so much, helping me when I was struggling.


Andrea Sargent, Stampin Up, 2020, Ornate Garden, Blends on Vellum

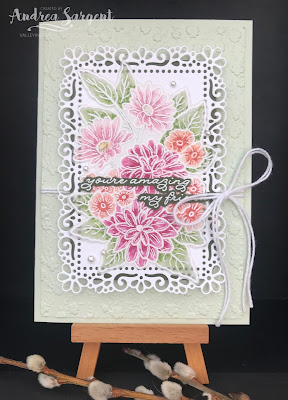
This card has a base of Soft Sea Foam card-stock, with the background layer that has been  dry embossed with the Ornate Floral 3D Embossing Folder - its so pretty. The card design focusses on the large floral image from the Ornate Style stamp set. It was stamped in Versamark ink onto Vellum and heat embossed using White Emboss powder.

Andrea Sargent, Stampin Up, 2020, Ornate Garden, Blends on Vellum

The Vellum embossed image was turned to the back and Stampin Alcohol Blends were used to colour the image. The Blends I used were Soft Sea Foam, Granny Apple Green, Petal Pink, Calypso Coral, Flirty Flamingo, Rococo Rose, Lovely Lipstick, and Rich Razzleberry using both light and dark of each colour. After the image was coloured, it was fussy cut. The close up below provides a better look at the finished floral image.


Andrea Sargent, Stampin Up, 2020, Ornate Garden, Blends on Vellum

The floral image has been framed on a filigree edged die cut from Whisper White card-stock using the second largest die from the Ornate Layers dies. To give it some depth on the Soft Sea Foam background a piece of Mossy Meadow card-stock was cut to a size just big enough to be partially seen under the filigree edging but not extending past the edge. I initially tried making the Mossy Meadow piece bigger but it seemed to overpower the delicateness of the focal Floral image.

Andrea Sargent, Stampin Up, 2020, Ornate Garden, Blends on Vellum

In assembling the card, I tied a double piece of Whisper White Bakers Twine around the dry embossed background and then adhered it to the card base. The Mossy Meadow piece of card-stock was adhered behind the Whisper White die cut piece and this was popped up on the card front with Dimensionals. The Vellum image was adhered with liquid glue, which was sparsely applied with a sponge. Sentiments from the Ornate Thanks stamp set were heat embossed in white on Mossy Meadow card-stock and fussy cut; then adhered flat onto the image. To finish off a Whisper White Bakers Twine bow was added to one side with a Glue Dot and a few Basic Pearls scattered around.

Andrea Sargent, Stampin Up, 2020, Ornate Garden, Blends on Vellum

I always like to ensure the card inner compliments the card design. The inner sentiment also came from the Ornate Thanks stamp set and was stamped in Mossy Meadow and Granny Apple Green ink. The Whisper White card-stock was mounted on a slightly larger piece of Mossy Meadow card-stock and both were adhered flat on the card base. Like the card front, the flower was white heat embossed on Vellum, coloured with Blends on the back and then adhered flat on the card.


Thank you so much for visiting my blog. The next blog takes you back to the beginning of this Social Stamping Blog Hop to the amazing and talented Kelly Kent at My Papercraft Journey


To hop back to the full list of participants click here.

Stay home, stay safe and stay healthy everyone. I look forward to blog hopping with you again.


AWH Colour Creations Blog Hop #36 Moody Mauve

Moody Mauve with Beautiful Butterflies Hello. Welcome to  Valley Inspirations with Andrea  and the  Art with Heart Colour Creations Blog Hop...