So glad you have dropped into Valley Inspirations as part of the Social Stamping Blog Host. I hope you are staying well and are coping in this interesting time and self isolating as much as you are able. As I have said previously, I am so thankful to have paper crafting as a hobby. There is always something new to experiment with and creating the card for this Blog Hop is no exception.
Welcome to the 3rd Social Stamping Blog Hop. This week the blog hop theme is "rainbows". Rainbows have become a symbol of connectedness during these times of isolation and aligns with the theme of "we're all in this together".
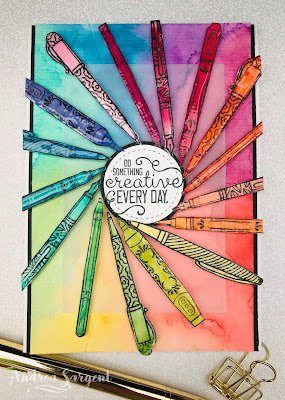
This week's topic was a lot of fun. I love rainbow colour combinations but had never paper crafted using this theme. The fun multiplied as I decided to try out a watercolour technique that I saw recently - more of this later. Here's my card:
The Watercolour technique I used for colouring the pens was demonstrated recently by Emma Goddard, who is a UK Stampin' Up! Demonstrator and part of the Artisan Team. I put some ink from my Stampin' Up inkpads on the edge of a large clear block and then spritzed the ink with some water. I cut one finger off a thin rubber glove and put it on my index finger and touched the tip of my covered finger into the watercolour and then dabbed each colour on one of the pens that had previously been stamped with Stazon ink. As I was colouring all the pens it occurred to me how much I was enjoying myself and realised it was taking me back to my childhood and the joy of finger painting. The difference this time was that my hands were relatively clean when I finished. The card background was created with a more traditional watercolour process using an aqua painter.
Now to how the card was the created. I stamped the pens and other writing implements (ie pencil, highlighter or pen - henceforth referred to as "pens") using 2 different stamp sets, that is Stampin' Up!s Crafting Forever and It Starts With Art. Both sets had a stamp of 3 pens. Each image was stamped 3 times in Stazon ink on Watercolour paper. Initially the pens from Crafting Forever were coloured as described above using Real Red, Calypso Coral, Daffodil Delight, Garden Green, Bermuda Bay, Pacific Point, Gorgeous Grape, Blackberry Bliss inks. The other pens from It Starts With Art set were coloured by mixing each of the colours listed above with the colour next to it, eg Daffodil Delight with Garden Green to create a more yellow-green. Each pen was painted with one to the mixed colours. They were left to dry thoroughly before fussy cutting each one out. I had ink remaining on the large clear block so I decided to watercolour the background with an aqua painter on watercolour paper.
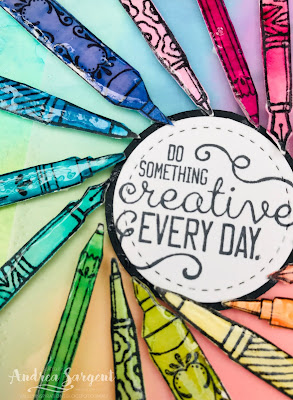
The sentiment from Crafting Forever was stamped on Whisper White card-stock with Momento ink and cut out using a stitched circle die from the Stitched Shapes dies. A circle was also punched out of Basic Black card-stock with a 1 1/2" circle punch. The sentiment was mounted on the black circle and adhered in the centre of the card front using Dimensionals.
Each of the fussy cut pens were covered with Shimmery Crystal Effects and left to dry to give them a shiny surface, to be reminiscent of the implements themselves. Mini Dimensionals were added to the back of the pens and each pen was placed at an angle around the centre sentiment in colour order. The positioning was by guesstimate as I couldn't find the appropriate positioning tool. (I looked for my wreath builder template - but it was hiding! Such is life.) Where some of the pens jutted out over the card front they were trimmed to align with the mounted card front.
The card front was adhered to a Thick Whisper White card base using Dimensionals.
I love carrying the theme of the card front to the inside of the card and so stamped a sentiment from the It Starts With Art stamp set on Whisper White card-stock in Momento ink. A pen, that had been previously watercoloured with the 8 colours (listed above), was adhered so the tip of the pen touched the end of the sentiment. The white centre panel was mounted on 2 thin strips of Basic Black card-stock and then adhered directly to the card base.
I had hoped to have another card or 2 to share with you but time has run out. So many ideas ... so little time!
I find cards using rainbow colours communicate "Happiness". I learnt a number of things as I created this card and even though there are aspects that I may change next time I do something similar, I did enjoy playing with rainbow colours. I hope you are enjoying this Rainbow Social Stamping Blog Hop.
Thank you so much for visiting my blog. The next blog showcases the rainbow creation of the very lovely Sheila who is at Stand Up Stamper
To go to the full list of participants click here.
I hope you find blessings in unexpected places this Easter. It may not be our normal form of celebrations but I do hope your heart is touched in some special way.
Stay home, stay safe and stay healthy everyone. I look forward to blog hopping with you again.


WOW! What an amazing card Andrea! I just love it! The colours and the design! Fabulous.
ReplyDeleteThank you so much Sharni. I appreciate it.
DeleteNo wonder you ran out of time- there's so much time and effort gone in to creating this one, it's definitely a happy card. Thanks for all the painting tips, and a great sentiment to follow.
ReplyDeleteLovely, bright and colourful. A great collection of different techniques. Chantell
ReplyDeleteWowsers. This is amazing!! I love the glossy effect on all those pens. Such an inspirational card!!!
ReplyDeleteOh I love this! Great background and the pens look great. A lot of fussy cutting!
ReplyDeleteOh how fun! I am loving seeing all this happy rainbow designs. Your card is awesome.
ReplyDeleteAbsolutely beautiful! Great way to build a multilayered rainbow - I love it! Great tips for the watercolouring technique. Thanks for sharing! Kelly x
ReplyDelete