Hello. Welcome to Valley Inspirations with Andrea and the seventeenth Colour Creations Showcase with members of the Art with Heart Team.
We are gradually working through the alphabet of Stampin' Up!s colours and this week we are starting on he colours with "G" and will be focussing on Garden Green, a rich green that sits within Stampin' Up!s Regals family of colours.
Garden Green can be found in Stampin' Up!s card-stock; Classic inks (both ink pads and re-inkers); Stampin' Write Markers; Watercolour Pencils; a range of Designer Series Papers; Wonder of the Season Memories and More card pack; the Boho Indigo Product Medley; and a couple of Project/Card kits.
I have created two cards this week - both wreaths, but the styles are different. I do love wreaths, so it has been fun to play with different expressions. I have used two of my favourite colouring techniques and tried a new one that I had seen Emma Goddard demonstrate.
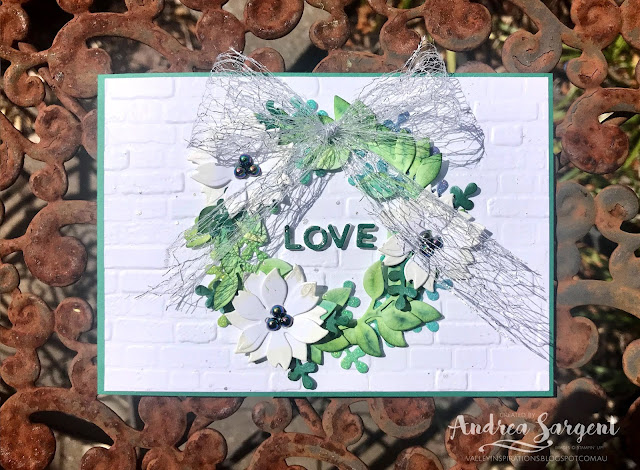
Card 1: I used the Arrange a Wreath bundle to create this card. It is a set that can be overlooked in Stampin' Up!s Annual Catalogue 2020-21 but it can create wreaths for a range of occasions and is just gorgeous. Using the Wreath Builder dies, one die was used to cut a wreath out of the Rainbow Glimmer paper. While this multicolour paper doesn't include Garden Green the colour combination coordinates very well with it. My exploration of the range of Stampin" Up!s colours through the Colour Creations Showcase has not only helped me better understand each colour, but also to learn more about colour coordination.
The leafy wreath die was used to cut two wreaths out of Shimmery White card-stock. These single wreaths were coloured with Garden Green, Granny Apple Green and Coastal Cabana Classic inks. Each of the ink pads were squished onto a block, which was then misted with water. Following Emma Goddard's instructions, I cut a finger off a thin glove and put this on my forefinger. The gloved finger dabbed into one of the inks and then onto parts of the die cut wreaths. The same process was used for each of the colours. I loved finger painting as a child, so the child within had a lot of fun, while the adult was happy that my finger remained "relatively" clean. The wet wreaths were left to dry. Colouring the wreaths in this manner allowed the wet ink to settle in the embossed leaf veins, which added to the colour effect.
Using the same die set the small poinsettia die cut a number of flowers from Whisper White card-stock; the twig die cut numerous twigs from Garden Green card-stock and Garden Green was also used to cut out the gorgeous heart with "Love" spelt within. Did you know that Stampin' Up! has Foam Adhesive Sheets? I also used one to cut out the heart die so I could add dimension to the "LOVE" letters. Check out the effect - isn't it great!
One of my favourite colouring techniques is to sponge die cut pieces to add shading or interest in some way. The tips of the poinsettia petals were sponged with Frost White Shimmer paint, while all the other die cuts were sponged with both Garden Green Classic ink and White Craft ink. With all the pieces ready the wreath was arranged onto a dry embossed Whisper White card front. The Brick & Morter 3D embossing folder was used for the embossing.
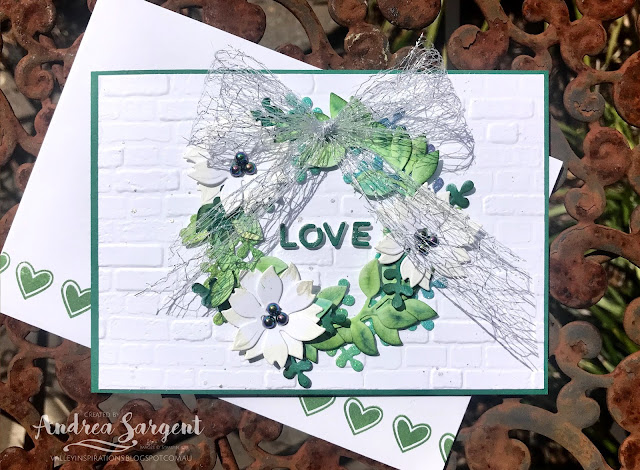
The card front was adhered to a Garden Green card-stock base. To finish off the card design Wink of Stella was painted over the sentiment "Love" and then flicked over the card. A shimmery bow was tied with Metallic Mesh Ribbon and Iridescent Pearls were popped at the centre of the poinsettias.
The Garden Green die cut heart was adhered to a Whisper White card inner and as time was running out, I wrote in my own scrawl following the "love" within the heart, "came down at Christmas". If I had had more time I would has stamped the words using the Make a Difference stamp set. I will be writing in the card to give it away at Christmas, so at least the writing will match and not look as out of place as it does now. Little hearts were stamped along the base of the C6 Whisper White envelope in Garden Green Classic ink.
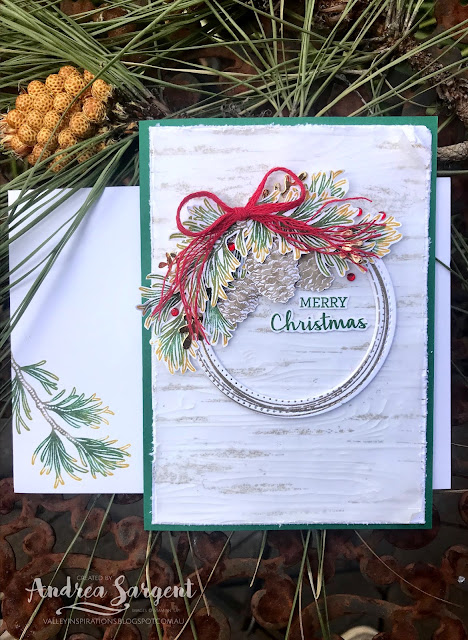
CARD 2: The next card has a bit of a rustic feel, although I couldn't resist some metallic shine and rhinestone sparkle. The background of the card was Whisper White card-stock stamped in Sahara Sand Classic ink with the Birch stamp. Even though I stamped off first, it was still darker than I wanted, so a piece of dry embossed Vellum card-stock was placed over the background piece. To reinforce the rustic look the card-stock edges were ruffed up and a corner was rubbed, divided and curled.
The largest circle stamp from the Swirly Frames set was stamped in Versamark ink on Whisper White card-stock and heat embossed with Gold Stampin' Emboss powder. The swirly circle was die cut with the largest two circle dies from the Stitched Shapes die set. Another three card-stock rings were also die cut and layered one on top of the other to give the gold embossed swirly circle a little stability and dimension.
Two of the pine sprigs from the Peaceful Boughs stamp set were coloured with Stampin' Write Markers and stamped on Whisper White card-stock. Colouring the stamps with markers is another of my colouring favs. I like to use my Stamparatus and build up the image in stages with a number of colours. I used Garden Green, Mossy Meadow and Crushed Curry on the pine spikes and Crumb Cake and Soft Suede Markers for the twigs. Two sets of two sprigs were coloured and then fussy cut as the coordinating dies didn't cut these out. Three small pine cones were stamped similarly. I already had a few pre-die cut brass metallic twigs on my desk that I decided to use.
The pieces were arranged near the top of the "wreath" and held in place with Multipurpose Liquid glue and Mini Dimensionals. Garden Green is one of the greens that works so well for Christmas and looks great with red, so a bow of the Real Red Braided Linen Trim was added with the ends unravelled.
As the red bow was the only red on the card, a number of Red Rhinestone Jewel Basics were added around the decorated part of the wreath. As a colleague of mine acknowledged last week, it is so easy to spend time on the placement of embellishments and in this case ... 3 didn't seem enough; would 5 be better; hmm, perhaps another 2; oh ... to many I think - remove 2; then to rearrange these touches of glimmer. And it looks so simple!
The sentiment came from the Arrange a Wreath stamp set and was stamped in Garden Green Classic ink on Whisper White card-stock. Not wanting to block the background from showing through the wreath, the sentiment was fussy cut. The card front was adhered directly to the Garden Green card-stock base.
A beautiful sentiment from the Peaceful Boughs stamp set was stamped in Garden Green Classic ink on the Whisper White card inner. A pine sprig was stamped near the bottom of the card inner and on the C6 Whisper White envelope. They were coloured in the same way of the pine sprigs on the front of the card.
Thank you so much for spending time with me. I do so appreciate you.
Catherine Proctor is our amazing host of the Art with Heart Colour Creations Showcase. If you haven't finished visiting all of the team's colour creations, you can visit/revisit Catherine's page at What Cathy Made, where she hosts all the links to the other Showcase participants. I'm certainly looking forward to checking out everyone's Garden Green creations. It is always inspiring to see the amazing projects created by others and their interpretations of showcasing the specified colour.
I hope to see you again next week when members of the team will share projects that hero Gorgeous Grape.
Do look after yourself and your loved ones. Stay well, stay safe and be kind to yourself and others in these strange times.
Andrea 💕🐾


Gosh, Andrea, you've made Garden Green really shine on your cards! I especially love the way you coloured the wreath on your first card; and the process sounds like a lot of fun. Such a beautiful effect.
ReplyDeleteTwo absolutely gorgeous cards Andrea. I particularly love all the layers on the those fantastic 'textured' backgrounds. Your matching 'insides' and envelopes are lovely too.
ReplyDeleteYour cards are wonderful, Andrea! Both wreaths are spectacular. I'm glad I'm not the only one who agonises over the placement of embellishments!
ReplyDeleteLovely cards Andrea, so many gorgeous details.
ReplyDeleteGorgeous cards Andrea. I love all that texture and the layers.
ReplyDeleteYour cards are gorgeous, Andrea - just love how you teamed Garden Green with all the different colours and textures!! I love your backgrounds of the brick embossing and the birch stamp especially!!
ReplyDeleteOh Andrea, I love both of your cards as I love a good Christmas wreath and card but I am particularly drawn to your second card and how you put all the elements together on that one. It is stunning! Beautiful cards!
ReplyDeleteThey're both beautiful. I've been wondering how to use that lovely sparkly ribbon - looks fab on a wreath.
ReplyDeleteWow Andrea, these cards are magnificent. I love the colouring techniques on both , especially the Crushed Curry tips of your pine boughs. Thank you so much for joining the Colour Creations Showcase this week and inspiring us all with your creations xx
ReplyDeleteAh, gorgeous wreath cards, Andrea. How amazing your first one looks on that brick wall, what an awesome idea! I do love that gigantic bow too, but I also love your next card with the pine cones. We always had pine cones in our open fire place for Christmas.
ReplyDeleteAndrea, your cards are always so lovely and your efforts in creativity and different techniques are so inspiring.
ReplyDeleteBeautiful Andrea, I love your wreaths I also have trouble with placement by your cards are so will balanced.
ReplyDeleteAbsolutely beautiful cards Andrea. I actually can't say which is my favourite as I love them both. Thanks for your detailed explanation of how you put the first wreath together. Just beautiful
ReplyDelete