Pretty Peacock with Arrange a Wreath and Today's Tiles
Hi. Welcome to Valley Inspirations with Andrea and the 37th 2020/2021 Colour Creations Showcase by members of the Art with Heart Team.
This week we are focussing on a a deep teal blue green called Pretty Peacock. Pretty Peacock is one of Stampin' Up! 2019-2021 In Colour collection. It is a beautiful deep rich colour that is a delight to use. Pretty Peacock can be found in Stampin' Up!s card-stock, both A4 & 12"x12"; Classic Stampin' inks (ink pads, re-inkers); Stampin' Write Markers; Stampin' Blends, some Designer Series Papers, including the Forever Greenery and Whale of a Time DSP, Pretty Peacock Scalloped Linen Ribbon, the delightful Pretty Peacock/Old Olive Reversible Ribbon, Woven Threads Sequin Assortment and Butterfly Gems.
I've created two different cards this week, both featuring Pretty Peacock, however, the colour schemes and techniques are different. The first card includes water-coloured die cuts with minimal stamping, while the second card uses layered 2-step stamping and heat embossing.
CARD 1:
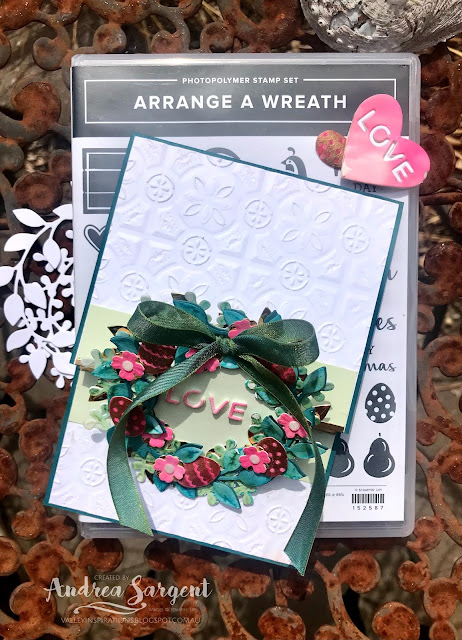
The oh so gorgeous Pretty Peacock/Old Olive Reversible Ribbon was the inspiration for this first card. The ribbon features Pretty Peacock with an Old Olive tinge on one side and the reverse on the other side, both with a metallic sheen. Also, I recently saw a video creating different styles of easel cards and was intrigued to try an upright wreath easel card. This is my version using quality Stampin' Up! products.
The Pretty Peacock cardstock card base was scored in half, folded and burnished - as normal. Approximately 5cm was trimmed off the front flap of the card base. A card front was prepared in Basic White card-stock and cut in two at the same point as the front of the base. Both pieces of the card front were dry embossed using the Tin Tile 3D embossing folder. The bigger piece was directly adhered to the top section of the card and the other piece adhered to the card base, ensuring that when the card is closed flat embossed white card-stock is fully seen.
Using the two different wreath dies from the Wreath Builder dies, one of each was cut from Shimmery White card-stock and a third from Brass Foil using the leafy wreath die. The leaf Shimmery White wreath was water-coloured with Pretty Peacock Classic Stampin' ink refill adding touched of Old Olive ink and the spriggy wreath was water-coloured with Old Olive with touches of Pretty Peacock. Extra wreaths were cut from Basic White card-stock and they were adhered directly to the underneath of the water-coloured wreaths to add extra strength. The wreaths were layered and adhered together.
A strip of Shimmery White card-stock was water-coloured with Cherry Cobbler Classic Stampin' ink, ensuring some variation of depth of colour. Once dry, Easter eggs from the Arrange a Wreath stamp set were stamped in Versamark ink and heat embossed using Gold Stampin' Emboss Powder. The eggs and some little flowers were die cut from the water-coloured strip using the coordinating Wreath Builder dies. Little flowers were also die cut from Brass Foil. Each water-coloured flower was layered with a brass flower. Also cut from the Cherry Cobbler water-coloured strip (that had been mounted on a piece of Foam Adhesive Sheet) was a heart with letters spelling "LOVE" cut out.
The eggs and flowers were arranged around the wreath, with a bow of the Reversible Ribbon being adhered at the top with a couple of Glue Dots. Small white Elegant Faceted Gems were added to the centre of each flower. A Soft Sea Spray die cut circle (cut using the Layering Circle Dies) was adhered to the back of the wreath. A smaller circle, die cut from Pretty Peacock card-stock was folded in half and with one half adhered to the underneath side of the card front. The other half of the circle was adhered to the upper centre of the back of the wreath - thus forming the hinge for the wreath. The cut out water-coloured lettering was adhered to the centre of the wreath.
I loved creating a different version of an easel card. I learnt along the way, so will make changes to my next card, including moving the layered section further down so the easel wreath sits at an angle rather than at right angles to the card base. This has spiked my creativity and I am looking forward to further exploration of ideas.
CARD 2:
As I pondered the other project to create showing Pretty Peacock, my mind went to an uninked stamp set, Today's Tiles. I decided to combine Pretty Peacock with Pool Party and silver embossing.
I stamped the full stamp in Pool Party Classic Stampin' ink knowing that Pretty Peacock was a strong colour and could cover the lighter Pool Party. As this was my first use of the stamp set, I needed to stamp, re-ink and stamp again to attain good ink coverage. I then coloured each alternate tile using a Pretty Peacock Stampin' Write Marker - stamping one tile at a time. The stamping plate was moved 2 notches to stamp another set of 8 tiles adjacent to the first. You have to love Stampin' Up's attention to detail that ensured the tile width matched the Stamparatus width of 2 notches.
As the stamp had significant area that touched the paper, the Basic White card-stock moved each time I lifted the stamp, even though it was held with 3 bar magnets. I tried to re-align it back into the same spot, but as you can see in the close-ups, it wasn't exact all the time and led to a little shadowing on some of the Pretty Peacock tiles. I wasn't happy with my first attempt so started afresh, adding an extra bar magnet. It still wasn't perfect, but I needed to progress the card - forgetting that there would be close-up photos. Ah well, in sharing the imperfections it is showing areas to watch out for, if you give this a go. I'm certainly looking forward to playing again with this set and working out how to ensure the card-stock doesn't move.
I set up the second stamp designed to highlight certain aspects of the tile design. I stamped it in Versamark ink and then heat embossed the tiles using Silver Stampin' Emboss Powder. I then moved the stamp plate 2 steps along and added Versamark ink to the adjoining set of 8 tiles. Wow, I was so excited with the effect (I know, it doesn't take much for me to get excited.)
The stamped square of 4 by 4 tiles was trimmed close to the tiles. I mounted it directly on a slightly larger square of Basic White card-stock and then mounted it on larger square of Pool Party card-stock using Dimensionals. It was then adhered directly to the Pretty Peacock card-stock base. A sentiment from the same Today's Tiles stamp set was stamped in Versamark on Pool Party card-stock and heat embossed with Silver Stampin' Emboss Powder. It was trimmed to a strip that spanned the tile design and mounted onto a wider piece of Basic White card-stock. Some white twine from the Snail Mail Combo Pack was tied around the sentiment strip ending in a bow. This was popped up with Dimensionals over a strip of 4 tiles. The final touch was the addition of 3 clear Elegant Faceted Gems.
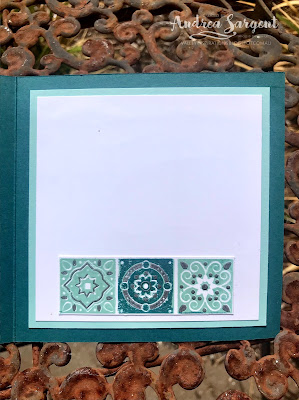
A piece of Basic White card-stock, mounted on Pool Party card-stock was adhered to the inside of the card. Three tiles from the discarded stamped tiles was added to carry the focal design through to the inside. As the card was not a standard size at about 12.5 x 12.5cm I custom-made an envelope using a piece of the Forever Greenery Designer Series Paper. A Basic White die cut oval was adhered to the front of the envelope for writing name & address.
I am looking forward to playing with this stamp set again and working to eliminate the imperfections. The coordinating dies are gorgeous and I have numerous ideas to include them on a project. So stay tuned ...
Catherine Proctor is the fantastic host of the Art with Heart Colour Creations Showcase. If you haven't finished visiting all of the team's colour creations, you can visit/revisit Catherine's page at What Cathy Made, where she hosts all the links to the participating blogs so you can find everyone's Pretty Peacock creations. Checking out everyone's creations and their interpretation of the amazing Stampin' Up! colours is always inspiring.
I hope to see you again next week when members of the team share projects that hero Pumpkin Pie, a strong orange.
Stay well, stay safe and be kind to yourself and others as these strange times continue.
Andrea 💕🐾


Andrea your cards are both so different but equally gorgeous. I love how the stamping, the cards stock and watercolouring of pretty peacock give such different tones. Thank you for sharing your pretty peacock projects with us tonight in the Colour Creations Showcase.
ReplyDeleteOh!! Wow! Wow! Wow! Andrea! Both cards are amazing! I love your "limited palette" which really showcases the strength of Pretty Peacock. Nice work!
ReplyDeleteTwo gorgeous cards, Andrea. Your Easter card is so beautifully bright, and a very clever design. That lovely ribbon had completely skipped my mind, when thinking of Pretty Peacock products to create with. Your second card is an "oh-my-goodness, WOW!" card. Such a beautiful colour combination (and the silver embossing takes it to another level). Your patience is admirable, getting all those tiles inked up! I love the end result.
ReplyDeleteI don't know where to start Andrea, both your cards are so gorgeous! I could stare at them for hours! I love the Easter Wreath card there is so much to look at and appreciate and all the different colourings then there is the tile card which is just STUNNING! Oh just beautiful! There are not enough words!
ReplyDeleteYou’ve done a beautiful job with the wreath and exceptional alignment of the stamped tiles and use of the two blue ink colours with the embossed silver. Well done!
ReplyDeleteOh wow, the work and detail in that first card is totally stunning, Andrea. It is just gorgeous. Thank goodness for the Stamparatus, to be able to line up all those tiles so perfectly. Amazing colours and I love the heat embossing on both cards.
ReplyDeleteOh my! I'm am totally gobsmacked by your first card - it looks very complicated, but absolutely stunning! I love the tile card too - the straight lines and colour combo are very pleasing to my brain.
ReplyDeleteAndrea I do love both of your stunning cards but the easel Easter wreath is just so very pretty. I appreciate the level of detail and the amount of work that has gone into creating such a beautiful card. Thanks for sharing.
ReplyDeleteThree WOW's for your cards Andrea, both of them are simply stunning! I'm in awe of that beautiful wreath card and then boom! - that tile card! Absolutely gorgeous and so much detail in both using lots of different techniques.
ReplyDeleteYou made 3 lovely cards but you've done an amazing job lining up the images perfectly in the tile card. It looks fabulous and is my favourite.
ReplyDelete