Basic Gray with Handsomely Suited
Hi. Welcome to Valley Inspirations with Andrea and the Art with Heart 2021-2022 Colour Creations Blog Hop. We are working our way through all the Stampin' Up! colours and focussing on one of the Stampin' Up! colours each week. We are currently progressing through the colours starting with "B". With this new round we are using a more traditional Blog Hop style, where we move to the next participant on the list. Just click on the "next" graphic near the end of this blog to go to the next participant. At the end of the blog there is a list of all of the participants in this week's blog hop where clicking on a name will take you to their particular blog.
I had numerous ideas when designing the Basic Gray projects. Is it quite a change, as I used to think of grey as an accompaniment to other colours but not a focal colour. More recently I have realised how lovely grey is to hero with another colour, for example yellow or pink. However, I decided to use some DSP incorporating Basic Gray with the Handsomely Suited bundle to create a gift bag/card and an easel card. I had been asked to incorporate a "male" card in one of next months card classes so decided to design it as part of this blog. Here are my projects:
PROJECT 1: GIFT BAG WITH CARD INCORPORATED
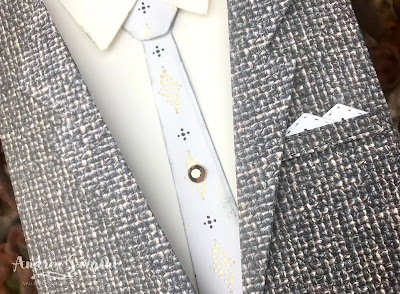
The gift bag was designed around a standard card front size. Two pieces of Basic Gray card-stock were cut with the addition of enough for the bag bottom. The bag sides (or gussets) were cut from a piece of the In Good Taste DSP that is reminiscent of woven fabric made with Basic Gray and a lighter brown. The DSP was cut wider than the needed gusset to include seams for adhering to the card-stock.
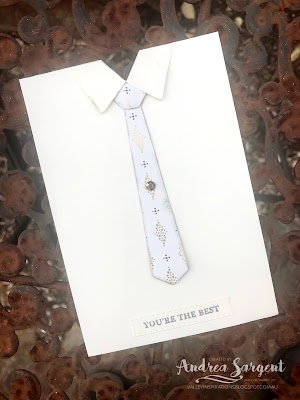
For the Bag/Card front, the DSP was cut with the dies from the Suit & Tie die set to form the suit and buttons were cut from Basic Gray card-stock. The card (Shirt front) was cut slightly smaller than the bag front from Very Vanilla card-stock and the collar was cut from the same card-stock. The tie was die cut from the Simply Elegant Speciality DSP and 2 tie ends were also cut from the same DSP to be reminiscent of coordinating hankies in the Jacket pocket.
The shirt collar, jacket lapels and pocket tab and the tie were adhered with a mix of Multipurpose Liquid Glue and Mini Dimensionals. Prior to adding the tie, a really light application of Basic Gray ink was added to the edge with a Sponge Dauber to give the tie greater definition. I think Smoky Slate ink would have been a better choice for sponging the edge. The buttons were popped up on small pieces of Dimensional.
I had so much fun designing & creating this bag with slip in card (your message is to be written on the back). I used some retiring Clever Clasps to close the gift back at the top. They are discounted and will be discontinued, so get in before the end of the month, or even sooner if they sell out. Don't delay as there are no similar clasps in the 2021-2022 Annual Catalogue.
The card base and card front was cut from Basic Gray card-stock. The card base was scored in half and then the front section in half again. The folds were burnished with a Bone Folder. The seperate card front was adhered to the bottom half of the front of the card base - thus forming the the basic easel mechanism.
The suit jacket was die cut from a piece of Well Suited DSP (as mentioned, this has just sold out). I will need to re-create this card for my coming class and will use the In Good Taste DSP so participants are able to access more DSP if they so choose. I will use the twill design, which will work well for a suit jacket. The shirt was cut from Basic White card-stock and the tie and hanky from the Simply Elegant Speciality DSP.
The 'suit' DSP was adhered directly to the shirt card-front and then the shirt collar was adhered with liquid glue and Mini Dimensionals. The jacket lapel was similarly adhered and 2 die cut Basic Gray buttons were added with little pieces of Dimensionals. The tie was tucked under the shirt collar and also under the bottom of the suit jacket. I added it at that point so it would sit neatly and centralised - the trick was to not adhere the jacket in that area, so the tie could tuck in. The die cut pocket with the touch of the SDSP for the hanky was adhered in place.
The shirt card front was snipped at the neck along the inside collar to indicate the neck line and then this "Suit" card front was adhered to the Basic Gray card-stock easel front.
To enable the easel front to stand, a piece of the suit DSP was adhered to a strip of Basic White card-stock that was the width of the card base. A thin strip of the SDSP to match the tie was adhered to the top of the strip - this could be reminiscent of a cumber bun. A birthday sentiment from the Handsomely Suited stamp set was heat embossed to a piece of Basic Gray card-stock using Versamark, White Emboss Powder and a Heat Gun. This was die cut with a small Stitched Rectangle die. This label was adhered directly in the centre of the suited DSP. This whole panel was popped up on Dimensionals, which provides a great stopper for the easel section.
As a finishing touch a white Elegant Faceted Gem was added to the tie. Ties from the same stamp set were stamped in Basic Gray ink on a C6 Basic White Envelope. As you know by now, I love small touches of the design added to the envelope to coordinate with the card.
There is more Basic Gray creativity. Click on the "next" graphic to be taken to the lovely Rosa Leyten's blog. I am looking forward to checking out Rosa's creation and everyone else's. If you started at the beginning with Michele Taylor you are getting close to the end of the hop but if you missed someone there is a list below with everyone who is part of tonight's Colour Creation Blog Hop.
Hope to see you next week when we will be featuring Bermuda Bay.


The gift box/card is awesome!
ReplyDeleteVery clever projects, Andrea! Those papers lend themselves perfectly to being made into jackets. The ties are great, too. Nice way to showcase Basic Gray. :)
ReplyDeleteBeautiful projects Andrea. I love the idea of the shirt card inside the jacket gift box
ReplyDeleteAndrea I am in total awe of your projects tonight and the amount of detail and thought that has gone into creating them - simply amazinq!
ReplyDeleteYour easel card looks sooo realistic. What an amazing use of the DSP. Well done on such fantastic projects xox
ReplyDeleteWow, love these! The card/gift bag is genius, and I love that paislet tie on your easel card.
ReplyDeleteSo much detail in your projects, Andrea, you have such a good eye for the smallest of detail. Your gift bag is such a clever way of adding the card and I love the DSP tie on your easel card.
ReplyDeleteWhat a stunning card and gift bag Andrea! That DSP used for the jacket looks so real. Also love the tie details.
ReplyDeleteWow, two awesome projects! Your suits look very dapper, especially with the gems on the ties and the hankies in the pockets. Great choice of DSP too.
ReplyDeleteWow, wow, wow Andrea - two fantastic projects! I love them both! So many realistic elements and very smart looking suit jackets. That gift bag is amazing and so clever.
ReplyDeleteOh wow Andrea, how snazzy is your card in the gift bag but I have to say the way you have used the DSP to look like a Pinstripe jacket in your second card is very effective.
ReplyDeleteAmazing projects Andrea! They are so realistic and very creative.
ReplyDeleteThese are the best projects I have seen using the Suit & Tie dies Andrea. Very clever. I also love the pop of foiling on the ties.
ReplyDeleteLoving the card/gift bag! Very clever!
ReplyDeleteThese are the most beautiful suit cards I have ever seen! thank you so much for sharing.
ReplyDelete