Garden Green with Sweet Candy Canes
Hello. Welcome to Valley Inspirations with Andrea and the Art with Heart Colour Creations Blog Hop. We are working though the Stampin' Up! colours in alphabetical order and are currently up to “G”.
This week’s Blog Hop is focussing on a mid green called Garden Green. Garden Green is part of the Regals Family and is, as the name suggests, a great green for garden or nature focused projects. This colour is lovely when used for leaves, at Christmastime (it usually goes with Real Red) and so much more.
Garden Green is produced in Stampin' Up!'s card-stock, both A4 & 12"x12"; Classic Stampin' inks (ink pads & re-inkers); Stampin' Write Markers; Watercolor Pencils; Regals Designer Series Paper as well as Sweetest Christmas, Gingham Cottage & Painted Christmas DSPs plus Real Red & Garden Green Ribbon Combo Pack, Adhesive-backed Seasonal Sequins; Cozy & Bright Kit; Today is the Day Memories & More Card Pack and Tea Boutique Cards & Envelopes.
My cards use Garden Green Classic ink, card-stock, Sweetest Christmas DSP, Real Red and Garden Green Ribbon Combo Pack and Adhesive Backed Seasonal Sequins (they have Garden Green sequins included but the green sequins were not used on this week’s cards). Here are my two cards featuring Garden Green:
As you can see both cards use the same Candy Cane dies and Sweetest Christmas DSP; the coordinating Christmas Banners bundle, the Real Red & Garden Green ribbon combo pack and the Adhesive-backed Seasonal Sequins.
CARD 1:
While featuring Garden Green, this card uses a colour combination from the Sweetest Christmas Designer Series Paper and a number of products coordinated within the suite.
The coloured top panel was layered onto the Garden Green card base with Dimensionals. The larger and second largest circular Stylish Shapes dies cut vellum and Basic White labels that were added to the centre of the card. The white label had been embossed with the Pine EF from the Wintry 3D Embossing Folders. A swoosh of Real Red ribbon from the Real Red & Garden Green ribbon combo pack was added and then 2 die cut candy canes from the Sweetest Christmas DSP were layered over with the top candy cane added with Dimensionals.
Pine fronds were cut in Soft Sea Foam card-stock using a die from the Christmas Banner die set. Some Garden Green ink was blended over theses die cuts before they were poked in here and there. A banner from the coordinating Christmas Banners stamp set was white heat embossed using White Emboss Powder, Versamark ink and a Heat Tool and a sentiment from the same stamp set was also white embossed. A number of red & white Adhesive-Backed Seasonal Sequins were added as the finishing touch.
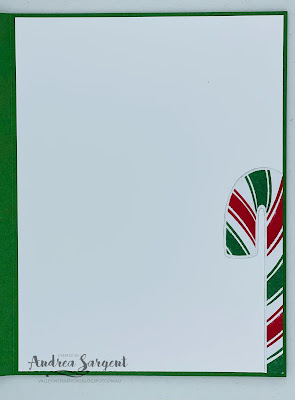
A partial candy cane from the edge of a sheet of the Sweetest Christmas DSP was adhered to a Basic White card inner. The flap of a Basic White C6 envelope had a section of coordinating DSP adhered. This adds a special touch to an envelope.
CARD 2:
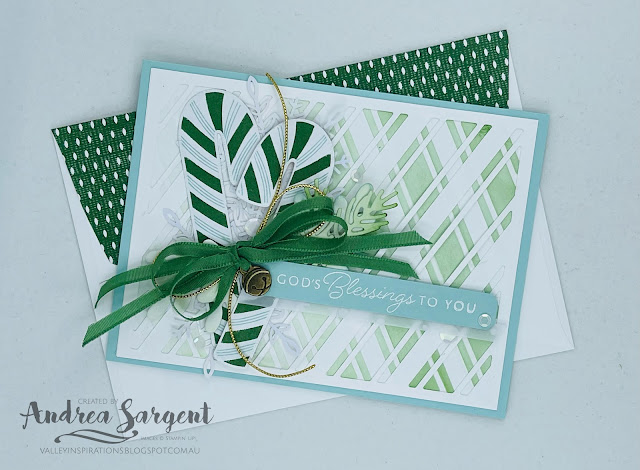
The second card uses the panel underneath the diagonal die cut panel that was coloured in an ombré fashion in Garden Green.
Another piece of Basic White card-stock was cut with the diagonal striped die and this was layered with the stripes going in the opposite directions. I love the effect this created. This panel was then adhered to a Pool Party card base. The colour combination for this second card is Garden Green, Pool Party and Basic White with touches of Gold and Antique Gold.
Two Garden Green & Pool Party candy canes were die cut from the Sweetest Christmas DSP, ensuring the candy canes face in opposite directions. Two Wonderful Snowflakes were adhered directly to the card front and the two candy canes added over, one adhered with Multipurpose Liquid Glue and the other with Dimensionals.
A strip of Garden Green/White DSP was added to a Basic White card inner. The same DSP was adhered to the back flap of a Basic White C6 envelope.
I really enjoyed creating the blended backgrounds, especially as the 2 were inked at the same time. The coordinating Sweetest Christmas DSP is great giving us the ability to die cut candy canes. The DSP is so happy and fun.
There is more Garden Green creativity. To continue with the blog hop, click the "onto the next" graphic below and be taken to the blog of my friend, the lovely Christine Blain. I always look forward to checking out Christine’s creations. I do love seeing everyones' projects - there is always so much inspiration.
I hope to see you next week when we will be featuring Gorgeous Grape, as we continue the weekly 2022-2023 Colour Creations Blog Hops. Also, don't forget that many of us are joining the Heart of Christmas Blog Hop on Monday evenings to share lovely Christmas projects to give you some ideas to help with your Christmas preparations.
Stay well, stay safe and be kind to yourself and others.
Andrea 💕🐾
If you find a broken link or have come to this blog hop from a different entry point, you can view the full list of participants on Catherine Proctor’s blog @ What Cathy Made. Cathy is our Art With Heart Team Colour Creations Coordinator. She is a special lady. Check out her delightful creation while you are there.
If you live in Australia, don't already have a Stampin' Up! demonstrator and would like your own copy of Stampin' Up's 2022-2023 Annual Catalogue and or the July - December 2022 Mini Catalogue then let me know and I will be delighted to send them to you. Please don't hesitate to make contact with any other queries about these projects or Stampin' Up!.
#colourcreationsbloghop #stampinup #stampinupaustralia #stampinupsouthpacific #stampinupdemo #handmadecards #makeacardsendacard #stampinupdemonstrator #papercrafting #artwithheartteam #papercrafter #stamper #valleyinspirations #sweetestchirstmas, #chirstmasbanners, #hopeandpeace


Wow, I love the two different cards you've made using that background die. The ombre inking is lovely, and I especially like the second card with the stripes in two different directions.
ReplyDeleteYour ombre blending on both cards gives such a wonderful effect, Andrea! I especially love the Garden Green ribbon and Gold Elegant Trim Bows tied with the bell trinket on your second card.
ReplyDeleteSuch lovely cards, Andrea! I really like the partial candy cane inside the first card - cute touch! Soft Sea Foam is a lovely complementary colour to use with Garden Green. The second card is my stand-out favourite, for its beautiful (and somewhat surprising) colour combination. The "criss cross" pattern created by overlaying the die cut in the opposite direction to the sponged panel, is really eye-catching.
ReplyDeleteOh, such fun Christmas cards Andrea. Love the candy canes, and the soft sea foam is so nice with Garden Green.
ReplyDeleteOh wow very Christmasy Andrea, They are both beautiful. I'm loving those candy canes. I might have to get that set.
ReplyDeleteOh wow Andrea two beautiful cards but I especially love the second one with its ombré background and the effect with the two white diecuts in opposite directions. Theresa
ReplyDeleteAndrea, both of these cards are fantastic. That background die looks amazing and I almost bought these dies just for that! The way you coloured it on the first card, plays with my eyes - it seriously looks like you have added the cut out pieces at the bottom half! I adore the way your created the background on your 2nd card though. That criss-cross pattern is the best!!!
ReplyDelete