Pacific Point with New and Continuing Products
Hello. Welcome to Valley Inspirations with Andrea and the first Art with Heart Colour Creations Blog Hop for 2023. Happy New Year! We are continuing to work though the Stampin' Up! colours in alphabetical order, focussing on one colour each week.
This week’s Blog Hop is focussing on a a bright blue called Pacific Point. Pacific Point is part of the Brights Colour Family and is a great colour - intense, clean and bright. This colour is lovely when used for sea, dramatic skies and where a bright blue is required.
Pacific Point is produced in Stampin' Up!'s card-stock, both A4 & 12"x12"; Classic Stampin' inks (ink pads & re-inkers); Stampin' Write Markers; Watercolor Pencils; Brights Designer Series Paper as well as Happy Forest Friends, Gingerbread & Peppermint and Beauty of the Earth DSPs; plus Old Olive & Sahara Sand Twill Ribbon Combo Pack, Glitter Washi Four Pack and Faux Sea Glass Shapes.
Pacific Point card-stock, ink, Stampin' Write Marker and Watercolor Pencil have been used in these projects plus a range of non-Pacific Point bits and pieces. Here are my cards:
I started playing with Pacific Point between Christmas and New Year, starting with some water-colouring and then some blending. As life was quiet, I ended up creating 3 different cards for this blog hop.
CARD 1:
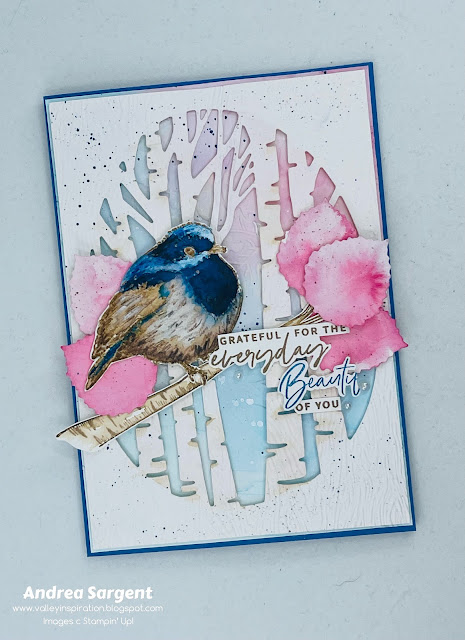
I started by creating the background on Shimmery White card-stock using Pacific Point & Polished Pink Classic Stampin' inks with the wide-brushed Water painter. I only wanted a light background so it didn't compete with the focal images. Once the background had dried it was splattered with both a Pacific Point Stampin' Write Marker and White Craft ink with the fine tipped Water Painter.
The die cut card front (Shimmery White card-stock) was cut using the large Aspen ... die. I so love this die. As you can see it cuts out tree trunks in an oval shape hole. The tree trunks were very lightly water-coloured with Crumb Cake ink. When dry, the panel was embossed using the Woodgrain 3D Embossing Folder and splattered with both Pacific Point and Crumb Cake Stampin' Write Markers.
The smaller leaf die from the Aspen Tree ... dies cut a number of leaves from Shimmery White card-stock. They were water-coloured with Polished Pink ink. The bird and branch from the Perched in a Tree stamp set were stamped in Crumb Cake ink, then Versamark ink and clear heat embossed using Clear Emboss Powder and a Heat Tool. My Stamperatus ensured the clear embossing was directly over the Crumb Cake ink. The bird and branch were water-coloured using Crumb Cake ink and touches of White Craft ink and the bird was also coloured with Pacific Point and Night of Navy inks. To add extra depth of colour I used Pacific Point, Early Expresso and Back Black Watercolor Pencils.
A couple of sentiments from the Something Fancy stamp set were stamped either in Crumb Cake or Pacific Point inks. Both sentiments were fussy cut and I combined part of a word from one sentiment into another sentiment. Don't forget that you can chop up sentiments and only use part of them or mix and match to get a sentiment that is perfect for the recipient. All the pieces were layered together onto a Pacific Point card-stock base and a few Iridescent Pearls add the finishing touch.
I hope my friend likes her Birthday card.
CARD 2:
Adding colour directly to coloured card-stock changes the colour as you can see with this card. Pacific Point was blended directly onto Smoky Slate card-stock using one of Stampin' Up!s gorgeous Blending Brushes. A piece of Stampin' Up!s Masking Paper was die cut with a Stitched Rectangle from the ... set of dies. If you look closely you with see the stitched outline around the coloured rectangle. It is an extra touch of gorgeousness that happens with no extra effort. It's wonderful. A touch of White Craft ink and Night of Navy Classic ink was also added to give extra monochromatic range.
A panel of Smoky Slate card-stock was embossed with the new Cane Weave 3D Embossing Folder and added to a Smoky Slate card base. The blended panel was trimmed down and splattered with water and then some White Craft ink. I love the effect of the different splatters. Some White Bakers Twine from the Basics Bakers Twine bundle was wrapped around the blended panel and tied in a bow.
The new Dainty Delight set of dies was used to cut some leaves and flowers from Basic White card-stock. They were arranged over the blended panel and adhered with either Multipurpose Liquid Glue or Mini Dimensionals. A panel of Basic White card-stock was adhered askew behind the front panel and then this card front was popped up onto the card base with Dimensionals.
A sentiment from the coordinating new Dainty Delight stamp set was white heat embossed onto Smoky Slate card-stock and the fussy cut out. A tad of blending was added to the edge of the sentiment before it was added to the card front with Dimensionals. The finishing touch was the addition of some Iridescent Pearls.
This card started out with the idea of a sympathy card but the addition of a white panel behind the front panel lightened up the feel and I thought I would use it as a New Year's card.
CARD 3:
I created 2 water-coloured panels when I first stared playing with Pacific Point. I had a number of ideas of how I would use the panel on this card, but in the end decided to use it behind the ... large floral die cut from the new ... Isn't it beautiful. It was cut from a piece of basic White card-stock and adhered directly onto the water-coloured
There is more Pacific Point creativity. To continue with the blog hop, click the "onto the next" graphic below and be taken to the blog of my lovely friend Rachel Palmieri. I always look forward to checking out Rachel’s creations. I do love seeing everyones' projects - there is always inspiration.
I hope to see you next week when we will be featuring Pale Papaya, one of the 2021-2023 In Colour family as we continue our weekly 2022-2023 Colour Creations Blog Hops.
Stay well, stay safe and be kind to yourself and others. May 2023 be a fantastic year for you and for those you love.
Andrea 💕🐾
If you find a broken link or have come to this blog hop from a different entry point, you can view the full list of participants on Catherine Proctor’s blog @ What Cathy Made. Cathy is our Art With Heart Team Colour Creations Coordinator. She is an wonderful lady. Check out her delightful creation while you are there.
If you live in Australia, don't already have a Stampin' Up! demonstrator and would like your own copy of Stampin' Up's 2022-2023 Annual Catalogue and or the new January - April 2023 Mini Catalogue then let me know and I will be delighted to send them to you. Please don't hesitate to make contact with any other queries about this project or Stampin' Up!.
#colourcreationsbloghop #stampinup #stampinupaustralia #stampinupsouthpacific #stampinupdemo #handmadecards #makeacardsendacard #stampinupdemonstrator #papercrafting #artwithheartteam #papercrafter #stamper #valleyinspirations #daintydelight #perchedinatree #somethingfancy #twotoneflora


Andrea, I love all of your gorgeous cards, but that bird, wow wee! It is so beautifully coloured and those polished pink leaves, truly outstanding. Love both of the backgrounds that are a highlight of both of the other cards too.
ReplyDeleteAndrea, your water coloured backgrounds are all superb, but oh my goodness that superb fairy wren really takes the cake! It is so beautiful! I'm so glad that bundle is carrying over and I can't wait to see the other cards you make with it.
ReplyDeleteYour cards are all so beautiful, Andrea! The bird looks amazing, but my favourite is the second, Smokey Slate card. The inking is fabulous, and the crisp white flowers over the top are perfection.
ReplyDeleteA beautiful set of cards Andrea. Your colouring of the bird is wonderful and the watercoloured background and leaves are lovely and soft. I love the layered panels on your second card and that Cane Weave EF is really lovely too. The die cut layer on your third card looks stunning on top of the ink wash layer. All stunning cards!
ReplyDeleteAdding my name….Rosa :-)
DeleteSuch lovely Pacific Point creations, Andrea! Beautiful details on each one, and I like how you've achieved varying tones of this blue. I'm sure Toni will love her birthday card; the bird is coloured beautifully, and the Polished Pink leaves are such a pretty compliment to the strong blue. What a great result you achieved, blending Pacific Point ink on Smoky Slate card! Lovely colouring, texture and details. Your last card just screams "pretty"! Such a gorgeous floral die-cut overlay to bring out the watercoloured details.
ReplyDelete