Theme #5: Fancy Fold
Hello. Welcome to Valley Inspirations with Andrea and the fifth blog hop celebrating Bronwyn Eastly. We're a group of stamping friends that are recognising Bron's 60th Birthday in 2022 with six blog hops, over six months, with six fun themes!
Knowing Bronwyn's brilliance in creating 3D fancy fold projects (as demonstrated above) I was somewhat intimidated with this theme. Having said that, I do enjoy creating fancy folds. As I knew I could not complete with Bron, I decided to create one of the fancy folds on my "To Do" List, that is a Free-standing Slimline Miura Card. Here it is:
I want to acknowledge Susan Wong, a New Zealand Stampin' Up! Demonstrator, a member of the Artisan team and part of the Crafty Carrot Collective. In a recent session Susan demonstrated a Miura Slimline card. While I used a completely different suite I so appreciated the numerous tips and tricks Susan shared. She and all the Crafty Carrot ladies are so amazing.
A friend of mine is enjoying an important "0" birthday and she is not one for flowers so i created this with her in mind. I hopes she likes it. I chose the Splendid Day Suite that includes gorgeous stamps, dies and amazing Speciality Designer Series Paper.
The Miura fancy fold is an Origami fold that required careful scoring of Basic white card base. The stamped outline leaves were coloured with a Blender Pen dabbed into either Soft Sea Foam or Pool Party Classic Stampin' ink pads. Some of the detailed dies from the Splendid Stems dies were used to cut out leaf shapes from either Basic White & Pool Party card-stocks or now retired Champagne Foil. The little bowl shapes were die cut from the same papers.
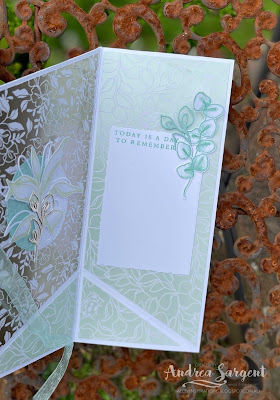
The photos above and below focus specifically on the 2 inner panels. The front panel uses what could be called a "B" side of the luscious Splendid Day SDSP, whereas the 2 inner panels used the foil designs, one with a Sahara Sand tinge, the other with a Soft Sea Foam tinge. Part of the difficulty is cutting the angles to match the folds.
The Miura fold does not usually have the extra panel showing underneath the diagonal fold (see the close up below) but I added this to enable the card to be more stable when standing.
The die cut panels were cut using the Deckled Edge dies. I so love the effect of the deckled edge. Pool Party Sheer ribbon was used to tie the card closed. A couple of Brushed Brass Butterflies were added to the front panel and a few Iridescent Rhinestone Jewels provided a subtle shimmer.
One of Stampin' Up!s Soft Succulent Slimline Envelopes is perfect for this card. I added a spare stamped and coloured leaf to the envelope.
Thank you so much for calling by.
Hop on over to the next blog by the very special Kathryn Mangelsdorf and check out her delightful creation. Just click on Kathryn's name or the Next graphic below to be taken to her Blog, Kathryn's Stampin' World.
If you come across a broken link or want to head back to Bron's blog for a list of everyone in this blog hop, just click on this link.
Apart from this Blog Hop there is also an Instagram Hop starting with Bron at @addinktivedesigns. Check it out too - there is more creativity to find.
#bronsbdaybloghops #stampinup #stampinupsouthpacific #stampinupdemo #handmadecards #makeacardsendacard #stampinupdemonstrator #papercrafting #splendidthoughts #thecraftycarrotco


OMG, what an amazing card! I've seen this fancy fold a few times now, and really like it, but the DSP you've used has really elevated the design. Stunning!
ReplyDeleteWell that's a little bit fancy, isn't it! I love your Miura fancy fold and your dreamy soft colour palette, Andrea. Just stunning!
ReplyDeleteOh, how clever to add that extra panel! May I ask how it’s attached? Vy
ReplyDeleteHi Vy, I cut the same cardstock as the card base to the size of the two end panels. It was scored down the centre. A corner was cut off, ensuring that the cut off section was a tad bigger than the section of the card that folds out. This enables the extra piece to be adhered to the back of the middle and end panels. Ensure you add DSP to the bottom of the extra panels before adhering to the back of the card. Hope this makes sense.
DeleteOh wow! This is so pretty Andrea. Such a fun fold that looks amazing with this DSP. x
ReplyDeleteA beautiful fold, gorgeous colours and use of elements. This is divine.
ReplyDeleteThis is absolutely divine Andrea! Product choices are just perfect for your fab fancy fold…Really beautiful card! Nikki Spencer.xx
ReplyDeleteBeautiful choice of papers and products, especially for a non-floral friend! I'd never thought of doing this fold as a slimline - it looks really great.
ReplyDeleteAbsolutely magical - totally love the softness and colours and papers and the magnificent fold!! Everything is sublime!!
ReplyDeleteWhat a lovely card! I'm sure your friend will love it.
ReplyDelete